
Summary
Creating an item in Engagifii Dues begins by selecting whether you want to create Membership Dues, a Service, or a Product. From there, you can configure the basic details, pricing, eligibility and visibility, enrollment behavior, extras, and advanced settings.
Membership Dues will be used as the main example in this guide because Services and Products follow nearly the same setup process. Products include an additional Inventory configuration, while some renewal and subscription settings do not apply to Products.
Part 1: Create Membership Dues
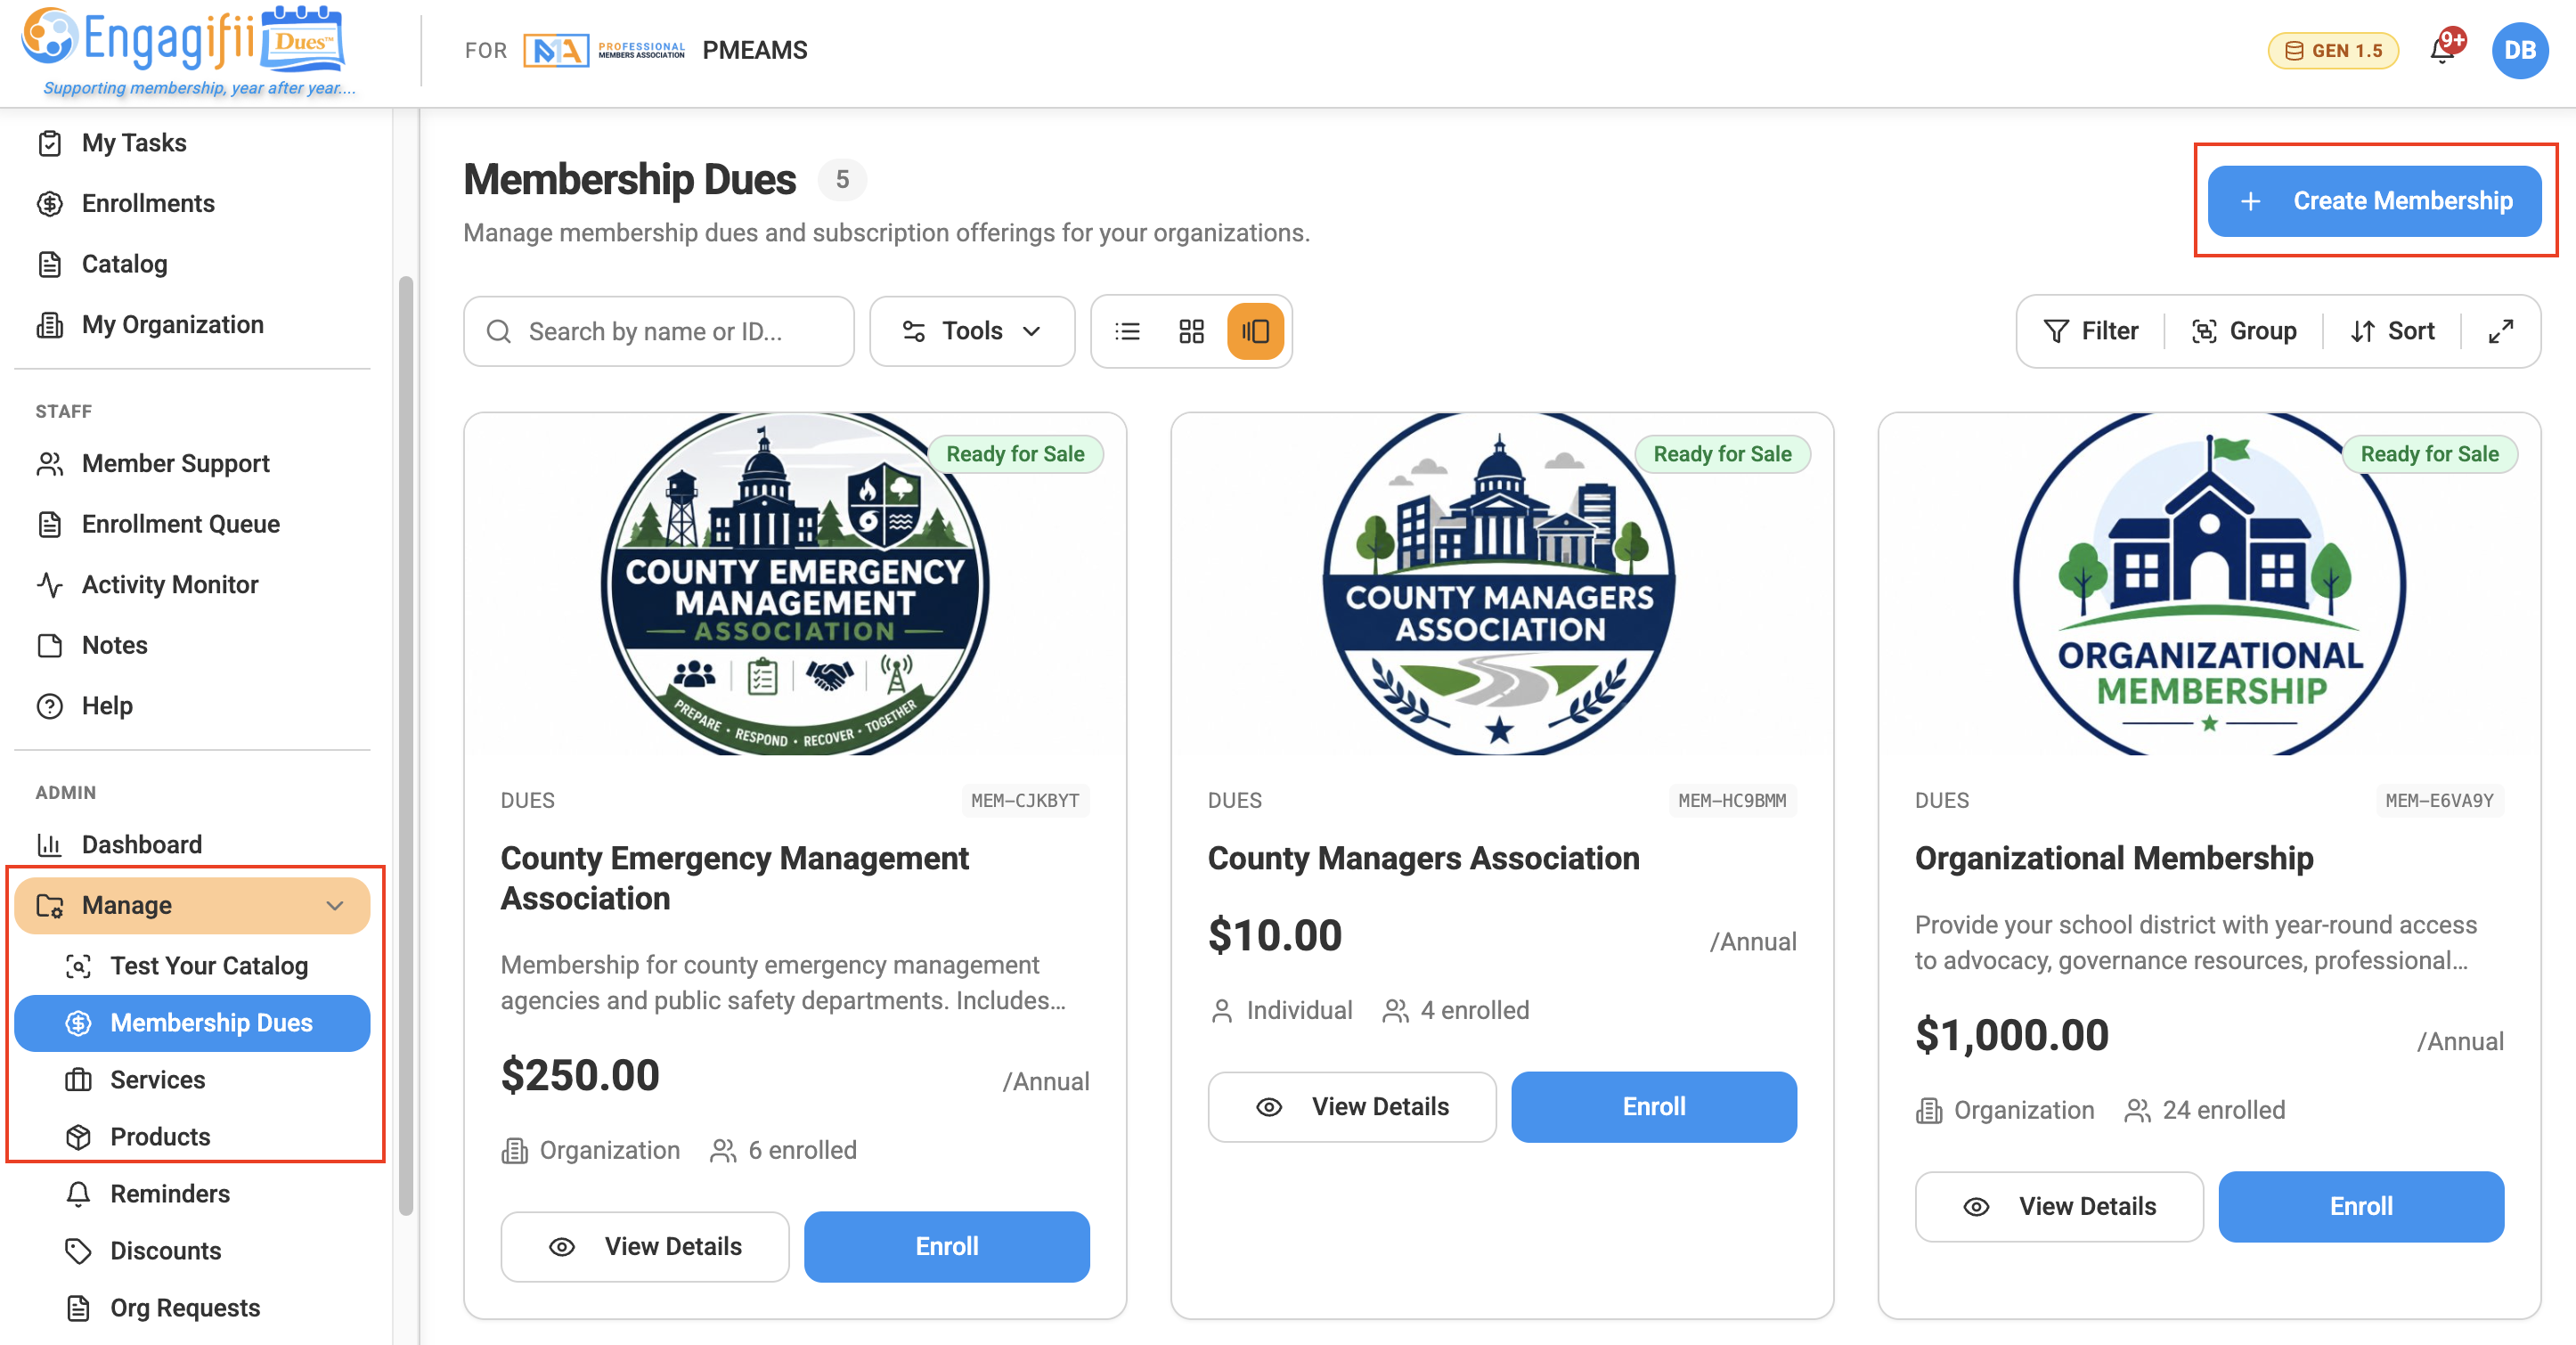
Open Membership Dues
Navigate to:
Manage → Membership Dues
The Membership Dues page displays the memberships already available in your workspace, including their price, buyer type, enrollment information, and current status.
Click Create Membership to begin creating a new Membership Dues item.
Step 2. Complete the Overview Tab
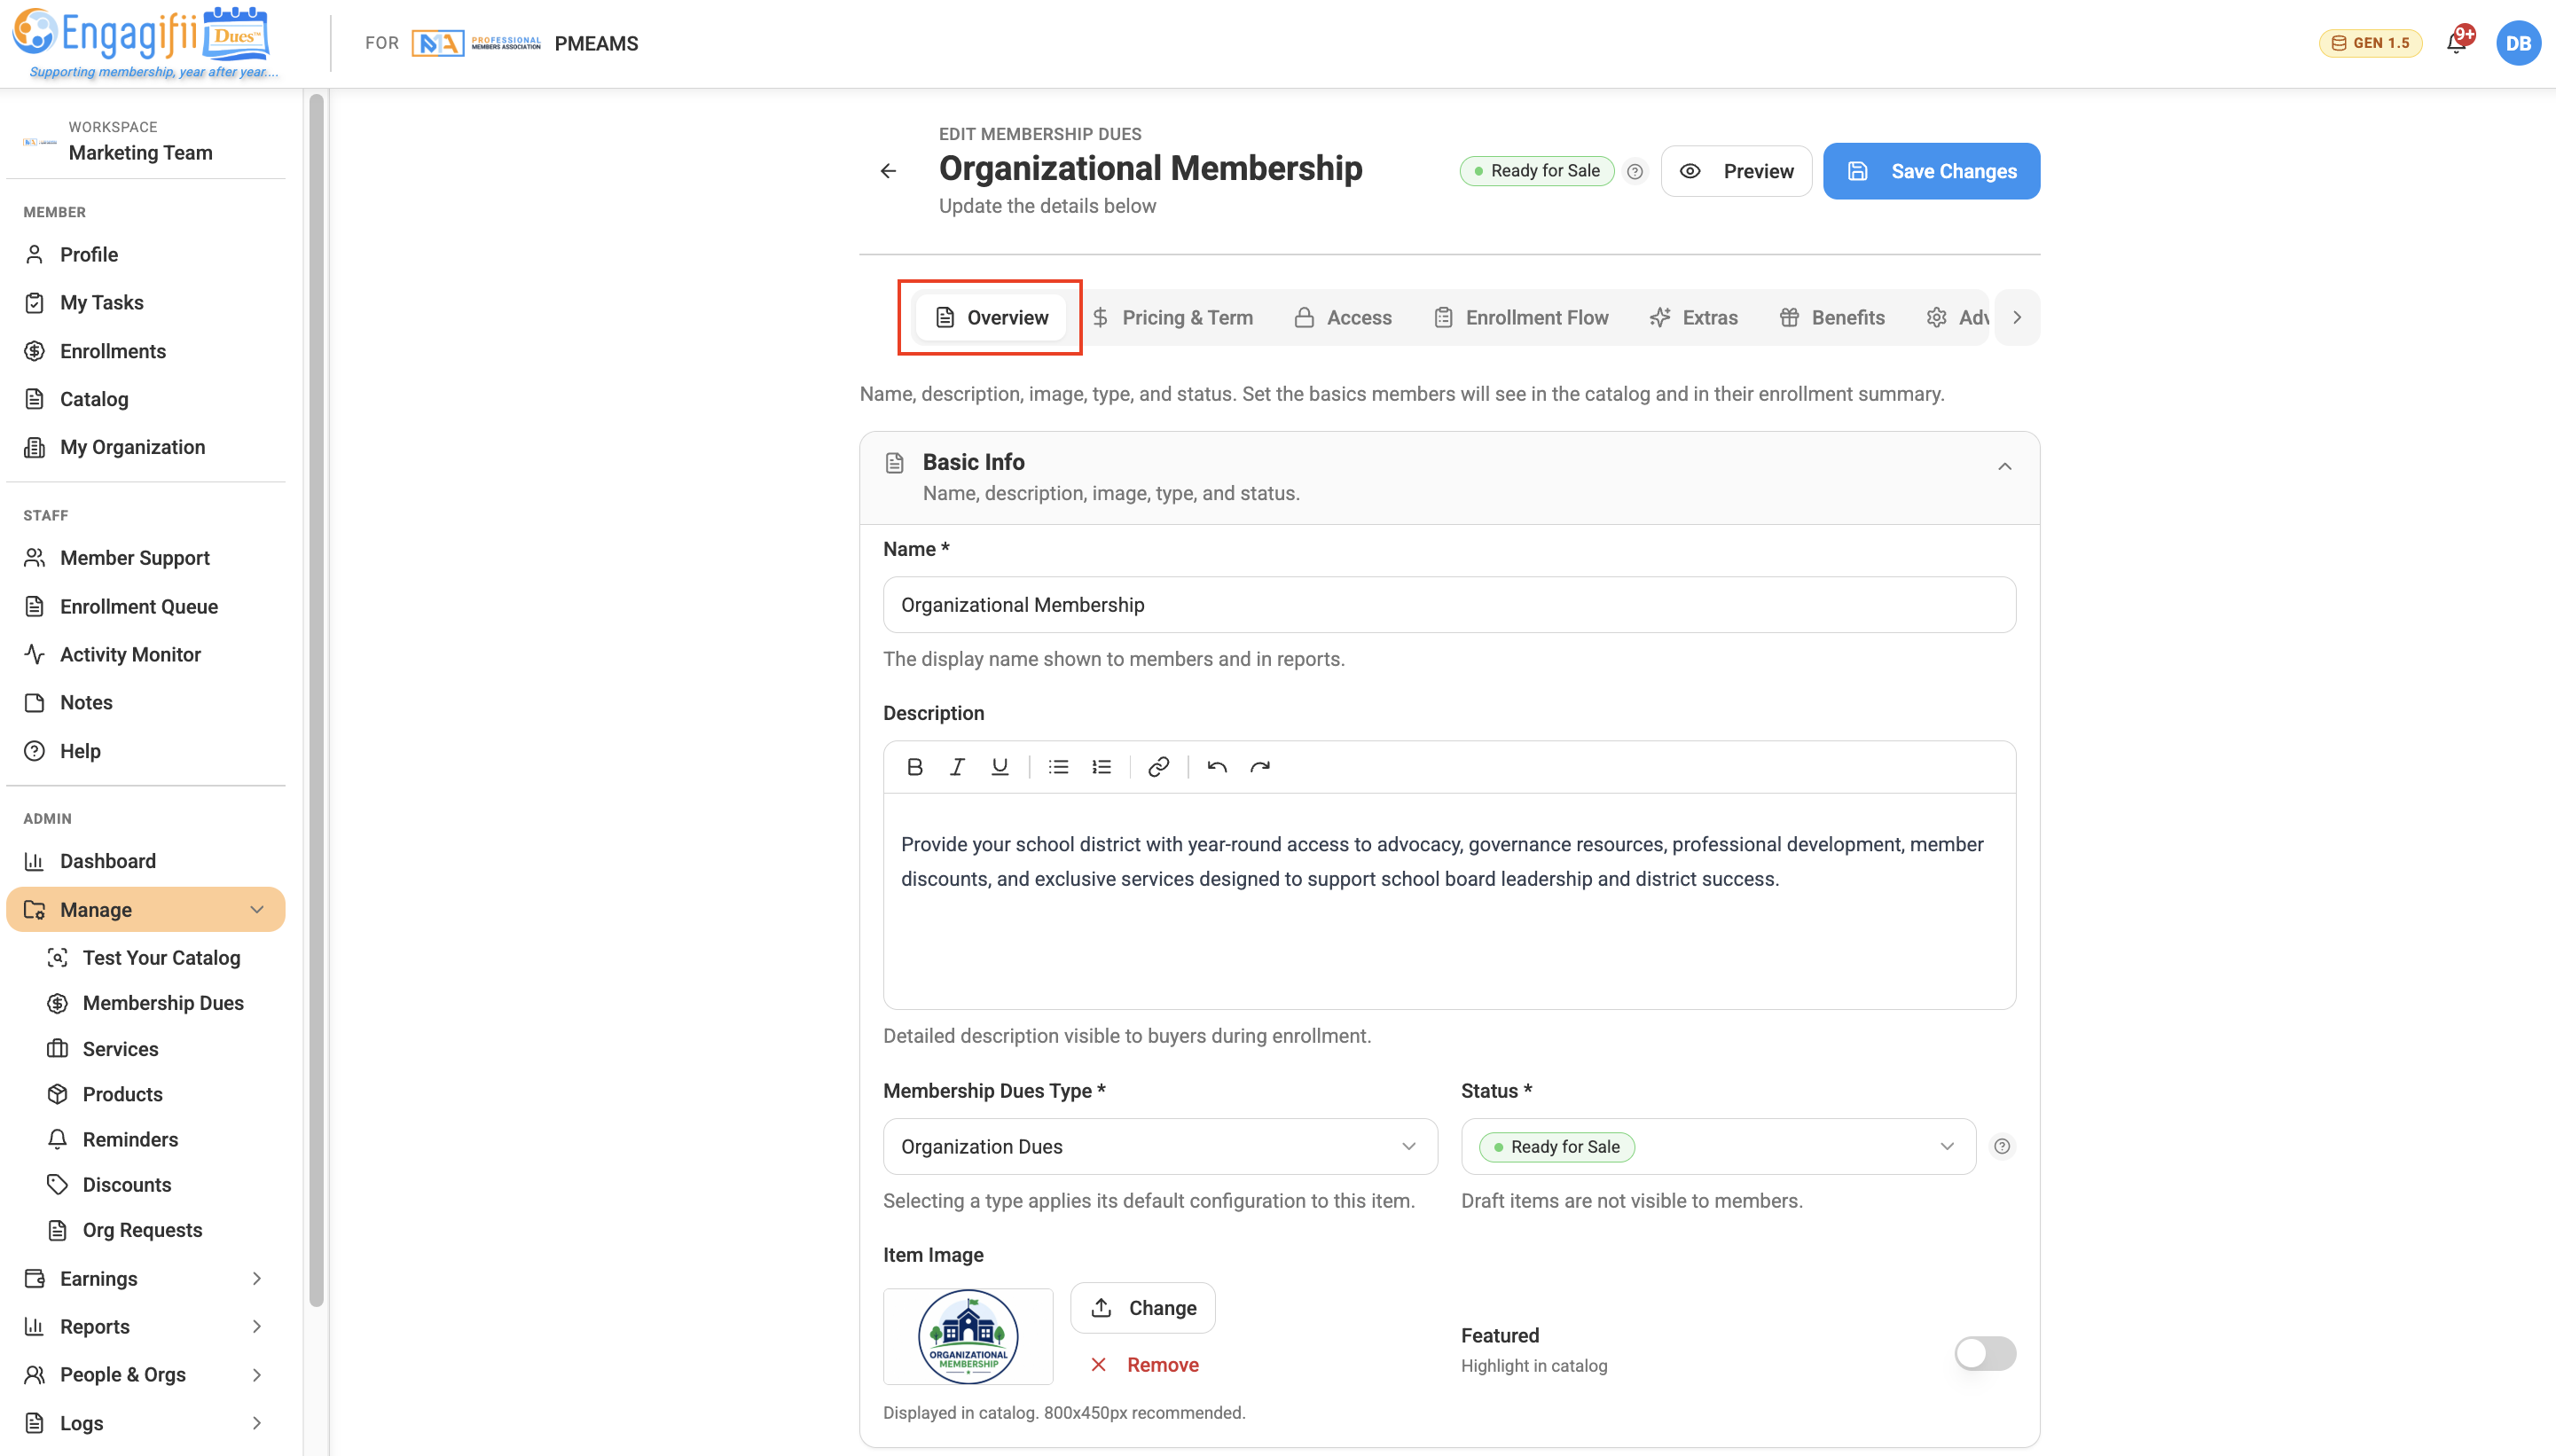
The Overview tab contains the basic information members will see when viewing the Membership Dues item.
Enter or configure:
- Name
- Display Name
- Description
- Membership Type
- Status
- Item Image
Membership Types may vary depending on how your organization has configured Engagifii.
You can also select the appropriate status for the item, such as Draft, Coming Soon, Ready for Sale, Paused, Suspended, Discontinued, or Archived.
Step 3. Configure Pricing & Term
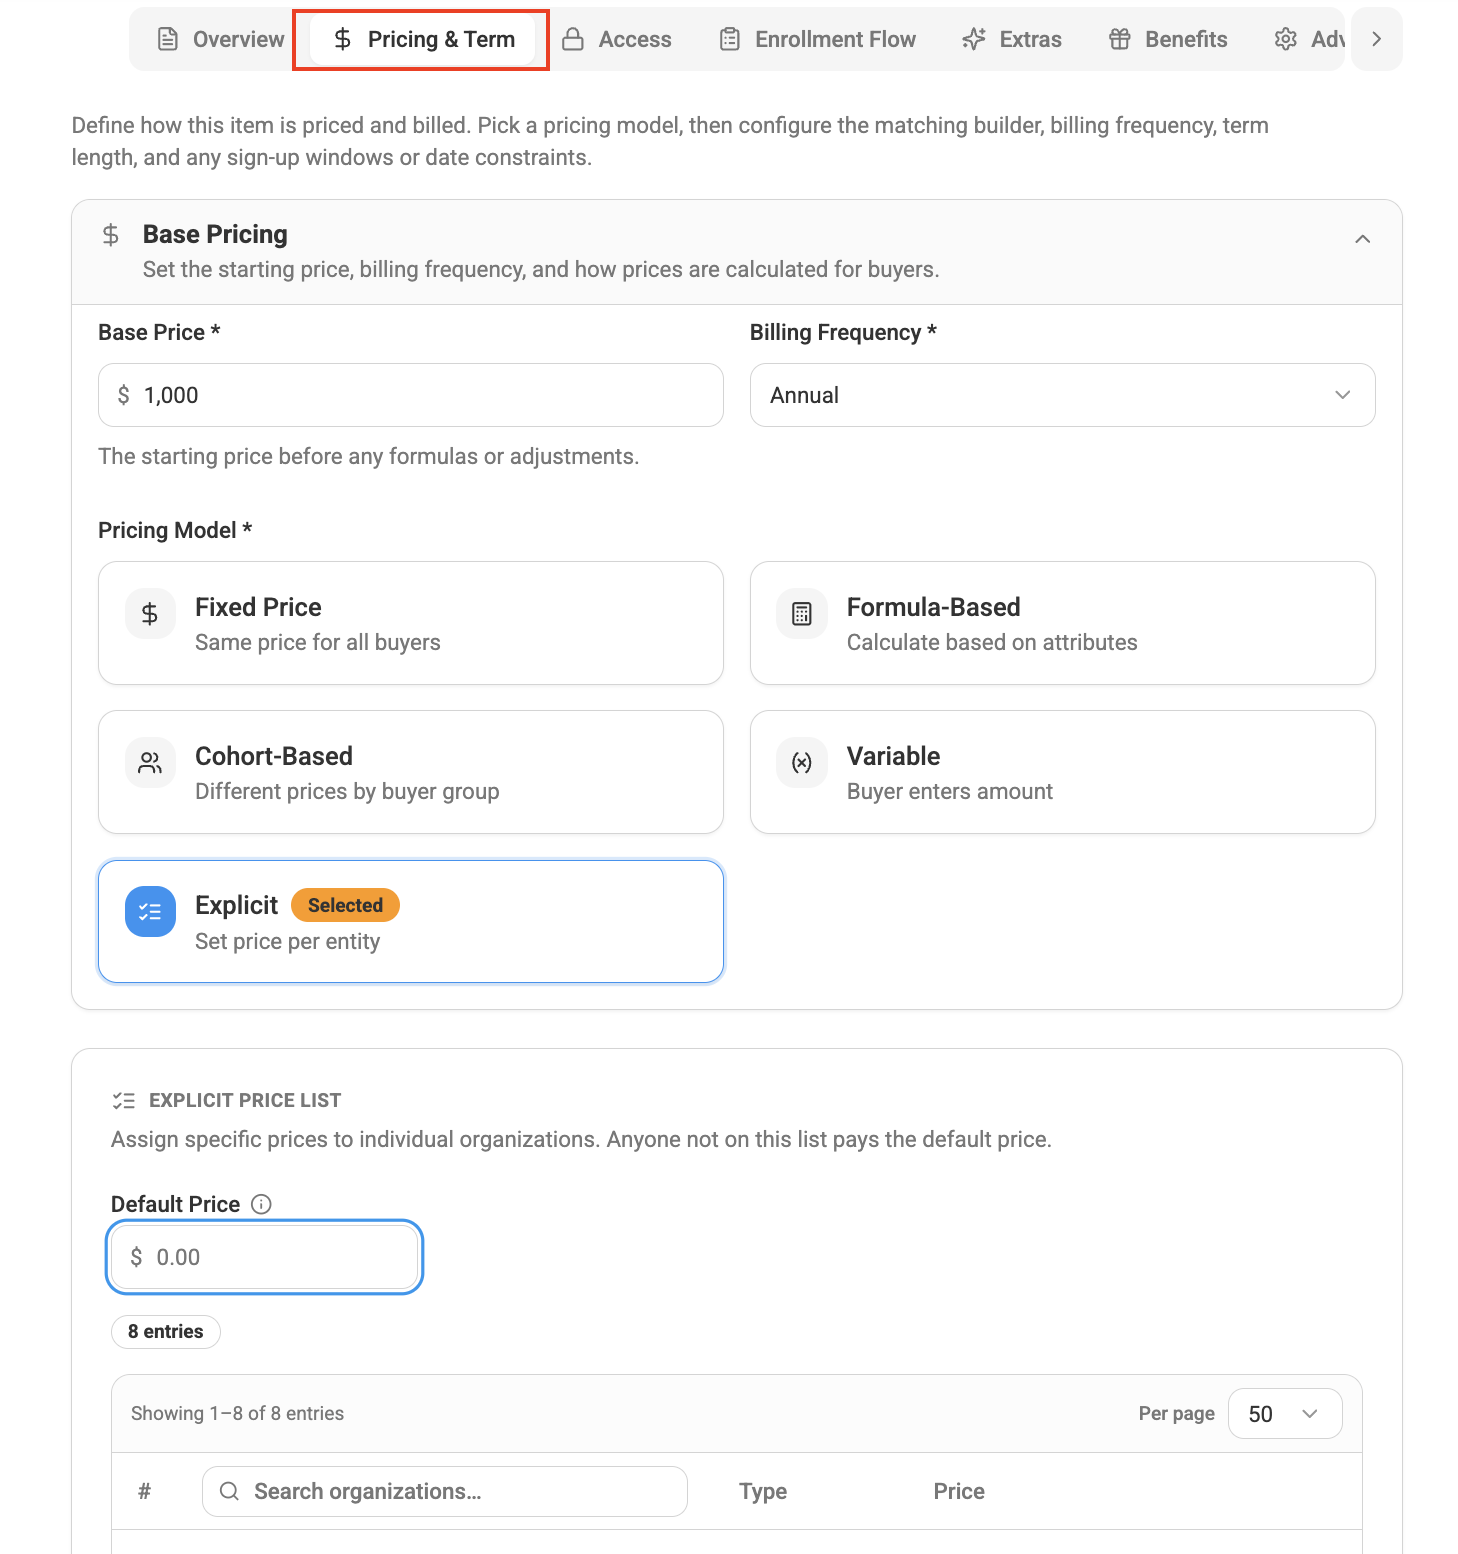
Open the Pricing & Term tab to define what the membership costs and how long it remains active.
Set the Base Pricing
Configure the base price and billing frequency.
Billing frequencies may include:
- Annual
- Semi-Annual
- Quarterly
- Monthly
- One Time
Select a Pricing Model
Choose the pricing method that best fits how your association calculates dues.
Available models include:
- Fixed – The same price for every buyer
- Formula-Based – Calculates pricing using defined attributes
- Cohort-Based – Different pricing for different buyer groups
- Variable – Allows the buyer to enter an amount
- Explicit – Assigns a specific price to individual entities
Configure the Term Structure
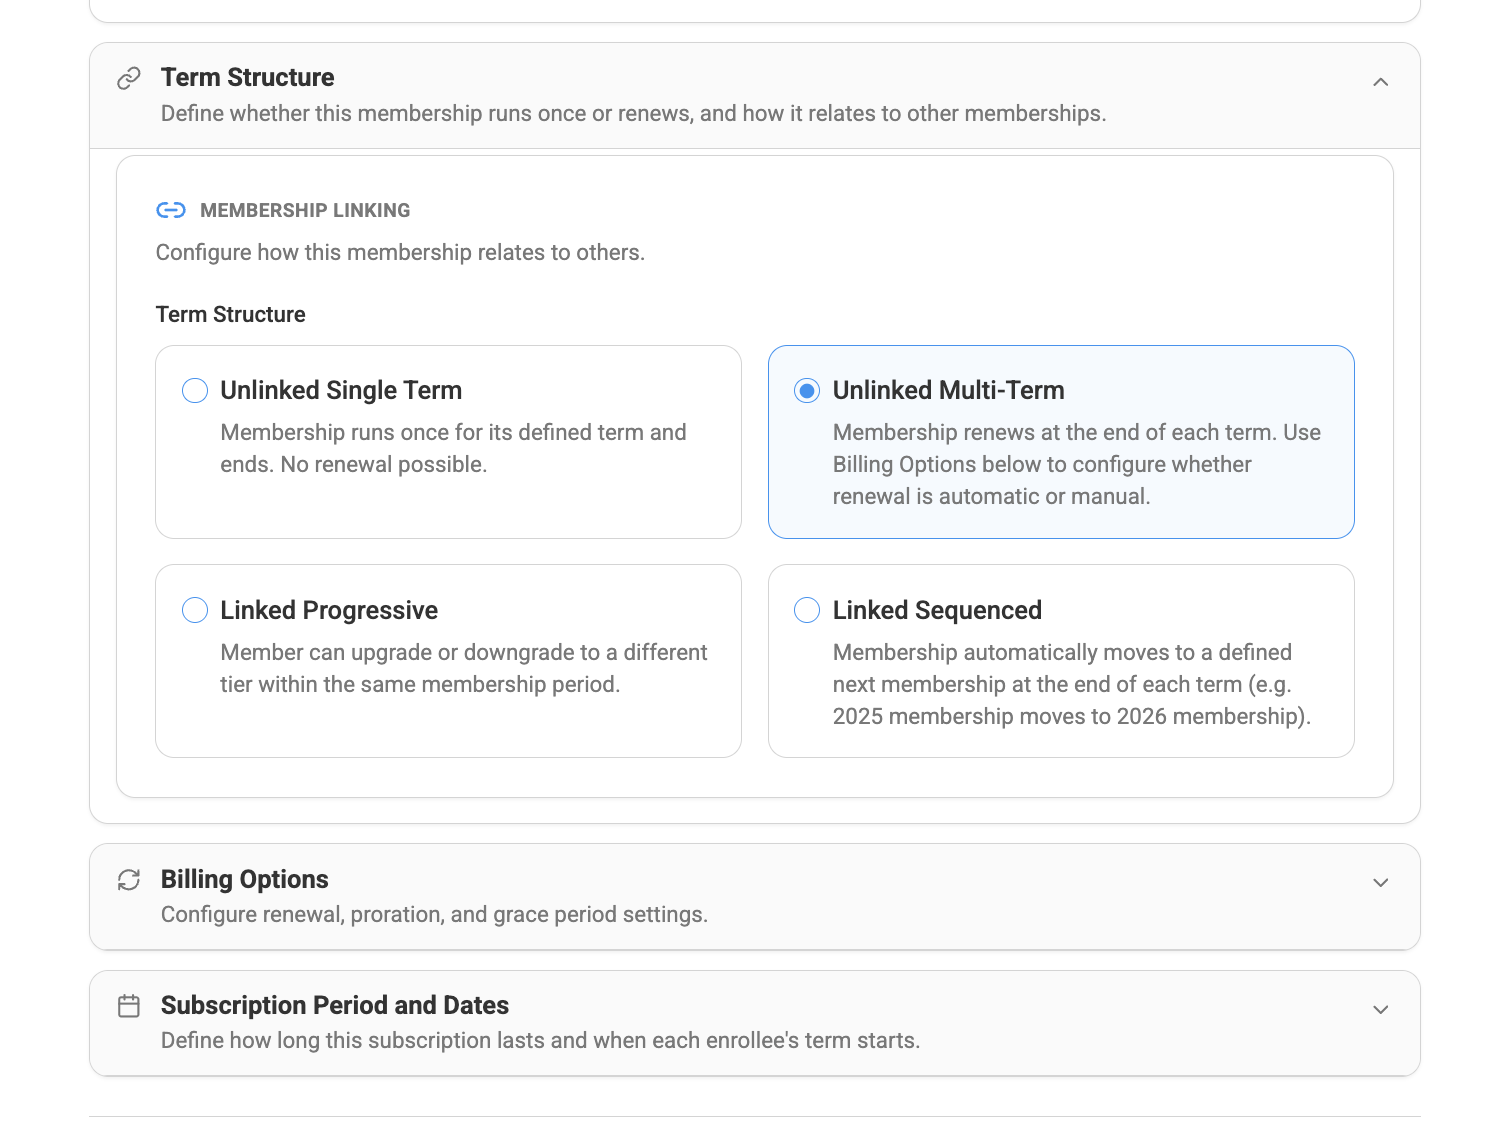
Select how the membership behaves over time:
- Unlinked Single Term
- Unlinked Multi-Term
- Linked Progressive
- Linked Sequence
For example, an Unlinked Multi-Term membership can renew at the end of each term without being connected to another membership level.
Configure Billing Options
Depending on the membership setup, you can also configure:
- Auto-Renew
- Grace Period
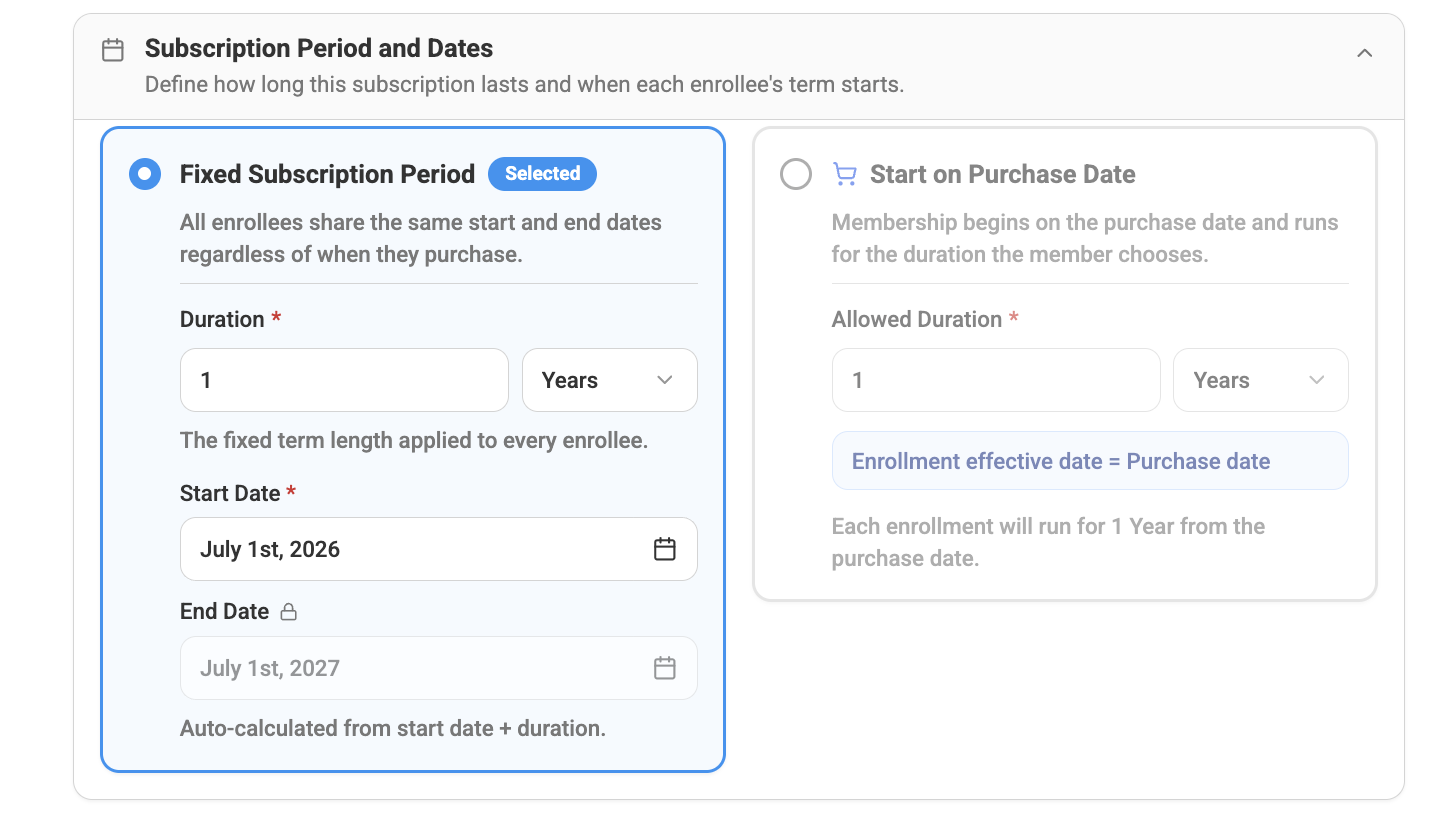
Select the Subscription Period
Choose how membership dates are determined:
Fixed Subscription Period
All enrollees share the same start and end dates, regardless of when they enroll.
Start on Purchase Date
The membership begins when the member enrolls and continues for the configured duration.
Part 2: Configure Access
The Access tab determines who can purchase the item, who can see it, and how payment can be completed.
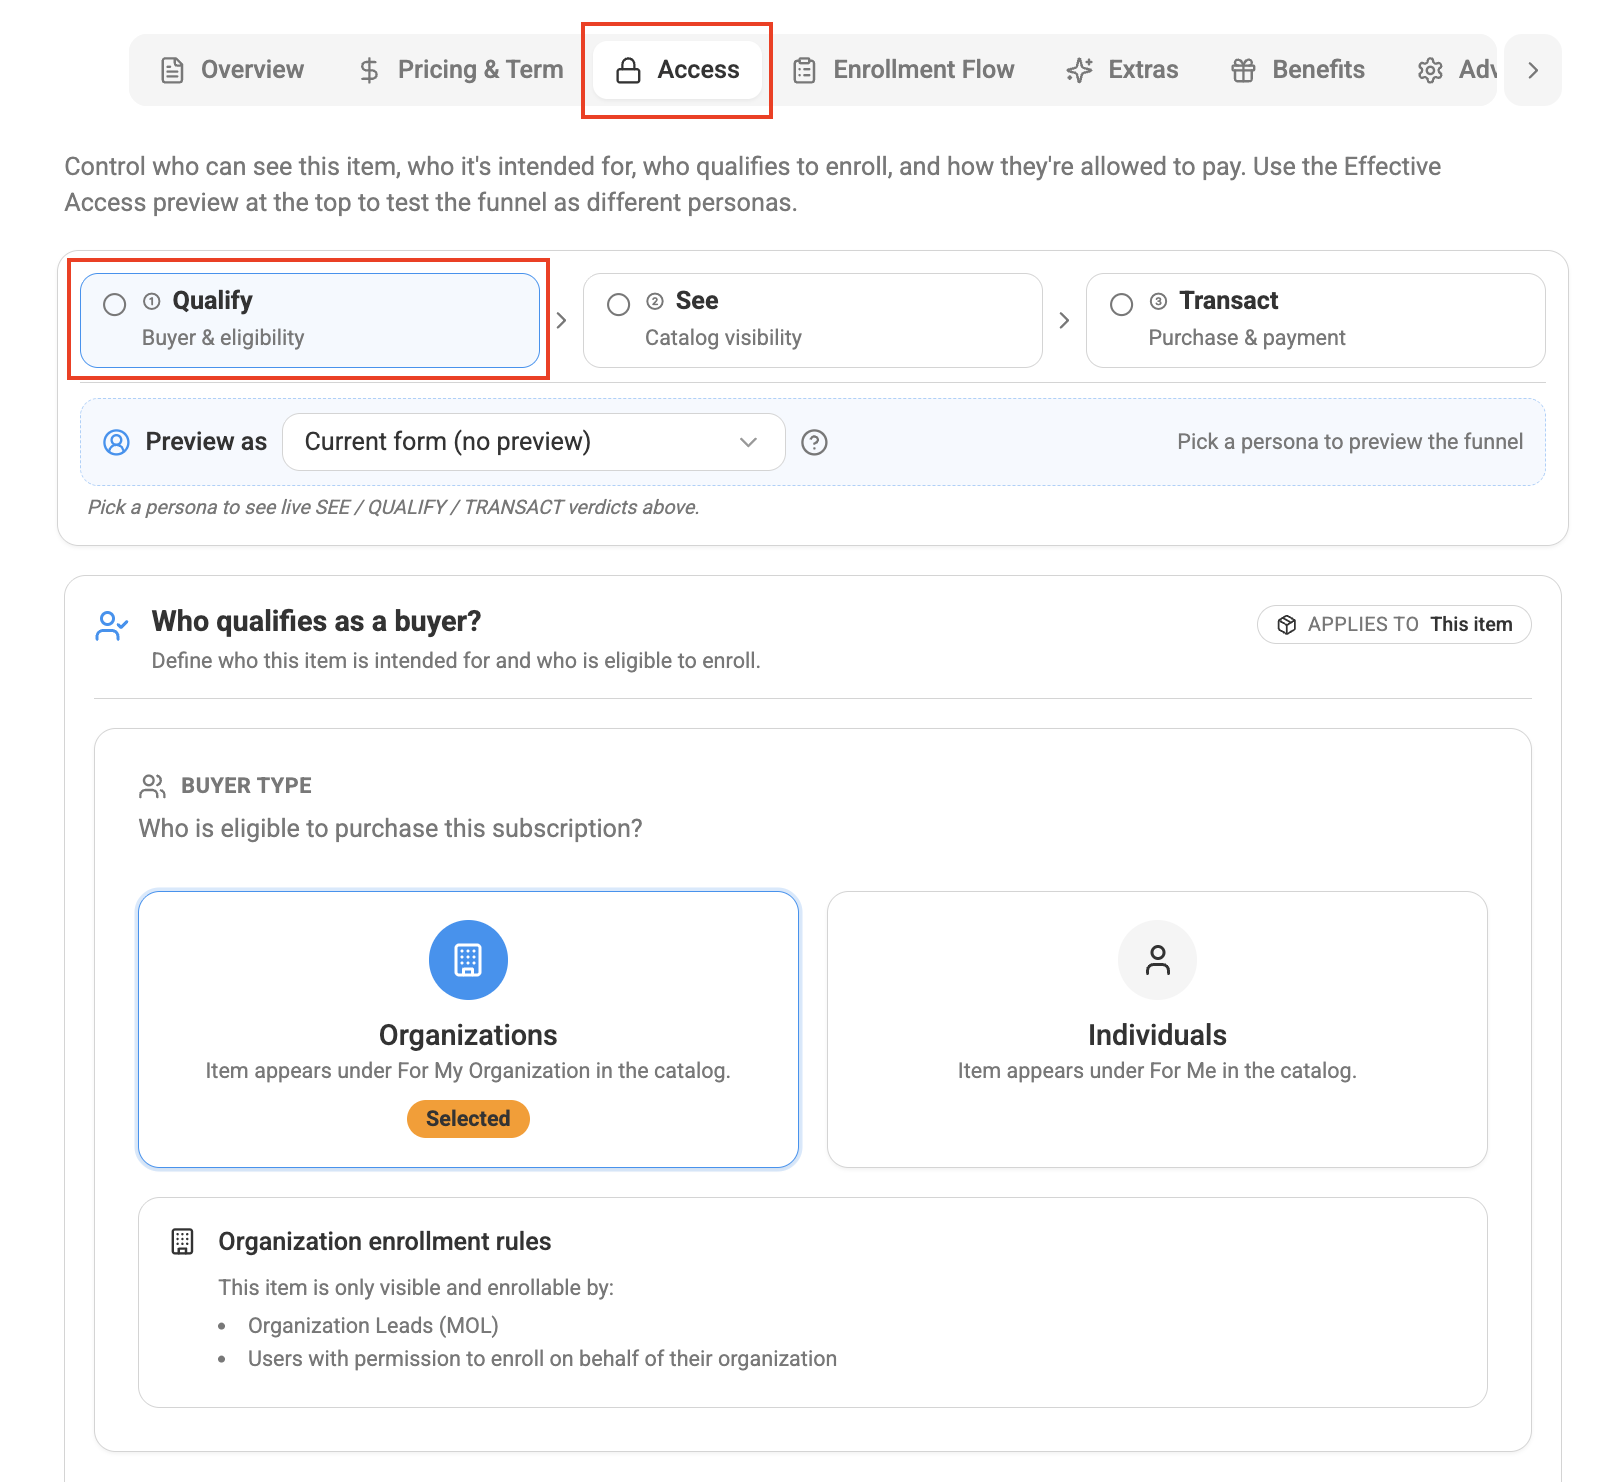
It is divided into three sections: Qualify, See, and Transact.
Qualify: Define Who Can Enroll
Start by selecting the Buyer Type:
- Individual
- Organization
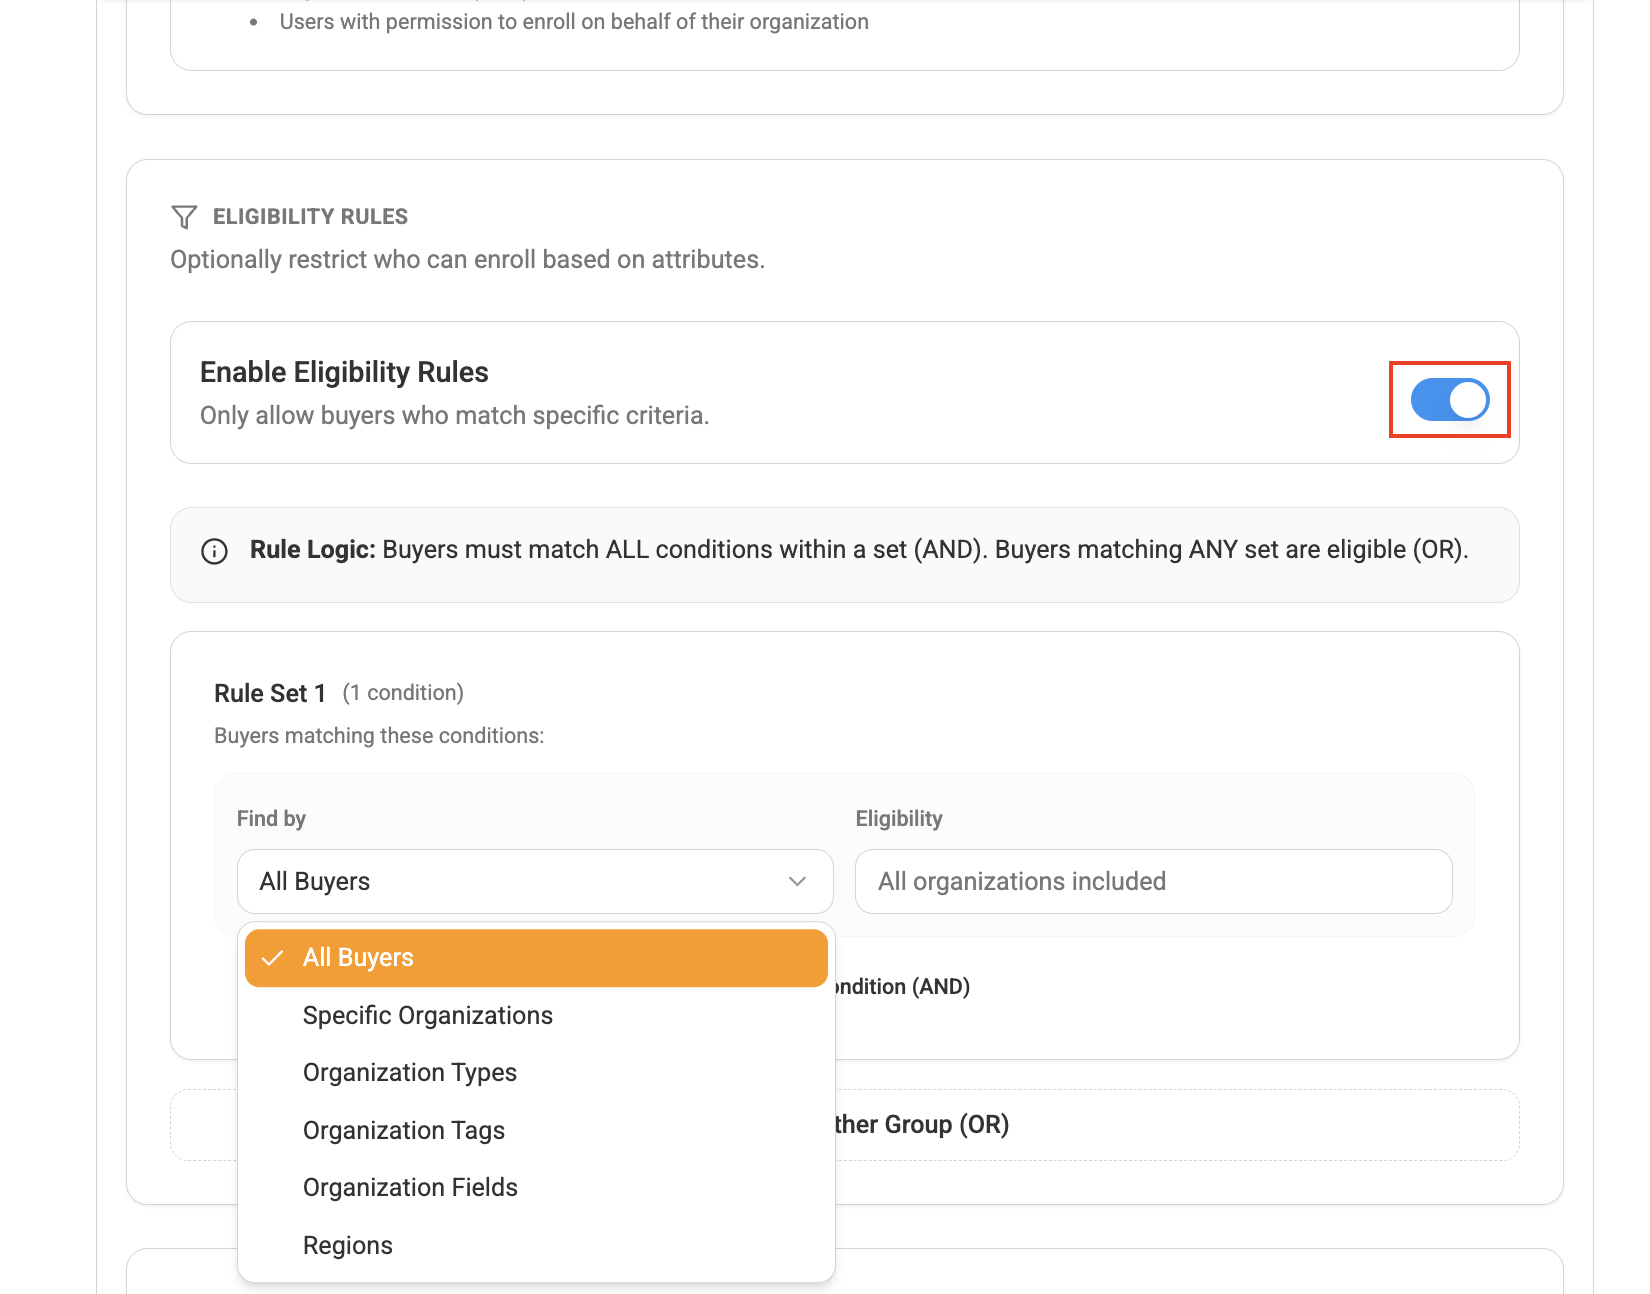
Then configure eligibility rules to determine who can enroll.
Eligibility criteria may include:
- All Buyers
- Specific Organizations
- Organization Types
- Organization Tags
- Fields
- Regions, and more:
You can also set a Maximum Enrollment limit. Leave the field blank if enrollment should remain unlimited.
See: Control Catalog Visibility
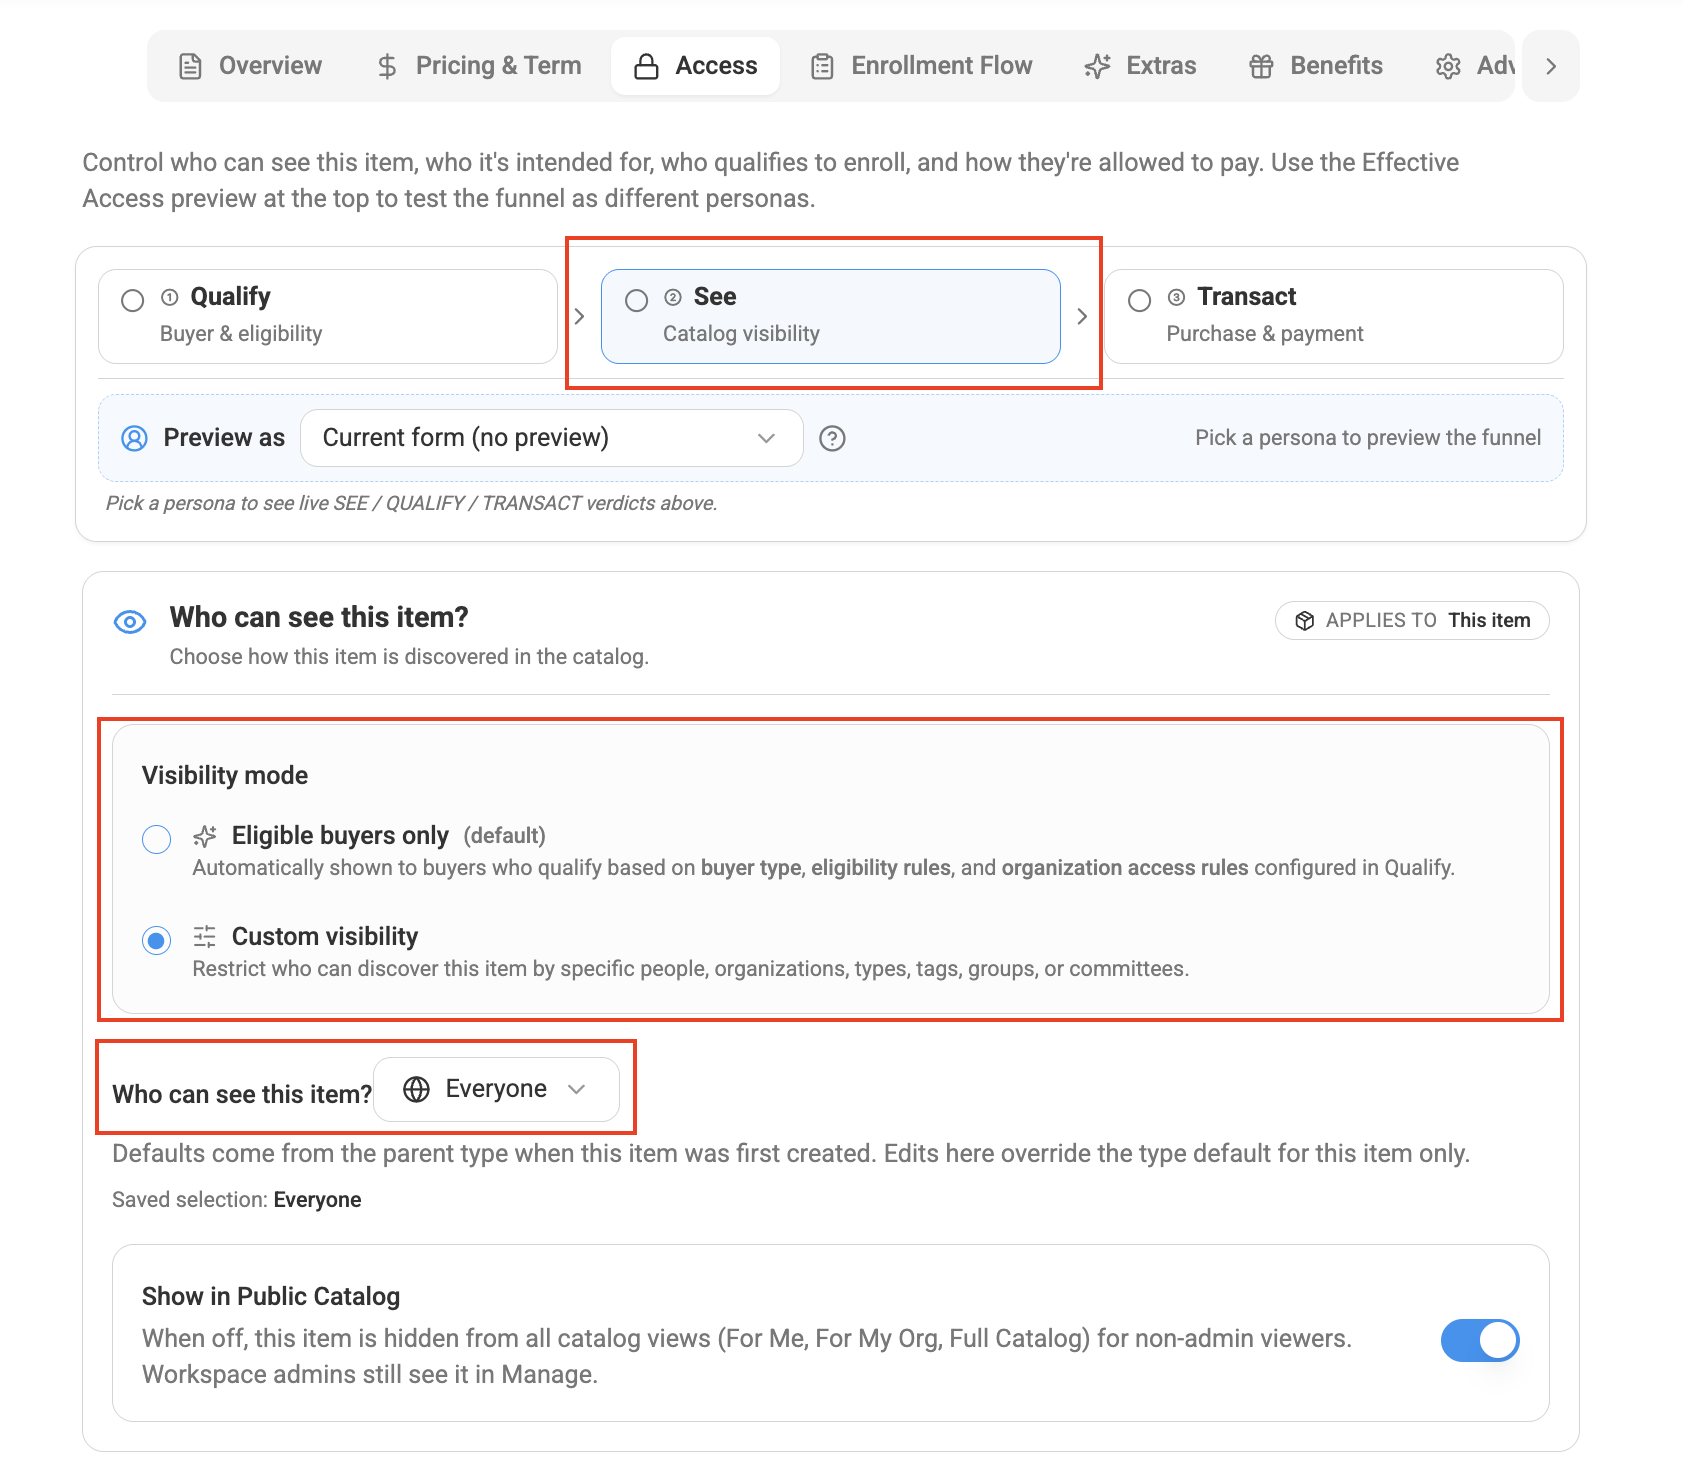
The See section determines who can discover the item in the Catalog.
You can choose:
Eligible Buyers Only
Only people or organizations that meet the eligibility requirements can see the item.
Custom Visibility
Control visibility using criteria such as:
- Specific People
- Person Types
- Organizations
- Organization Types
- Committees
- Groups
This allows you to control what appears to different audiences within the Catalog.
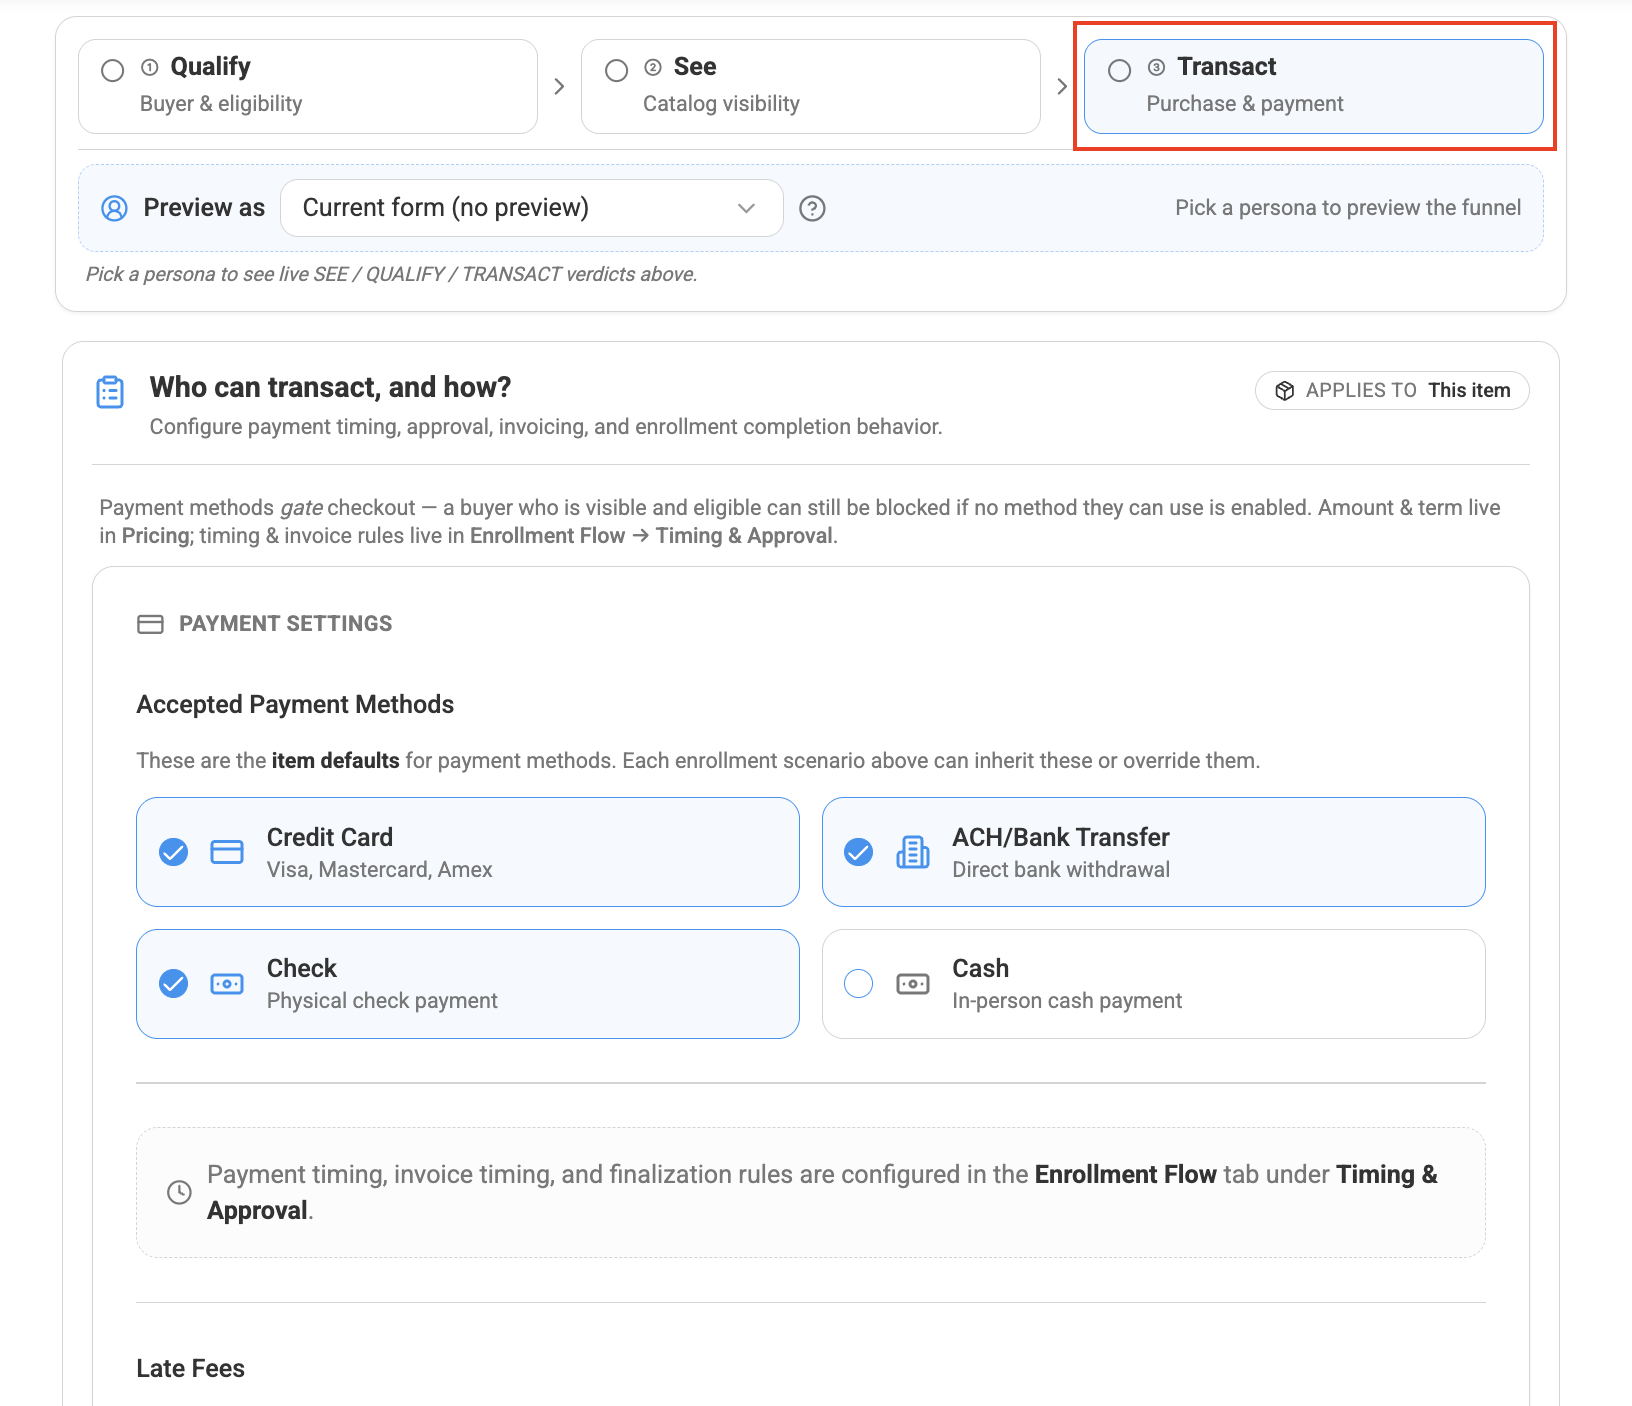
Transact: Configure Payment Options
Use the Transact section to determine how eligible buyers can complete the purchase.
Configure the accepted payment methods available for the item, such as:
- Credit Card
- ACH / Bank Transfer
- Check
- Cash
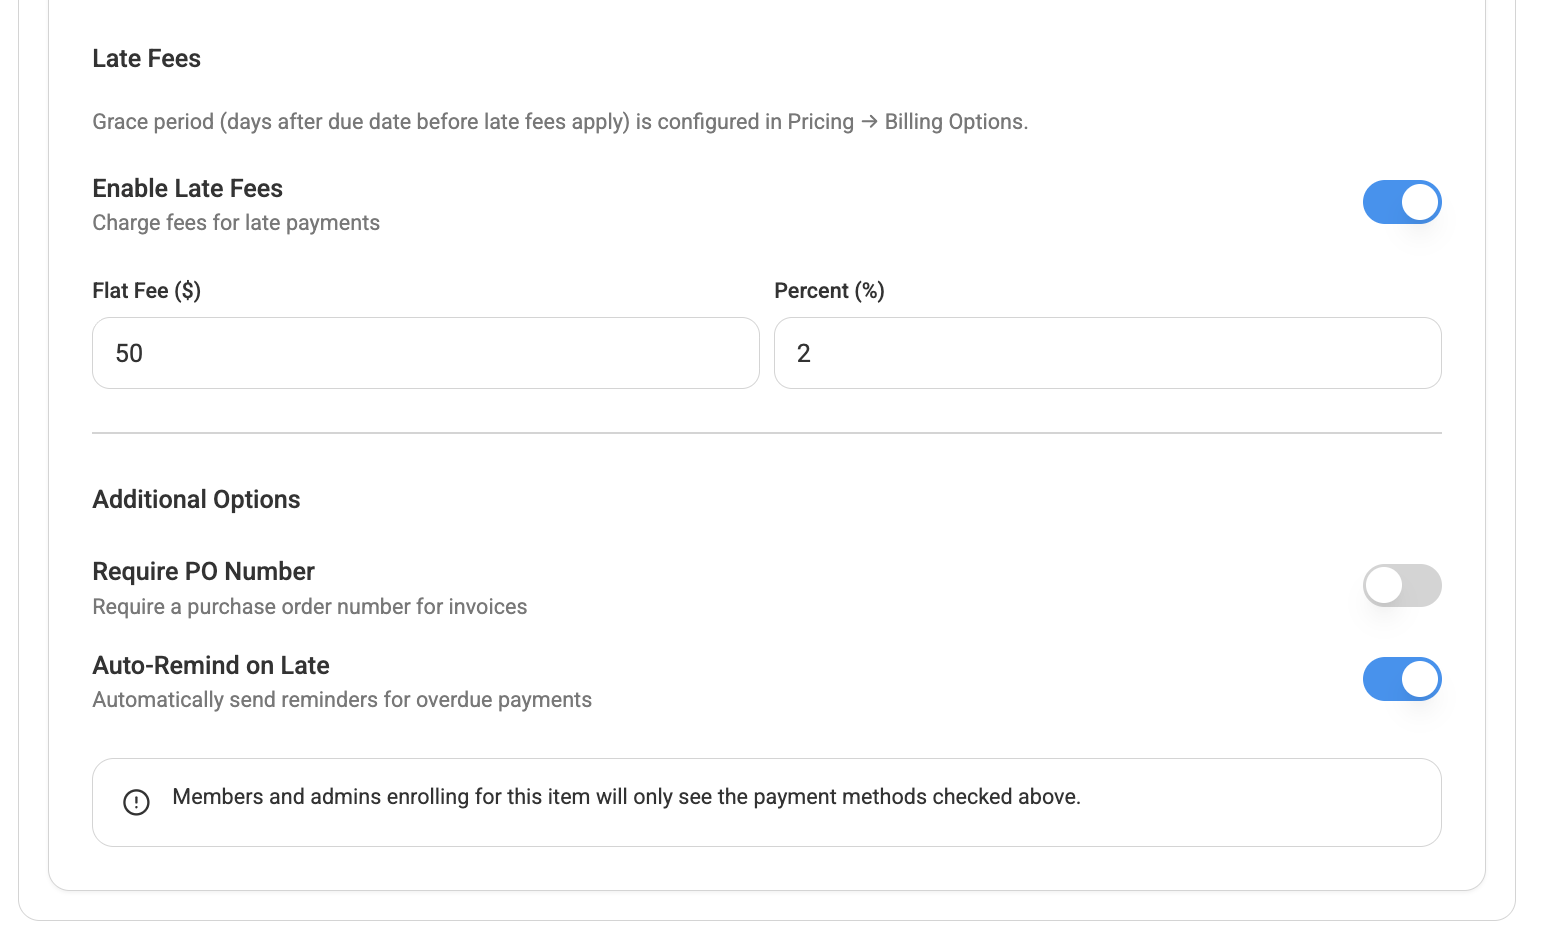
You can also configure a Late Fee, including a flat amount or percentage when applicable. And you can have Additional Options like "Require PO Number" and "Auto-Remind on Late".
Part 3: Configure the Enrollment Flow
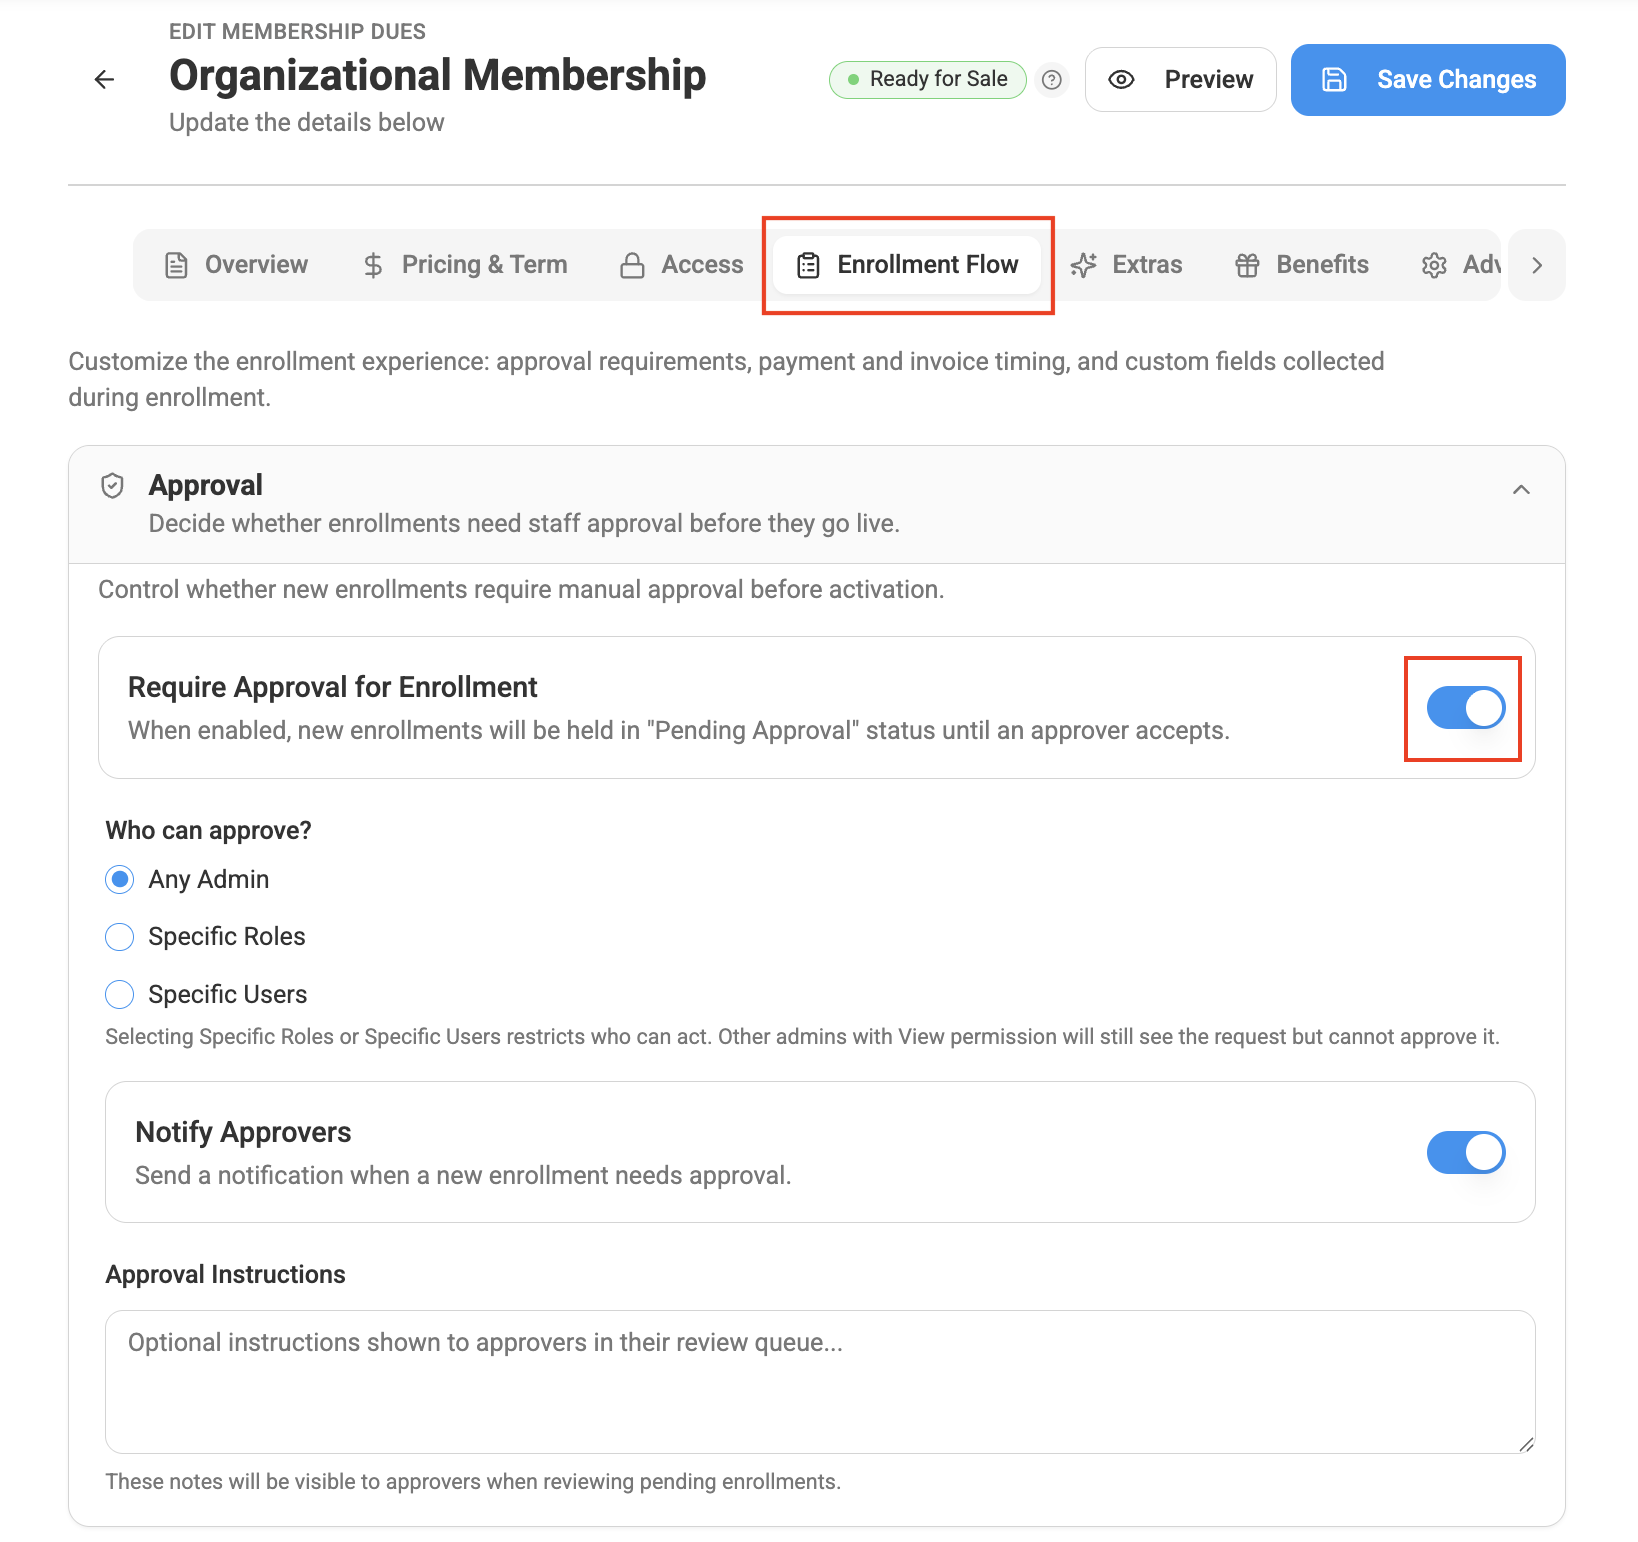
Open the Enrollment Flow tab to determine what happens when someone enrolls.
Approval
Turn on Require Approval for Enrollment if an administrator or authorized team member needs to review an enrollment before it becomes active.
When approval is required, enrollment requests can be accepted or rejected before activation.
Enrollment Timing
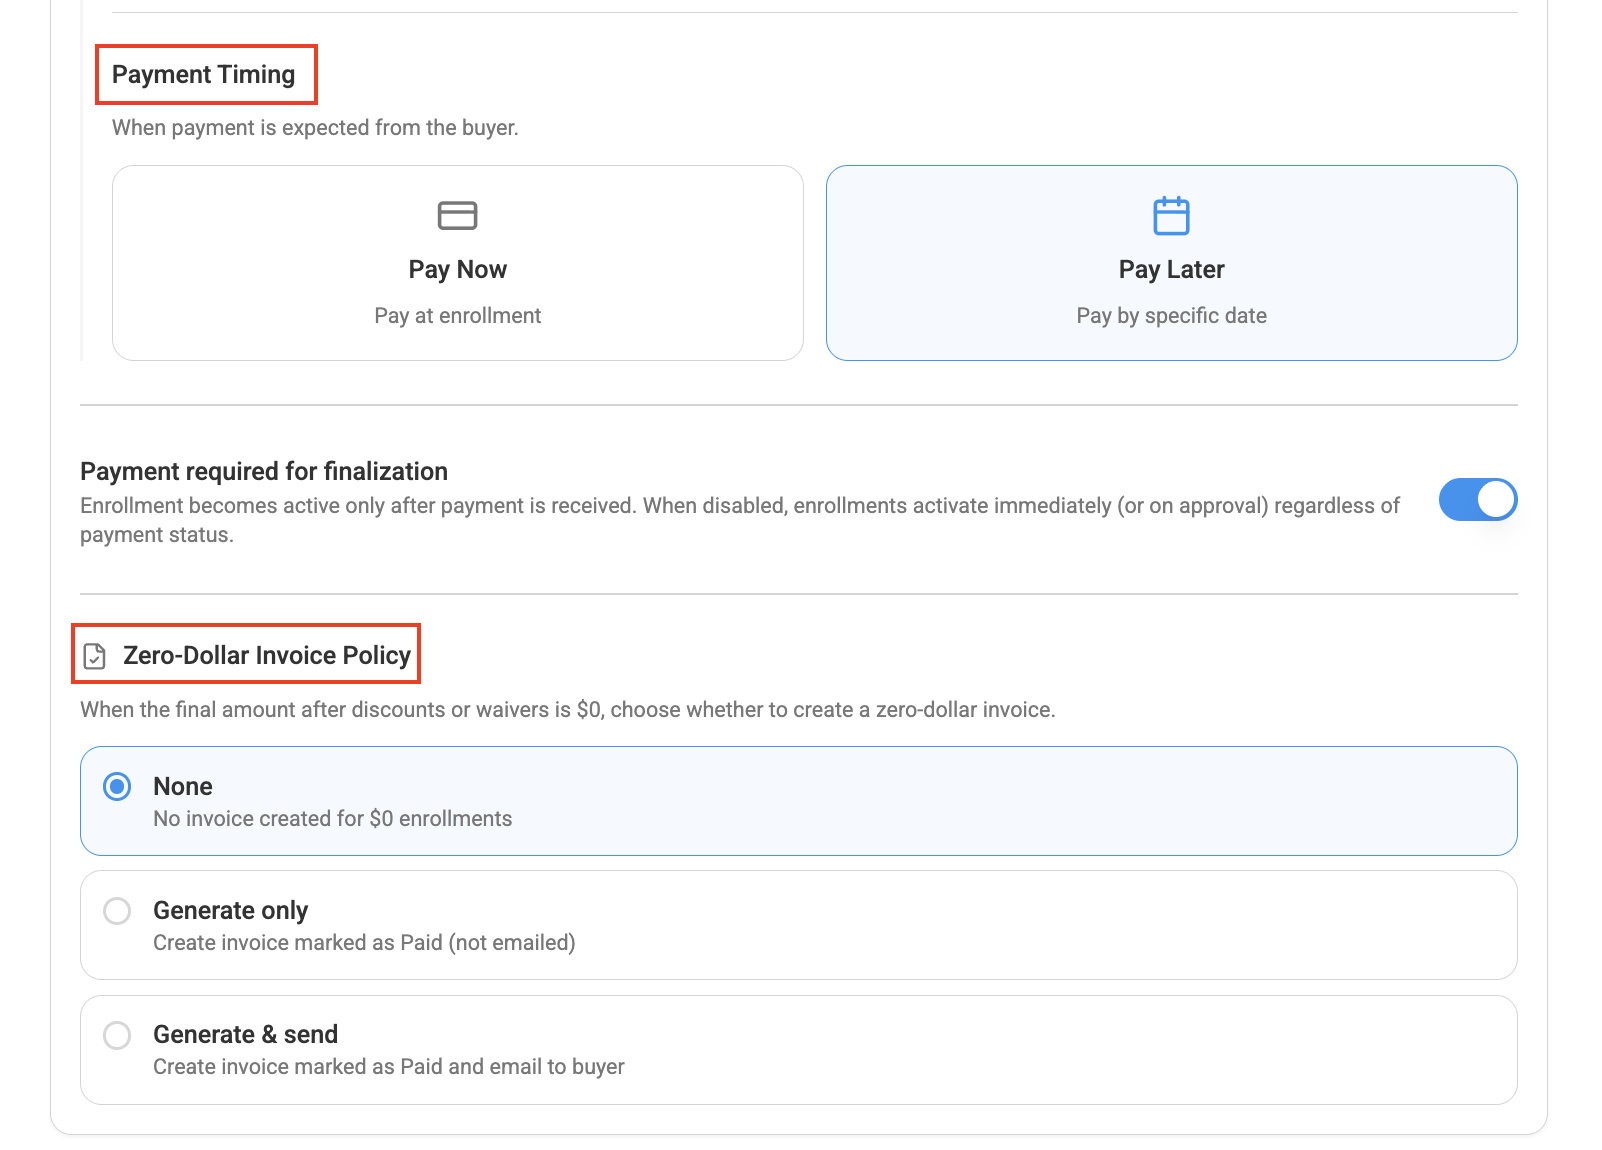
Configure how invoicing and payment should work during enrollment.
Options may include:
- Send Invoice on Enrollment
- Pay Now – Payment is expected during enrollment
- Pay Later – Payment is due at a later date
You can also configure how $0 enrollments should be handled:
- No Invoice
- Generate Invoice Only
- Generate and Send Invoice
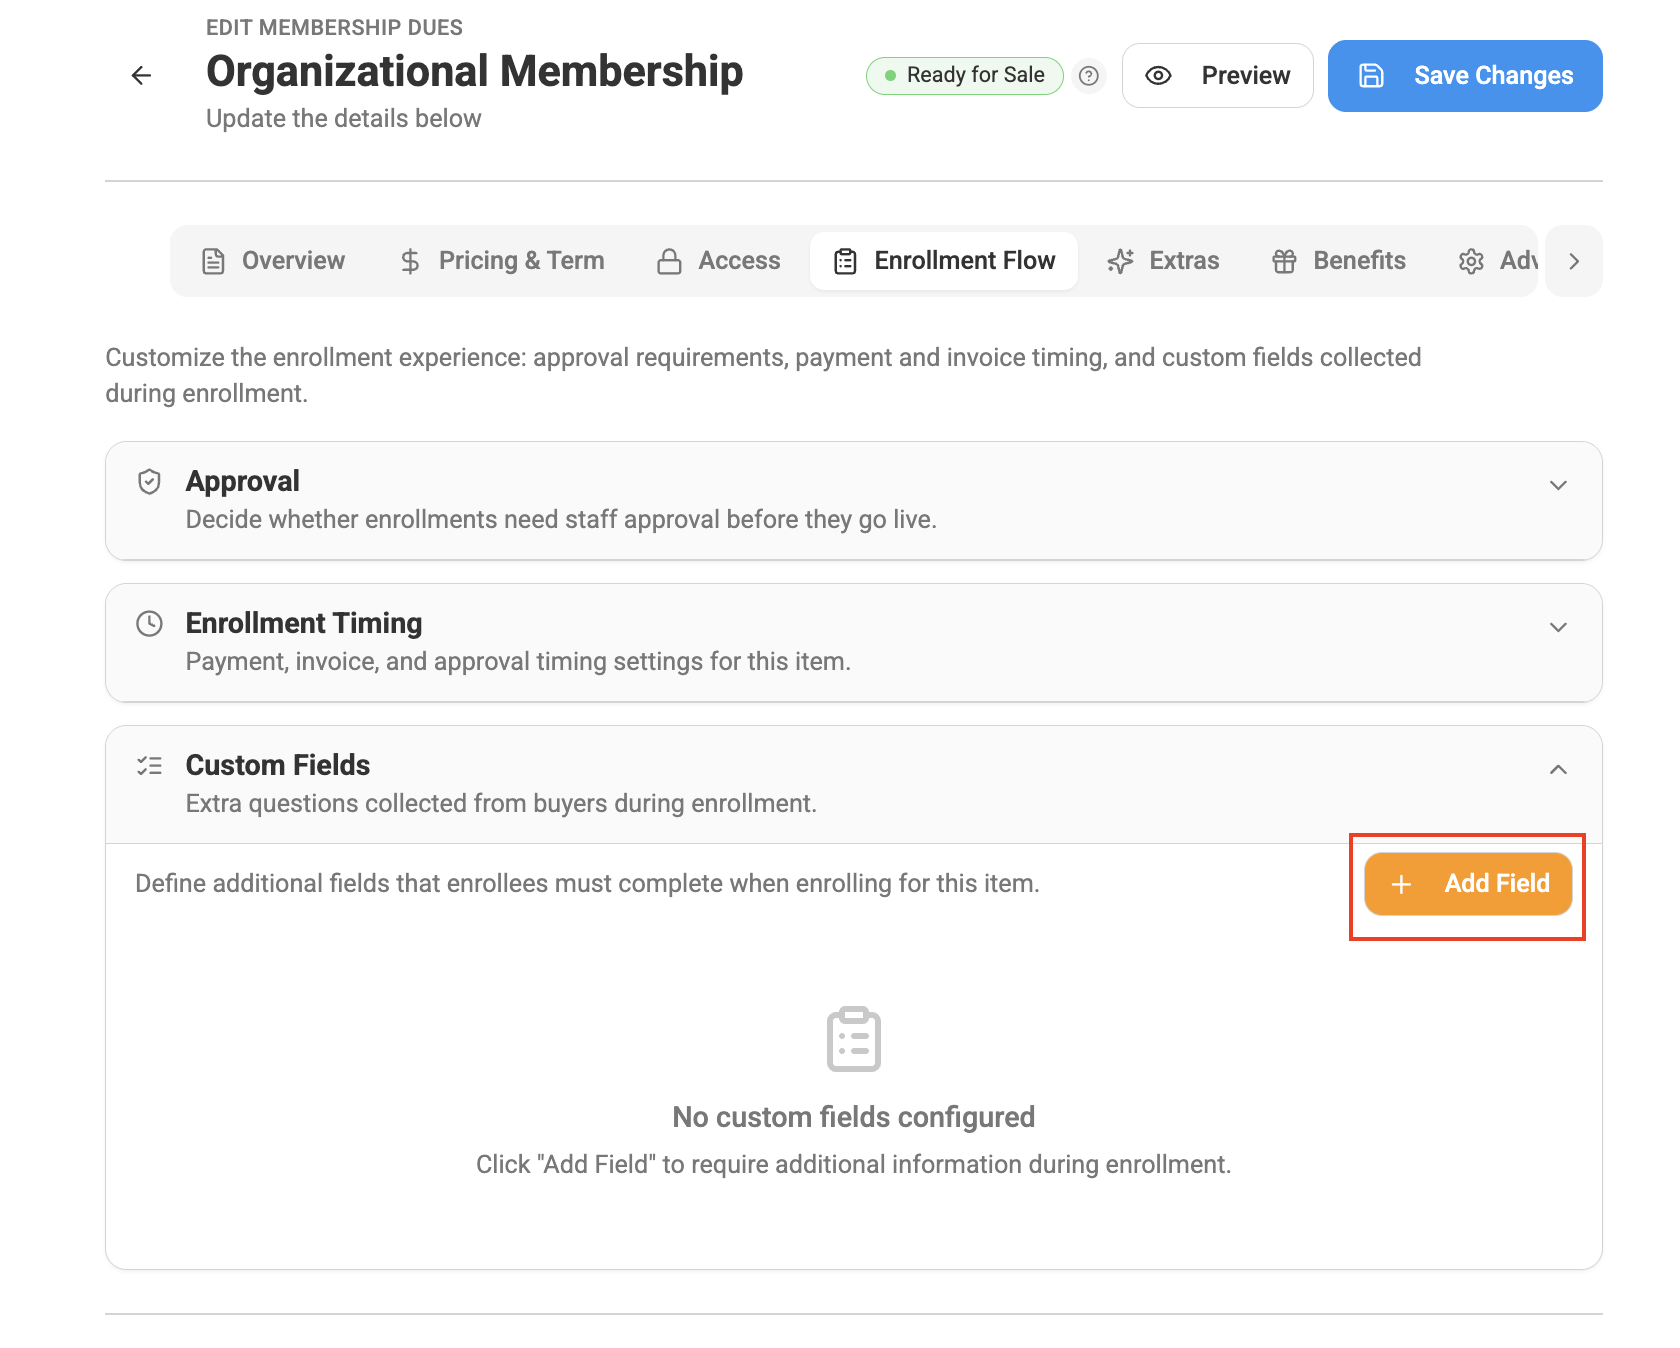
Custom Fields
Use Custom Fields to collect additional information during enrollment.
Click Add Field to include questions or information that buyers must complete when enrolling.
Part 4: Add Optional Extras
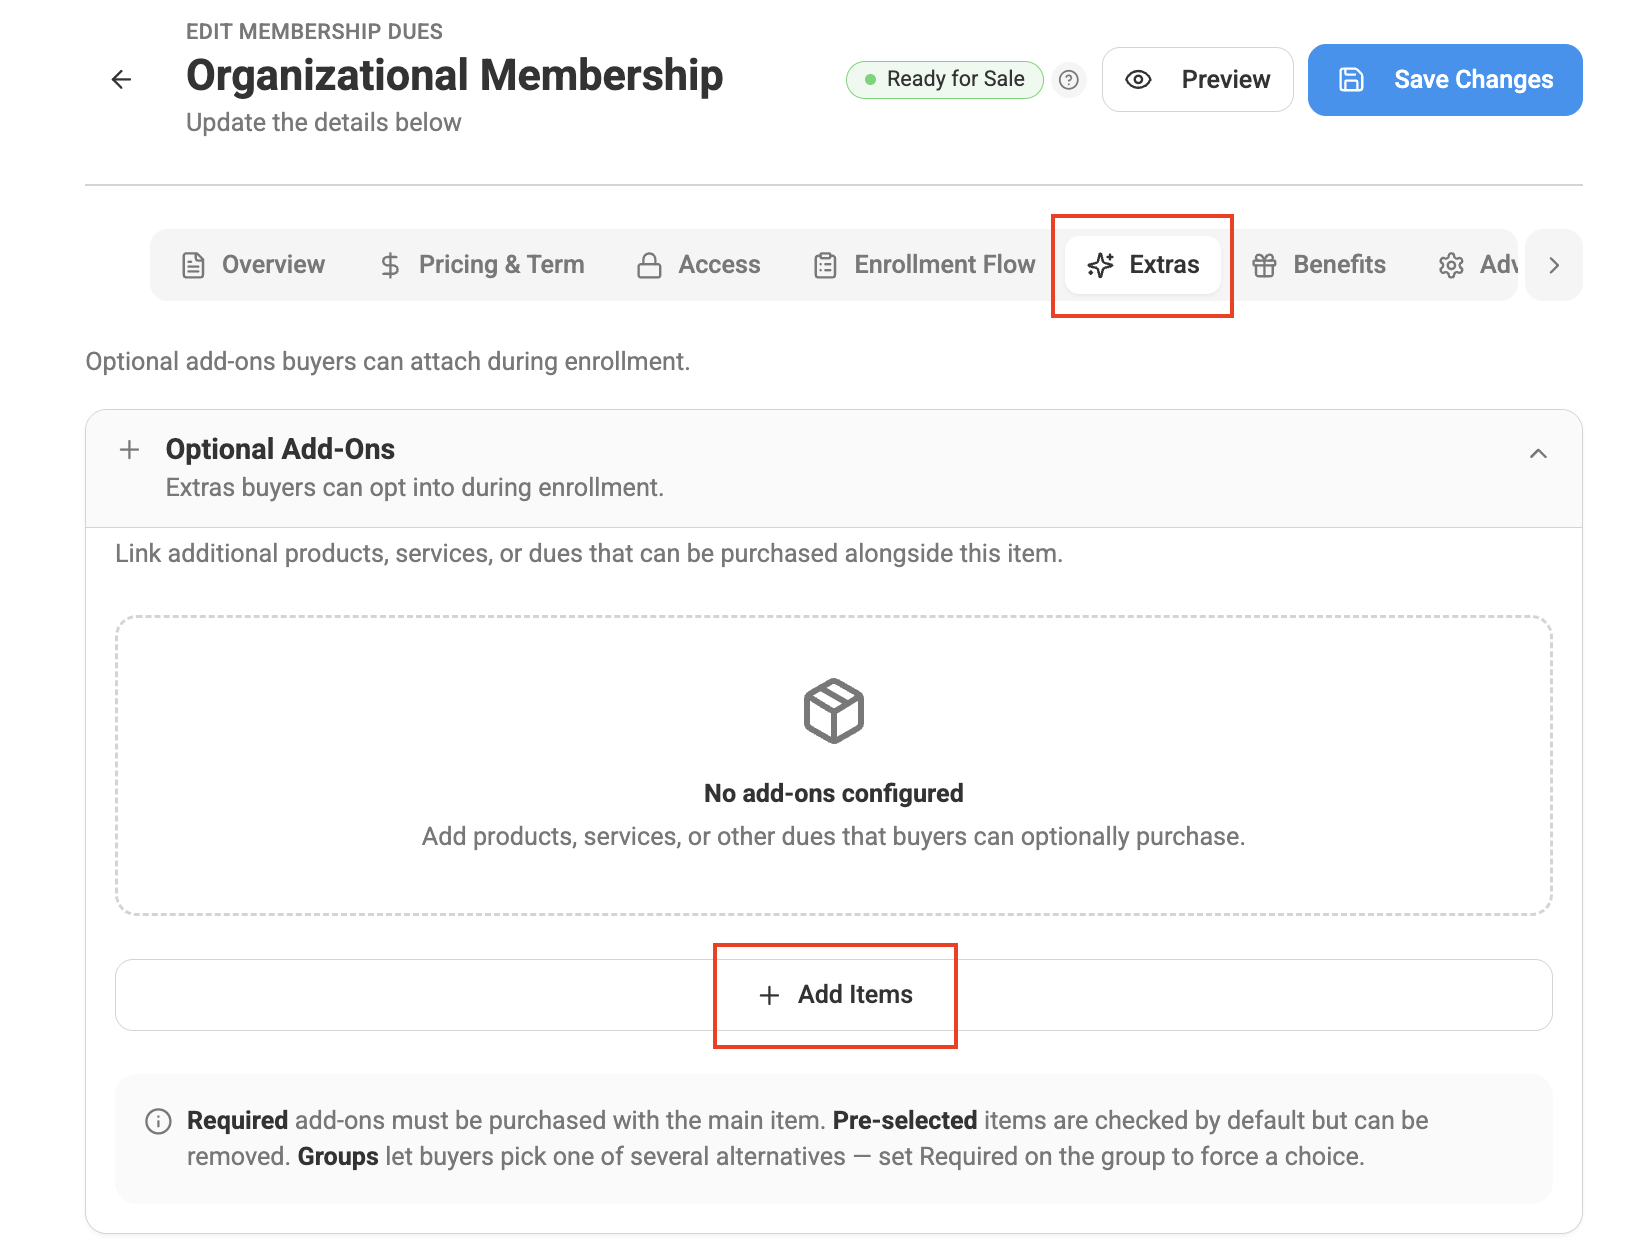
The Extras tab allows you to offer additional items during enrollment.
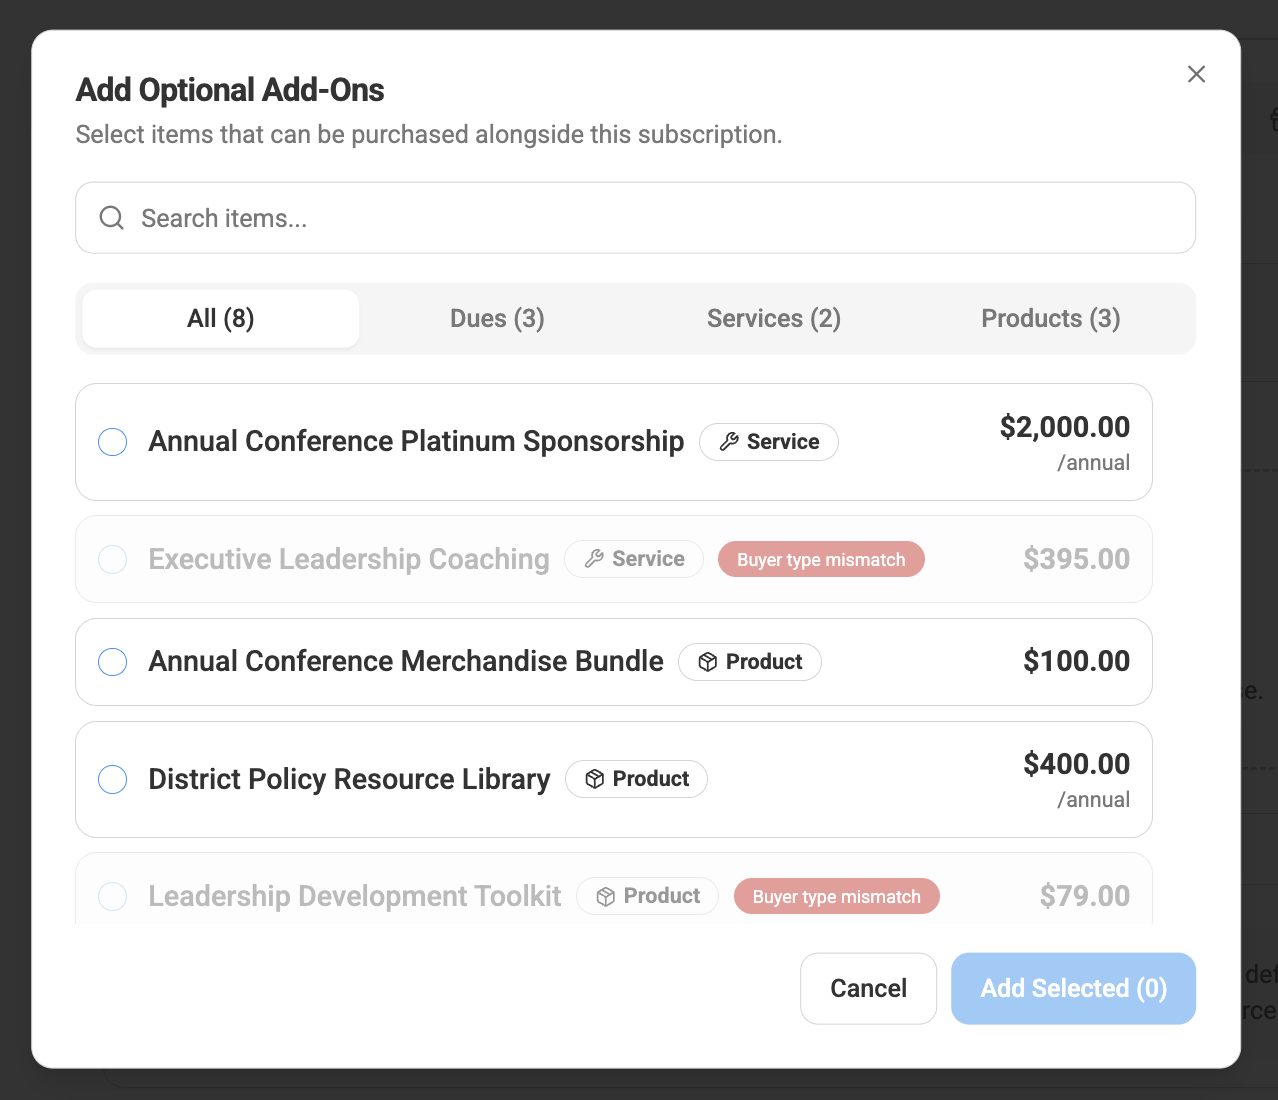
For example, you may offer:
- Additional Membership Dues
- Services
- Products
Click Add Item, select the items you want to include, and add them as optional extras.
This allows members to purchase related offerings while completing their enrollment.
Part 5: Configure Advanced Settings
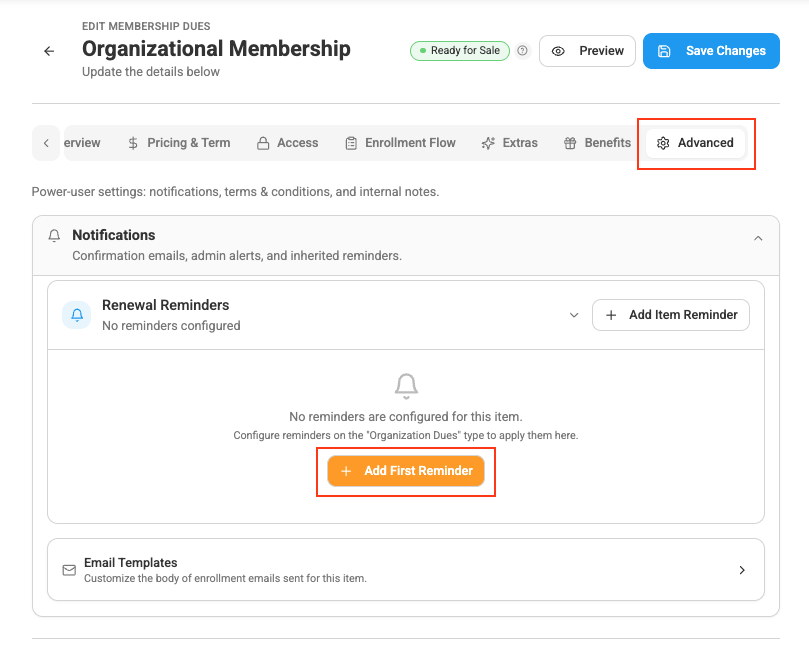
Open the Advanced tab to configure additional settings such as notifications and reminders.
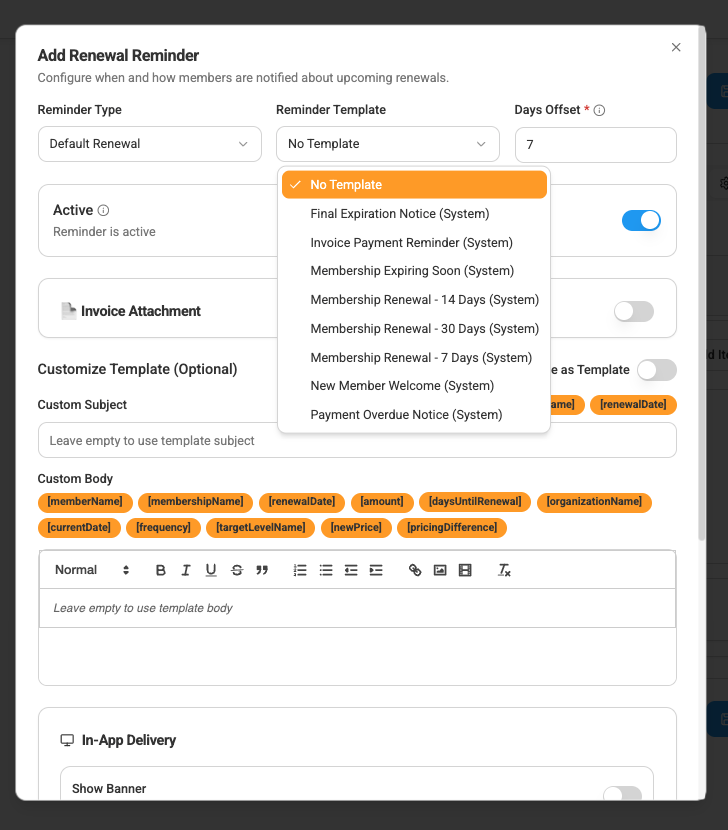
Notifications & Reminders
Click on Add Item Reminder to create notifications for different points in the membership lifecycle, including:
- Welcome Notices
- Renewal Reminders
- Payment Due Notifications
- Expiration Warnings
- Renewal Past Due Notices
When adding a reminder, you can configure:
- Reminder Type
- Notification Template
- Days Offset
- Active or Inactive Status
- Attach Invoice
- One-Time or Recurring Frequency
Once configured, click Add Reminder or save your changes.
Part 6: Create the Membership Dues Item
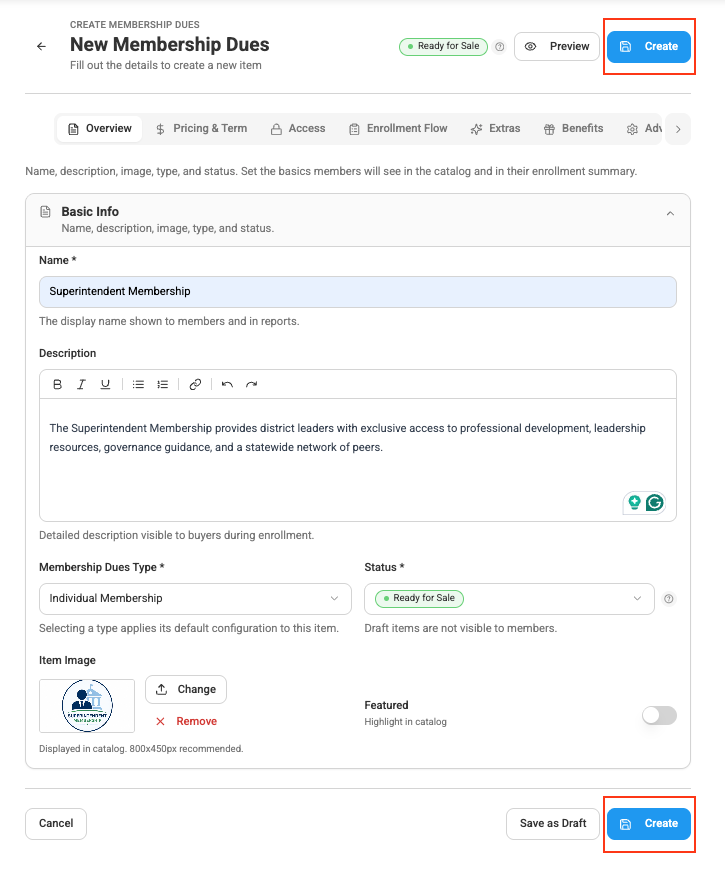
After completing the required setup, review the information entered across each tab.
When everything is ready, click Create.
The Membership Dues item will be created using the status and configuration you selected.
Suggested Screenshot: Top navigation showing the Create button.
Creating Services
Services follow the same general setup process as Membership Dues.
Navigate to:
Manage → Services
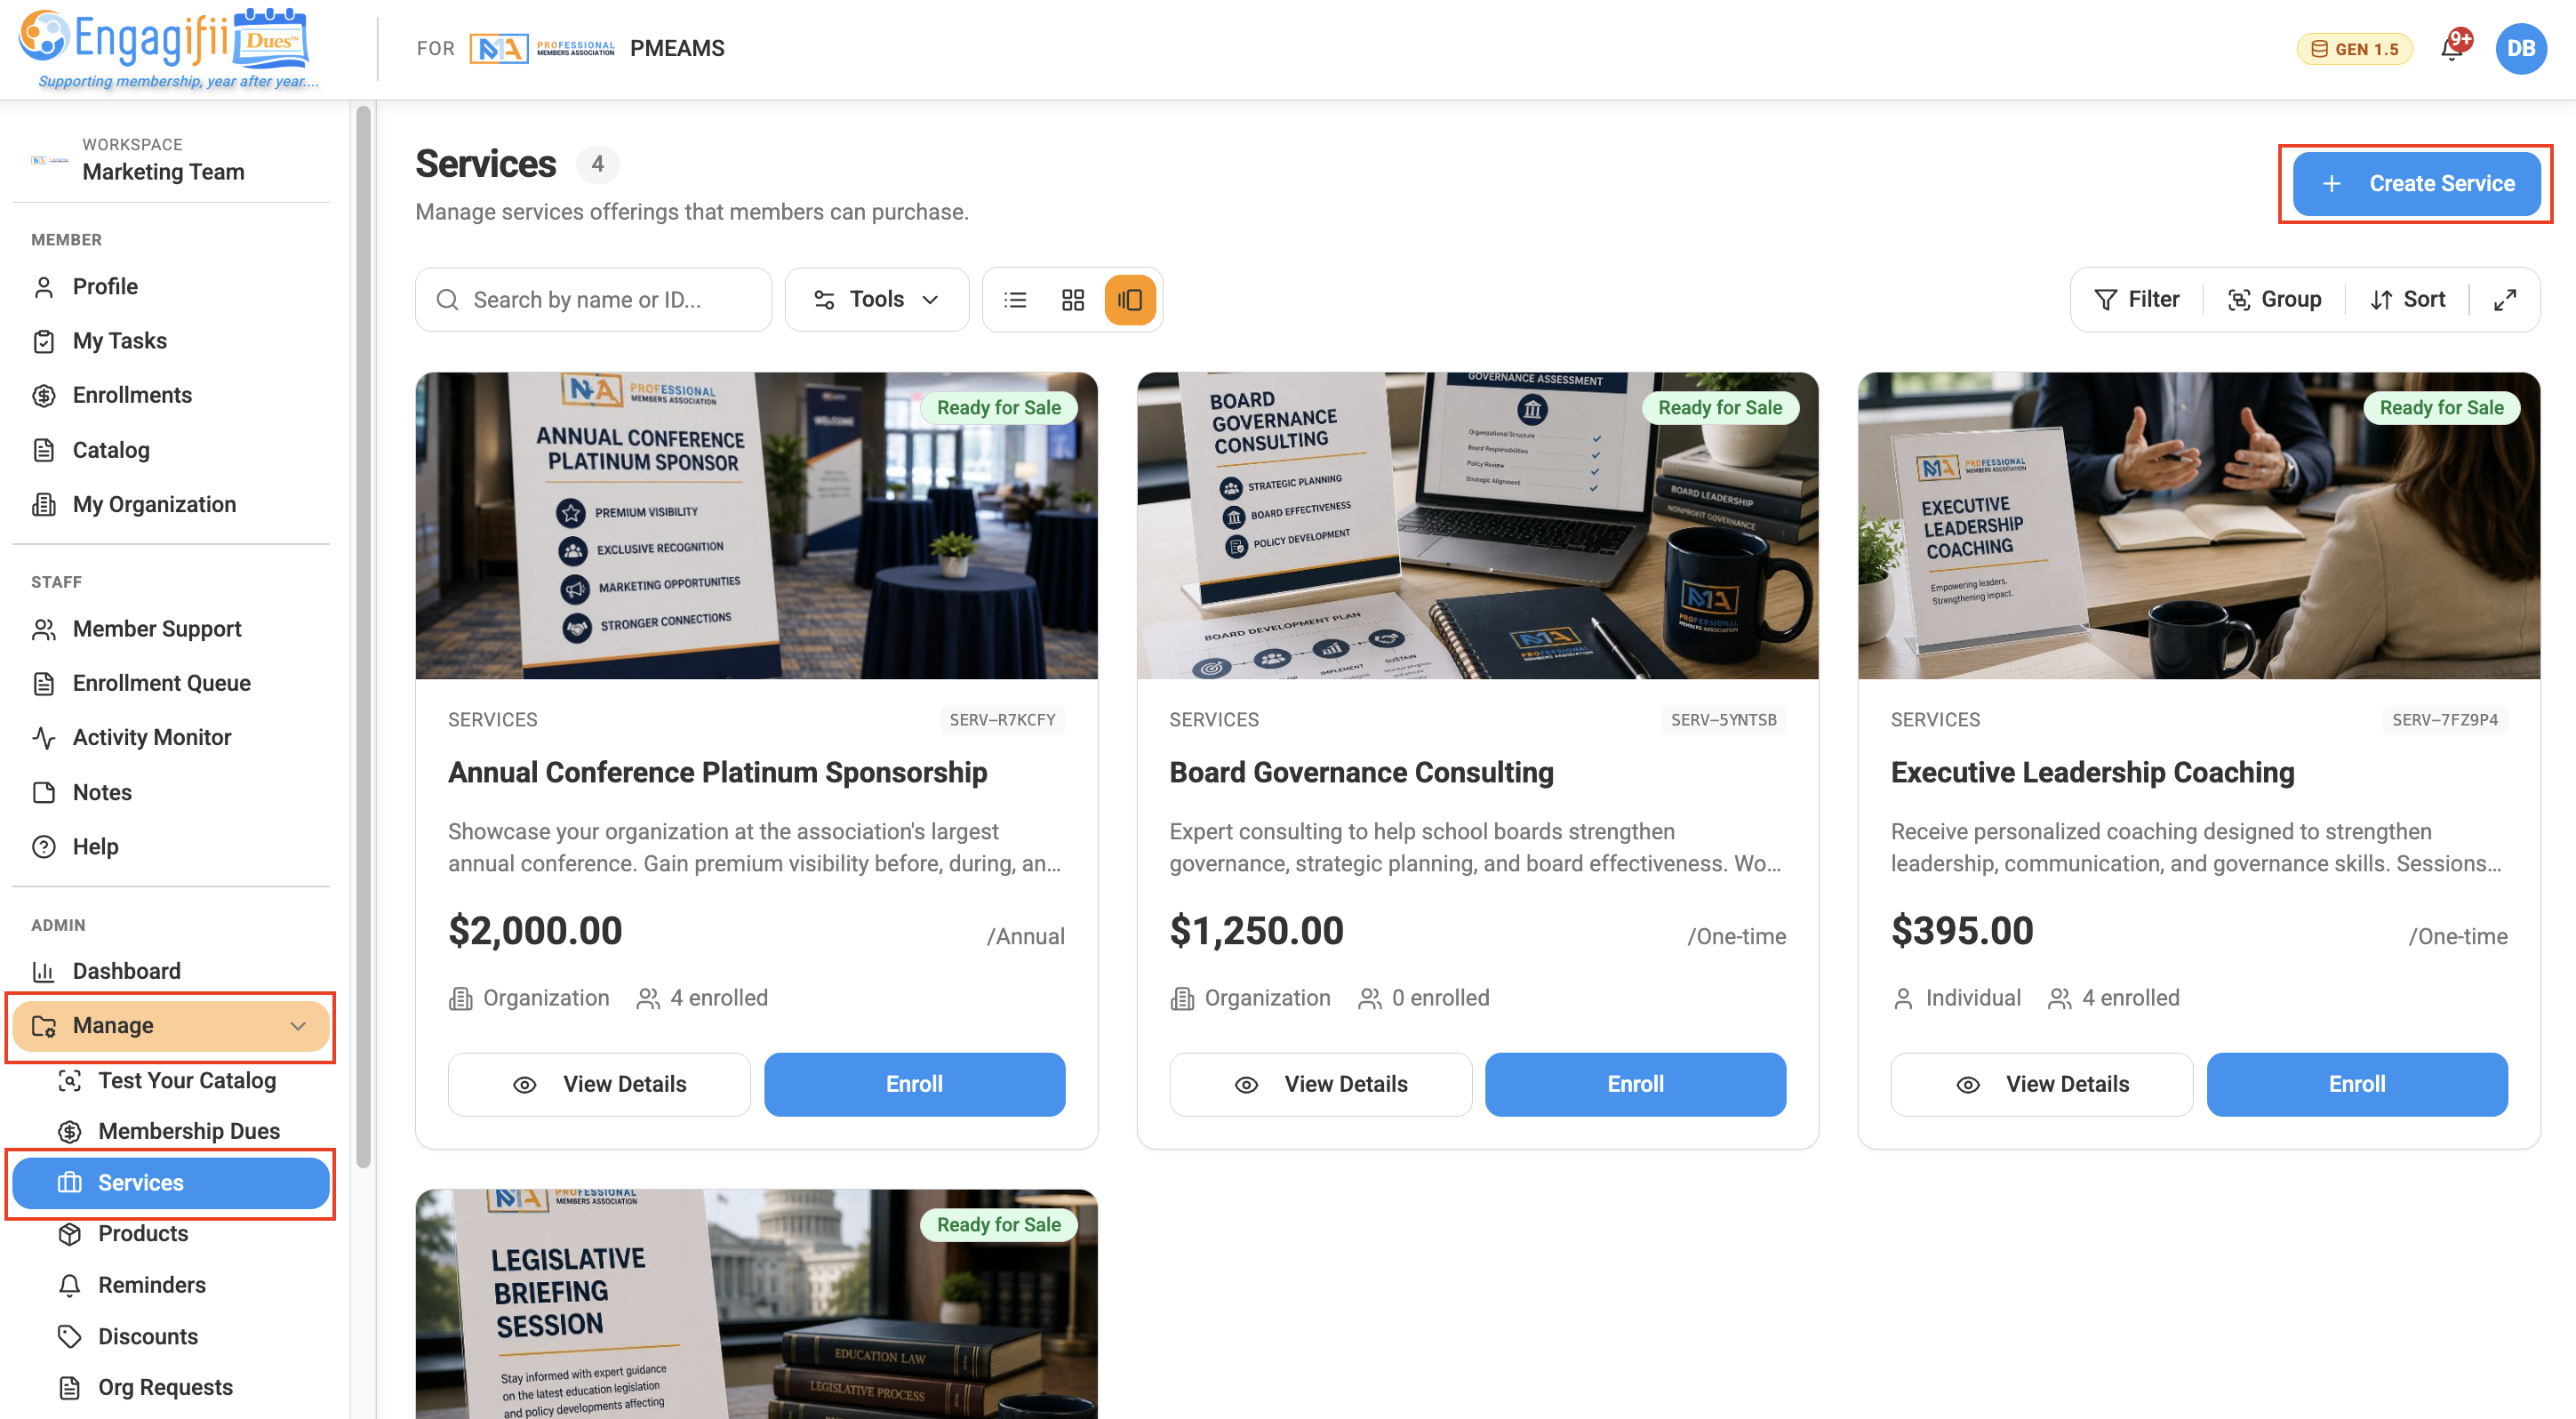
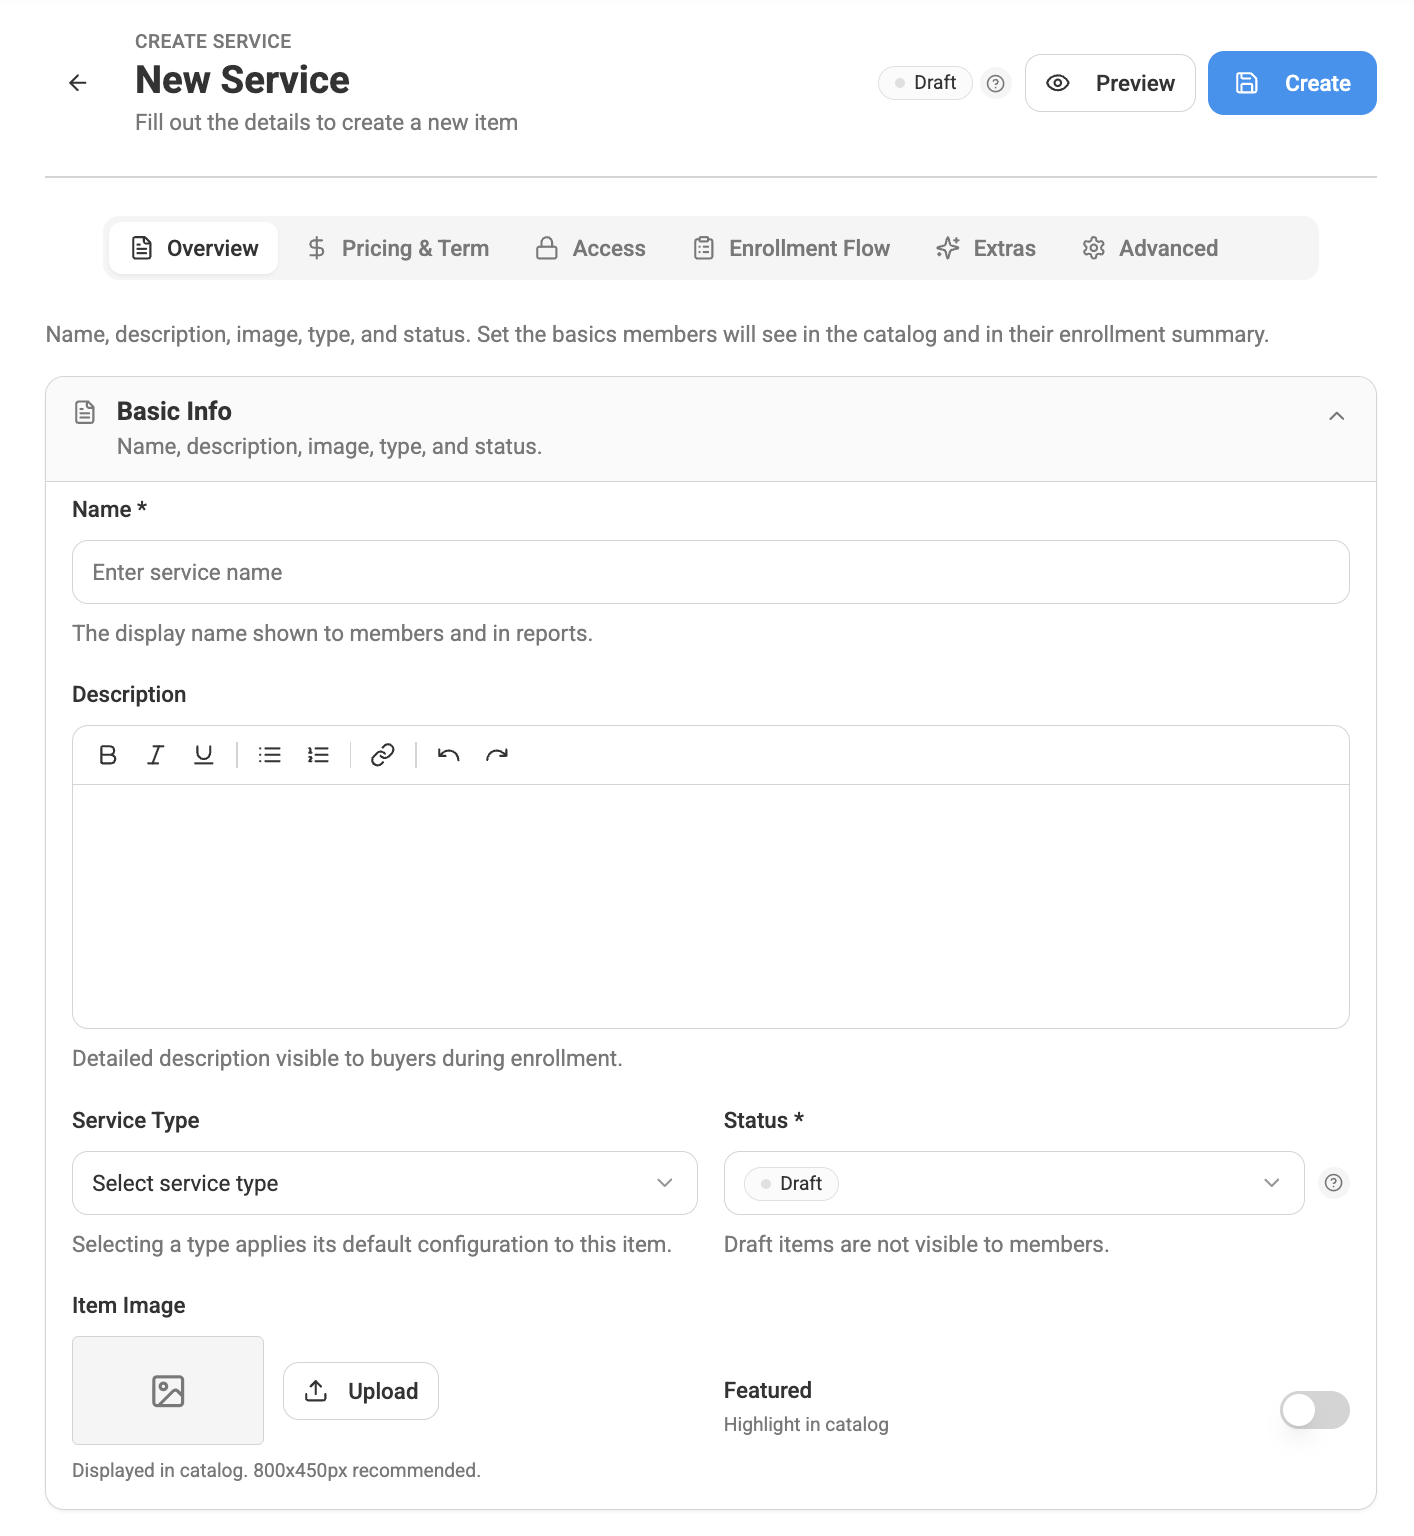
Then create the Service and configure the applicable settings across:
Overview → Pricing & Term → Access → Enrollment Flow → Extras → Advanced
You can set the service price, determine who is eligible to purchase it, control Catalog visibility, configure enrollment behavior, offer additional items, and set up notifications.
Because the workflow is consistent, you can follow the same steps outlined above while choosing settings appropriate for the Service you are offering.
Creating Products
Products also follow the same overall creation process.
Navigate to:
Manage → Products
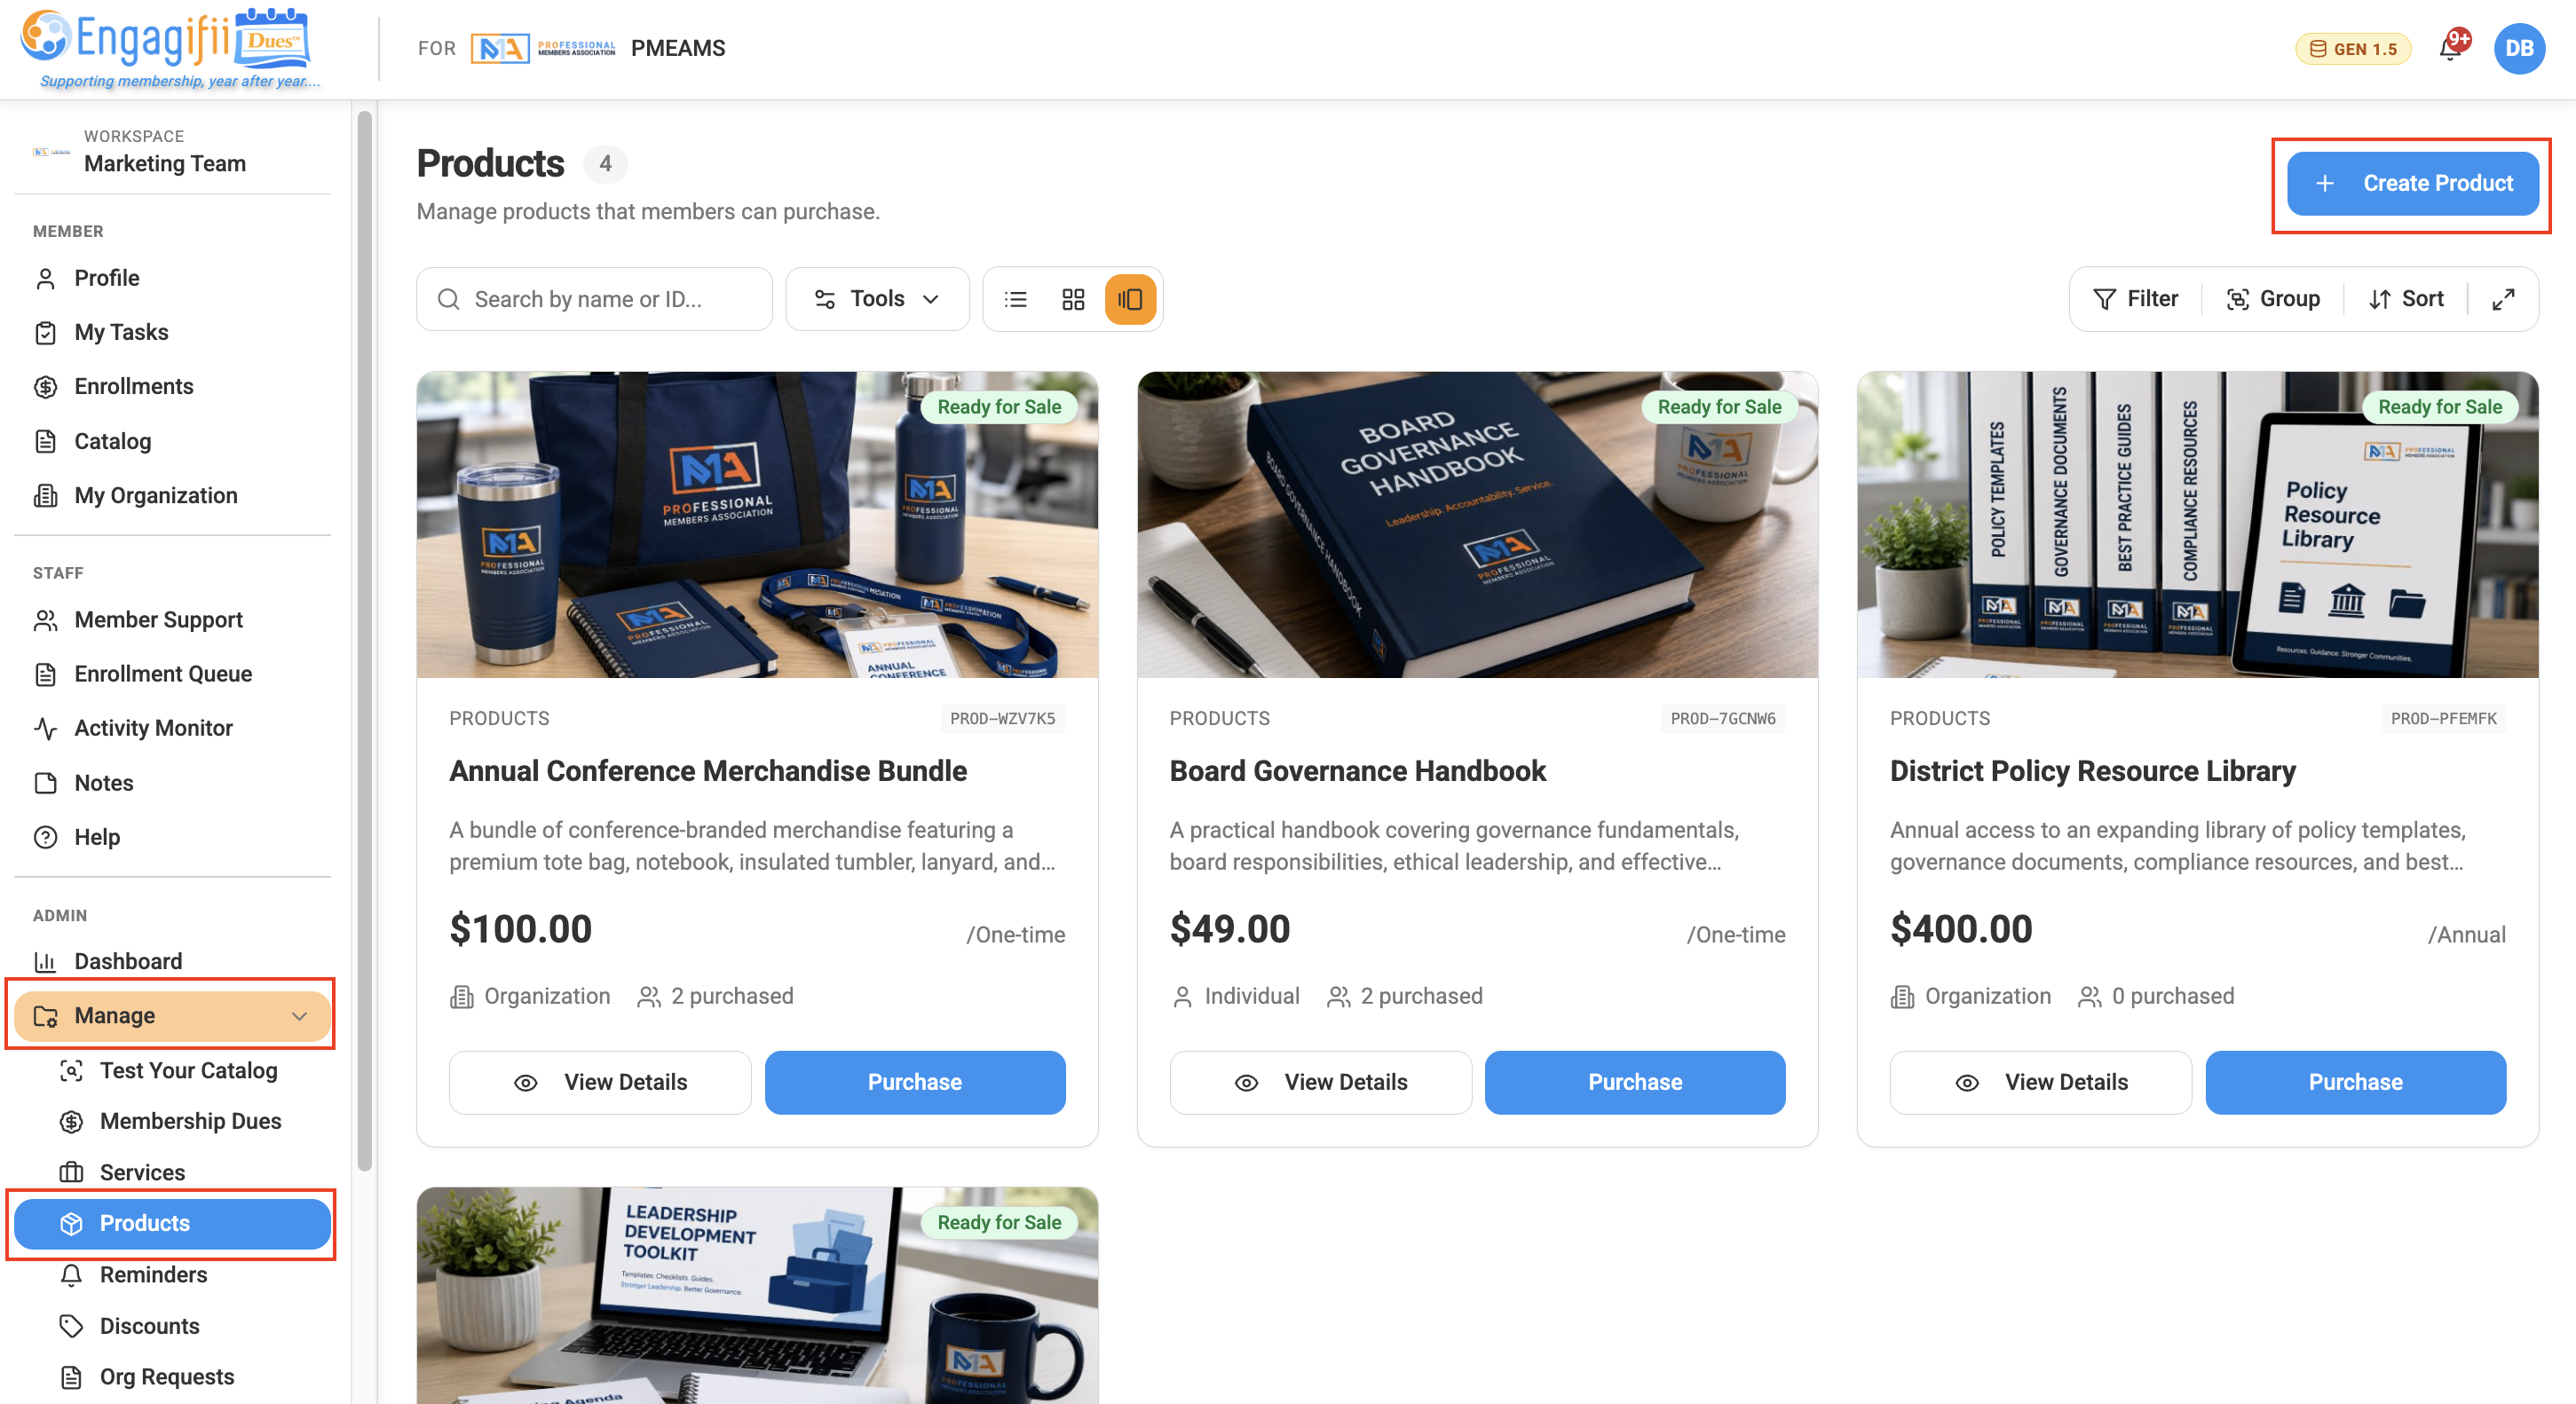
Configure the applicable settings using the same tabs, including Overview, Pricing, Access, Enrollment Flow, Extras, and Advanced.
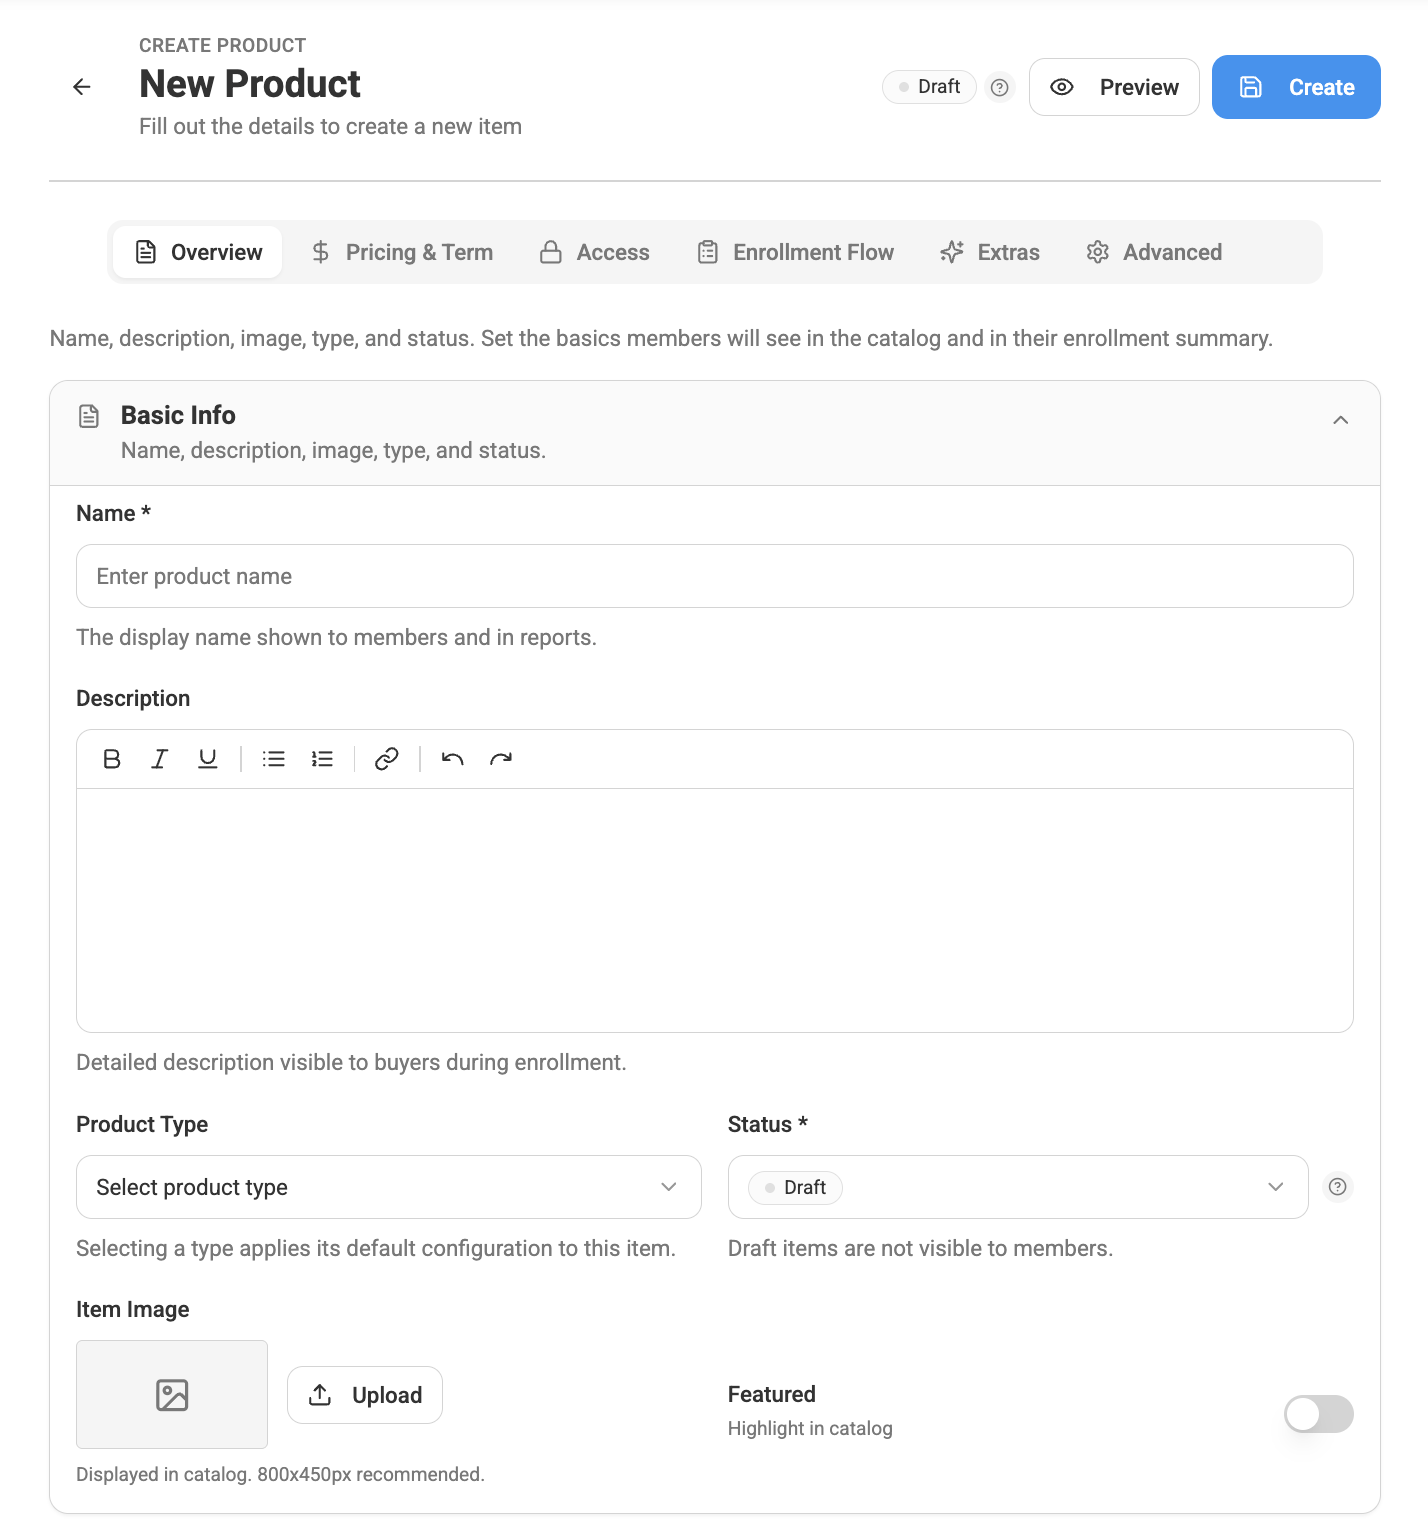
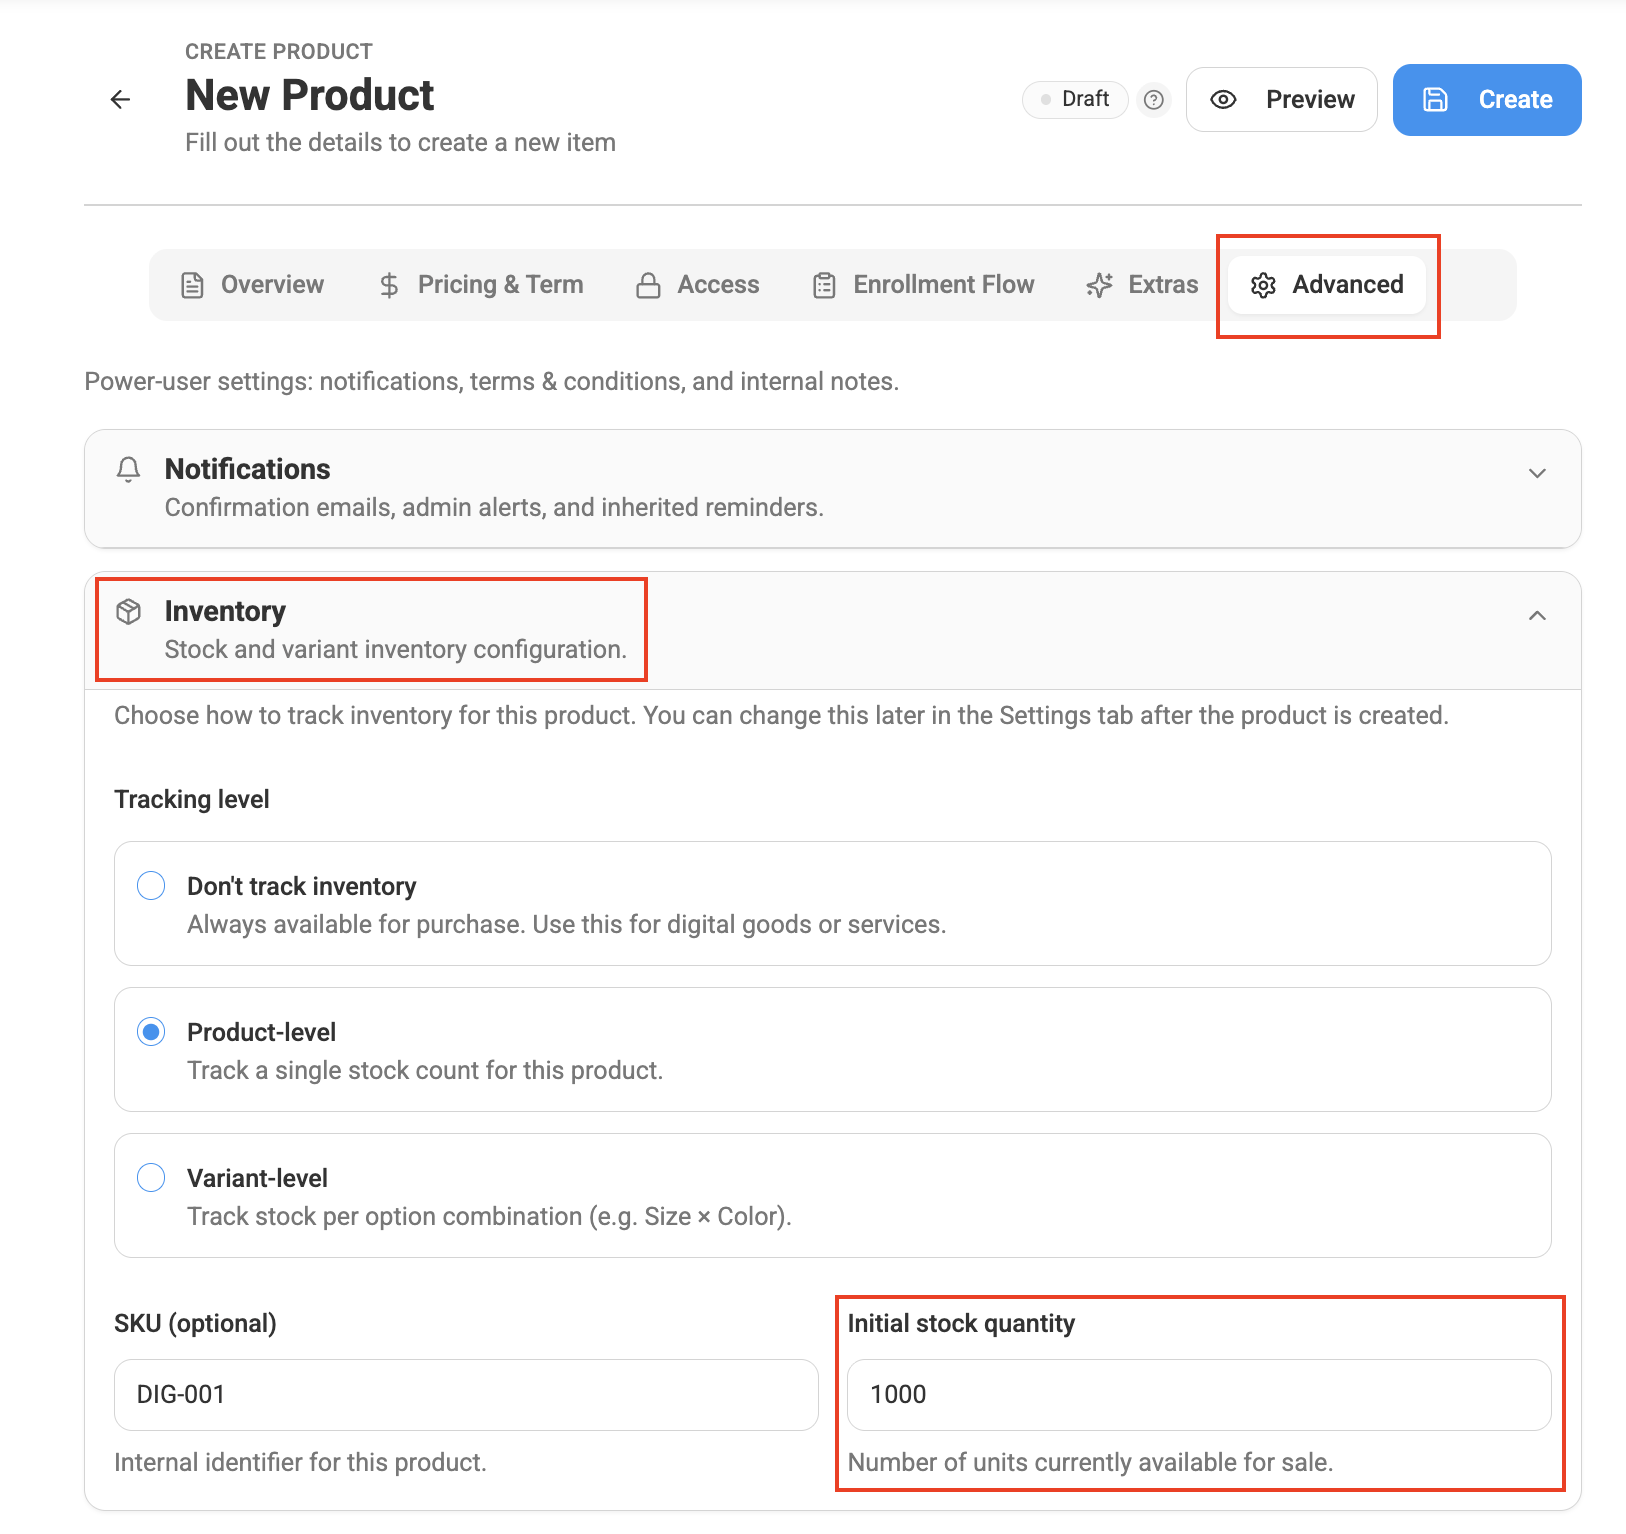
Products include one additional configuration that is especially important for physical items: Inventory.
Configure Product Inventory
Under Advanced → Inventory, choose how inventory should be tracked.
Available options include:
- No Tracking – Inventory quantities are not maintained.
- Product Level – Maintain one stock quantity for the complete product.
- Variant Level – Track inventory separately for product variations such as size, color, region, or material.
When using Variant Level tracking, you can define variant options and manage the available quantity for each combination.
Additional tools may be available to help distribute or update inventory across variants.
Note: Products do not use membership renewal or subscription settings because they are purchased rather than renewed.
Best Practice
Before making an item available in the Catalog, review its pricing, eligibility, visibility, payment methods, enrollment flow, extras, and notifications. This helps ensure members see the right offering and experience the enrollment or purchase process exactly as intended.
Closing
Using the same structured setup across Membership Dues, Services, and Products makes it easier to manage your association’s offerings while still giving you the flexibility to configure each item for its specific purpose.
We hope this guide helps you create and manage Membership Dues, Services, and Products in Engagifii Dues. If you have any questions or feedback, please reach out to us at support@engagifii.com