
Summary
In Engagifii, a Term represents the defined period of time associated with a Position. A person can serve multiple Terms, return after time away, move between organizations or Positions, or leave before a Term ends while their historical information remains available on their record.
This guide covers how to create or duplicate Terms, define applicable Positions and scenarios, assign people to current or upcoming Terms, maintain historical Term information, and export people associated with a Term.
Part 1: Create and Configure Terms
Understanding Terms, Positions & Scenarios
Before creating a Term, it helps to understand how the different pieces work together:
- Term: The defined period of time, such as 2026–2030.
- Position: The role someone serves in, such as Commissioner, Mayor, or School Board Member.
- Term Scenario: How someone entered the Position, such as Elected or Appointed.
- Term Duration: Defines whether a Term uses Fixed or Flexible dates. Fixed Terms have known start and end dates, while Flexible Terms depend on when a person begins serving and may support lifetime appointments.
A person may not necessarily serve for the entire Term. For example, one person may leave office early and another may finish the same Term. The Term remains the same, while each person's Position dates reflect when they actually served.
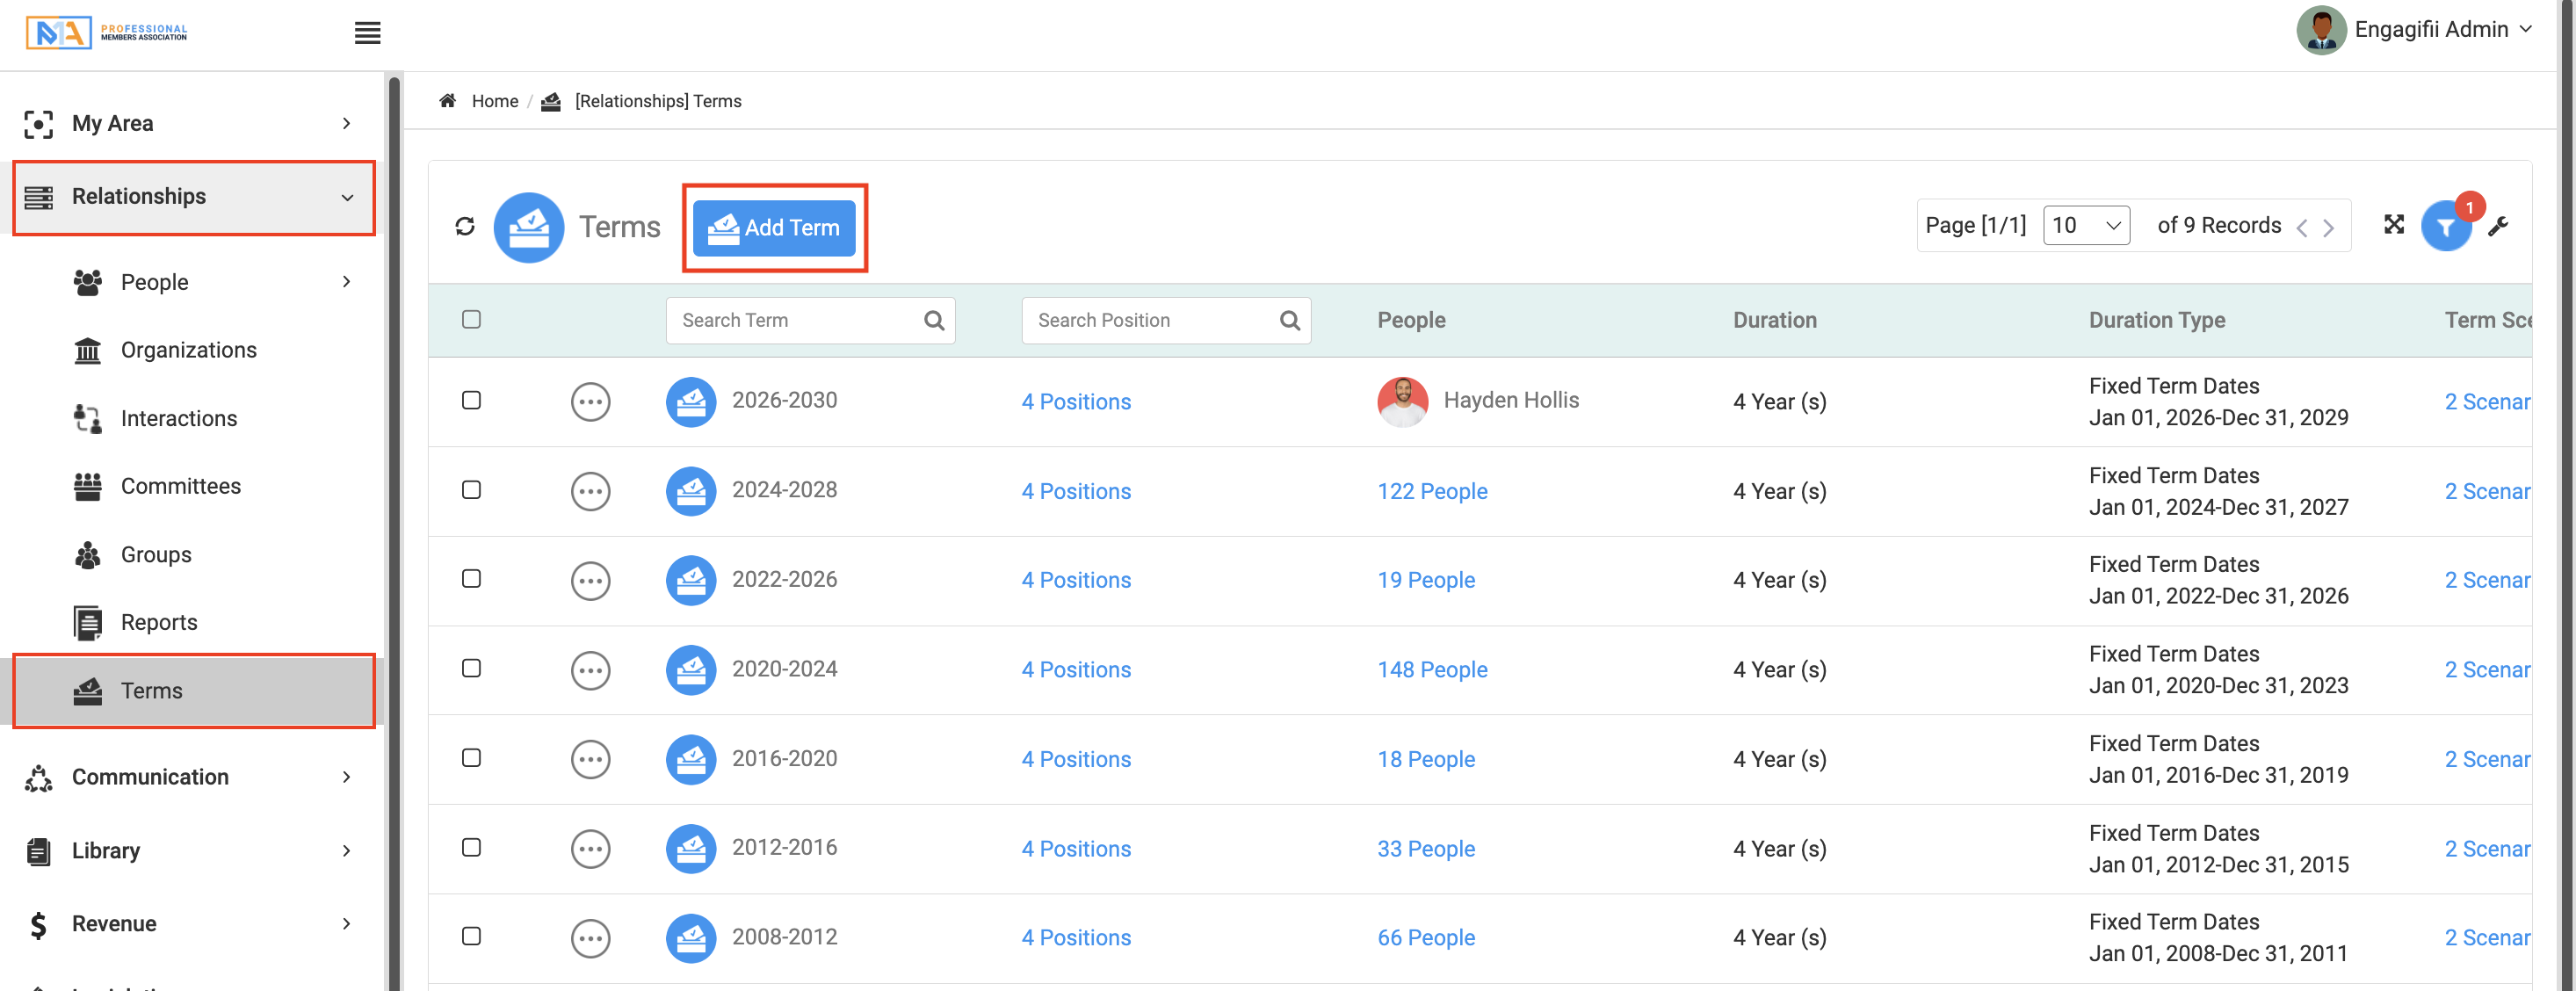
Step 1. Open Terms
Navigate to:
Relationship Module → Terms
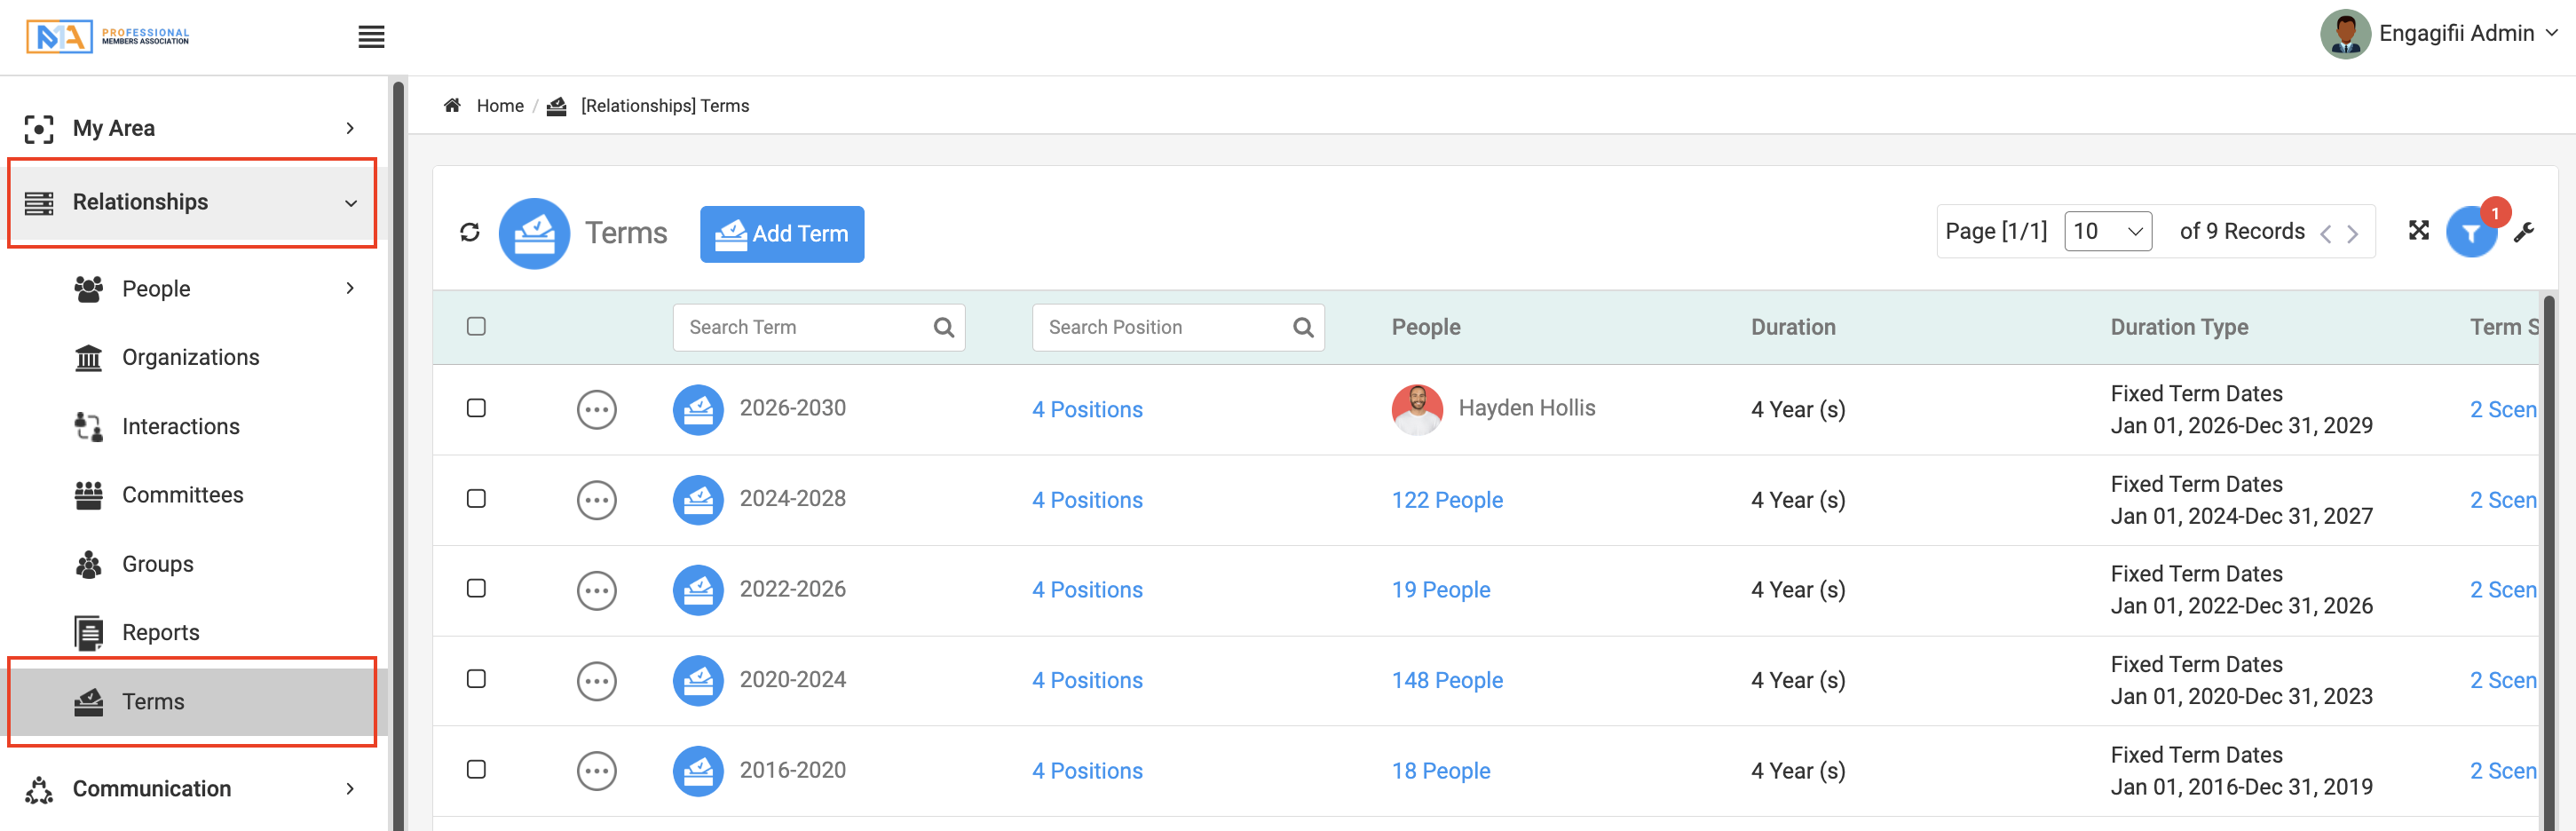
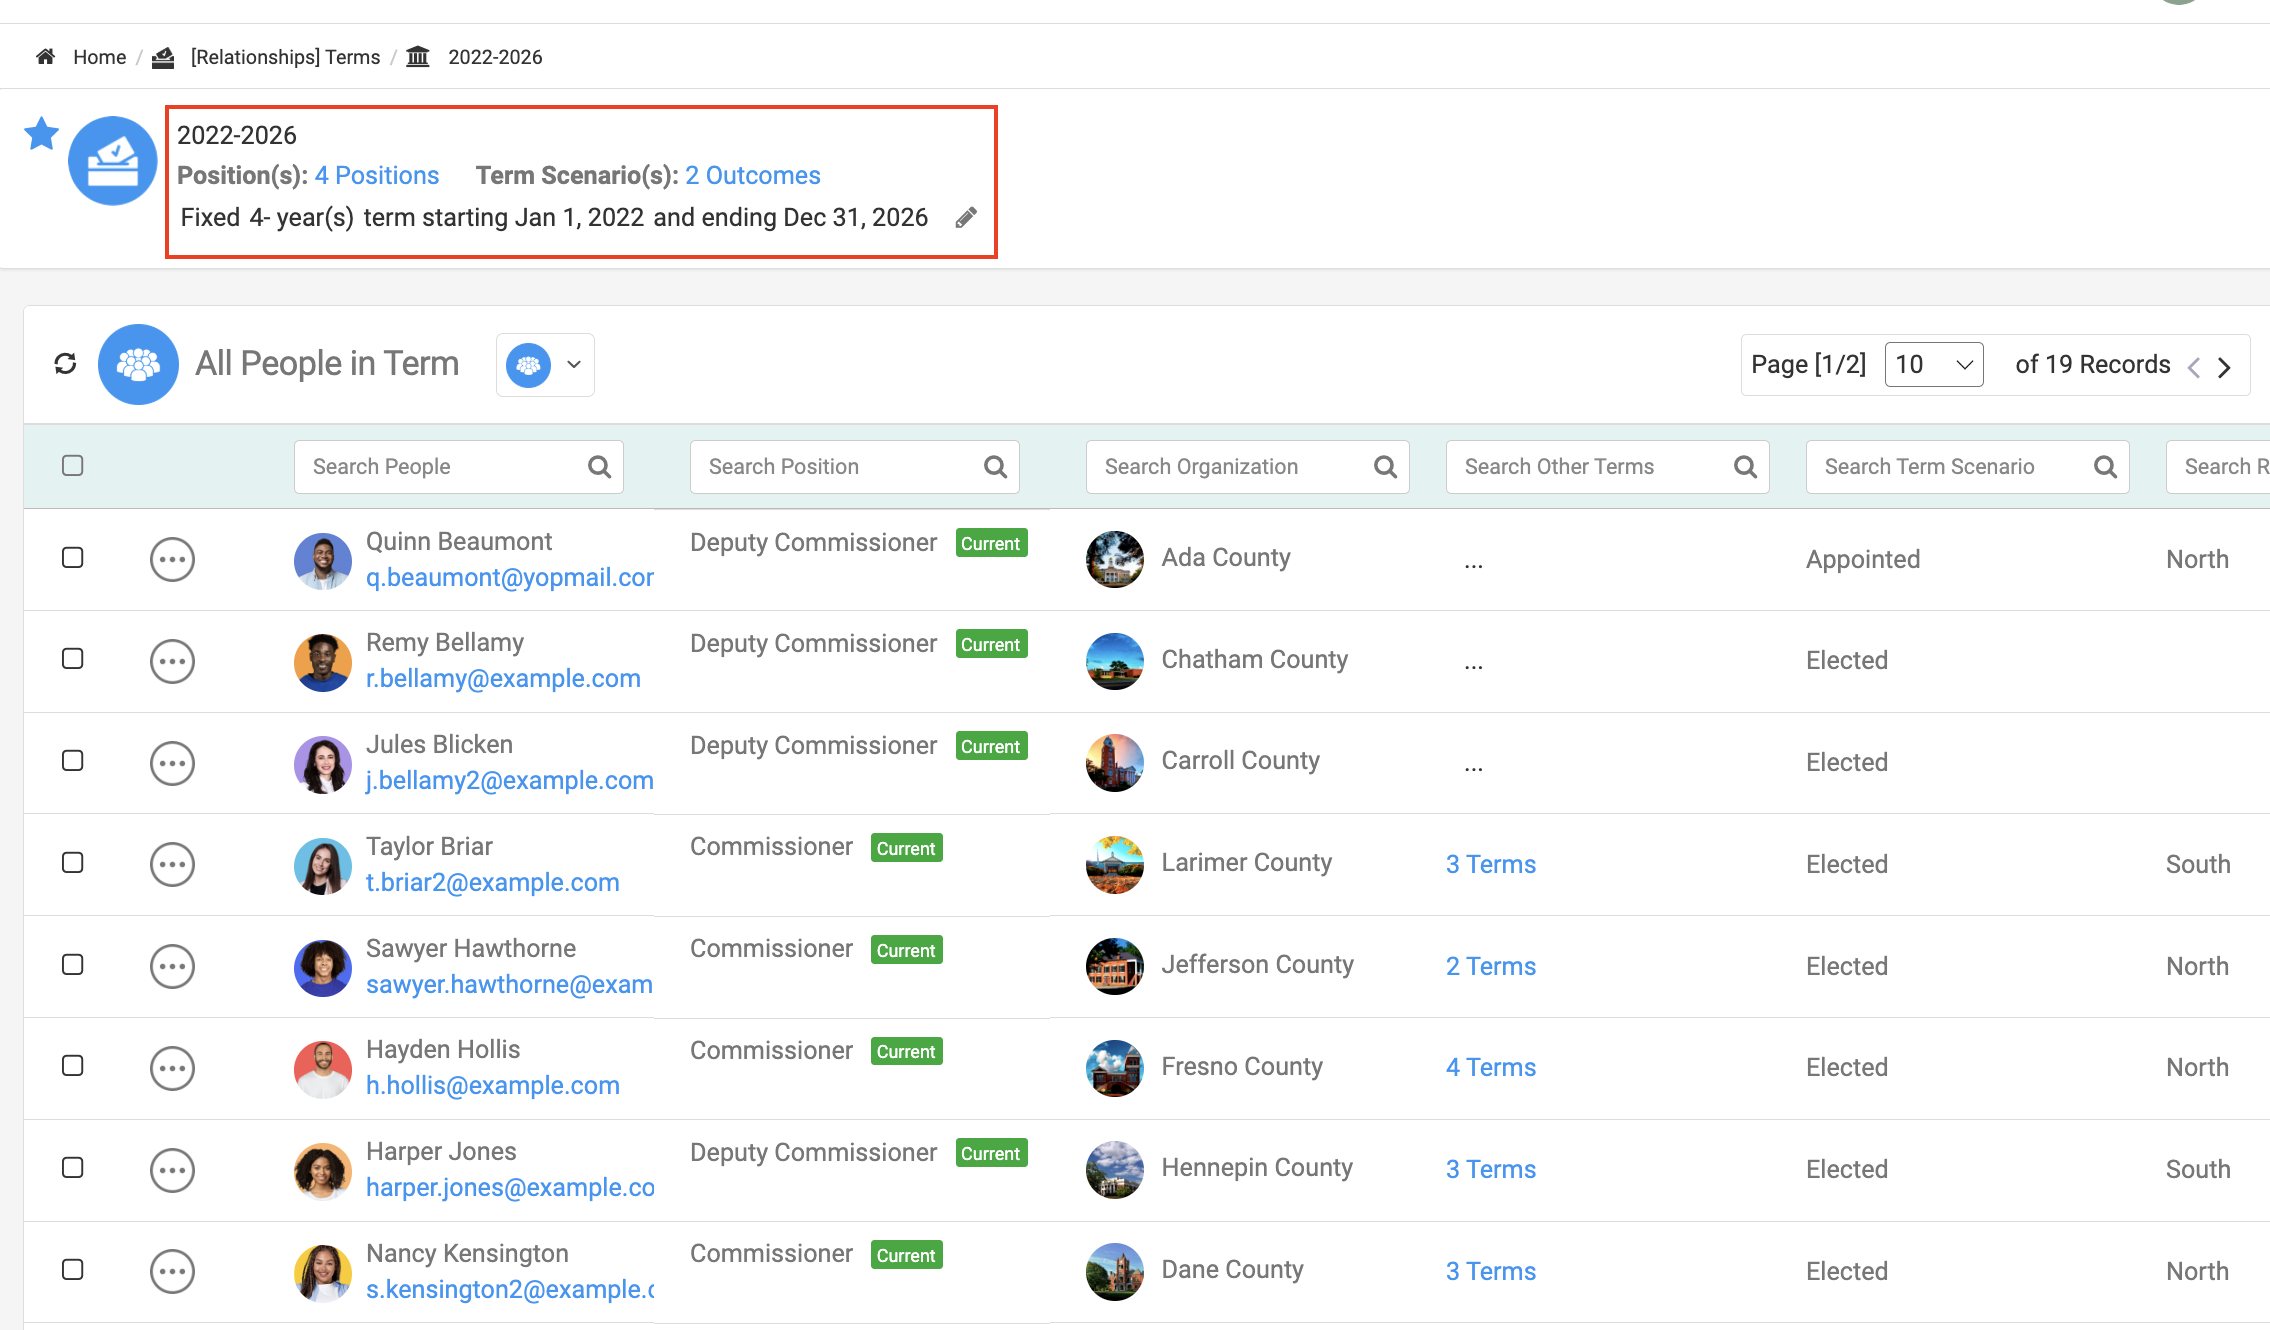
The Terms page displays the Terms already configured in your workspace, including their dates, related Positions, and the number of people associated with each one.
From here, you can create a new Term or duplicate an existing Term.
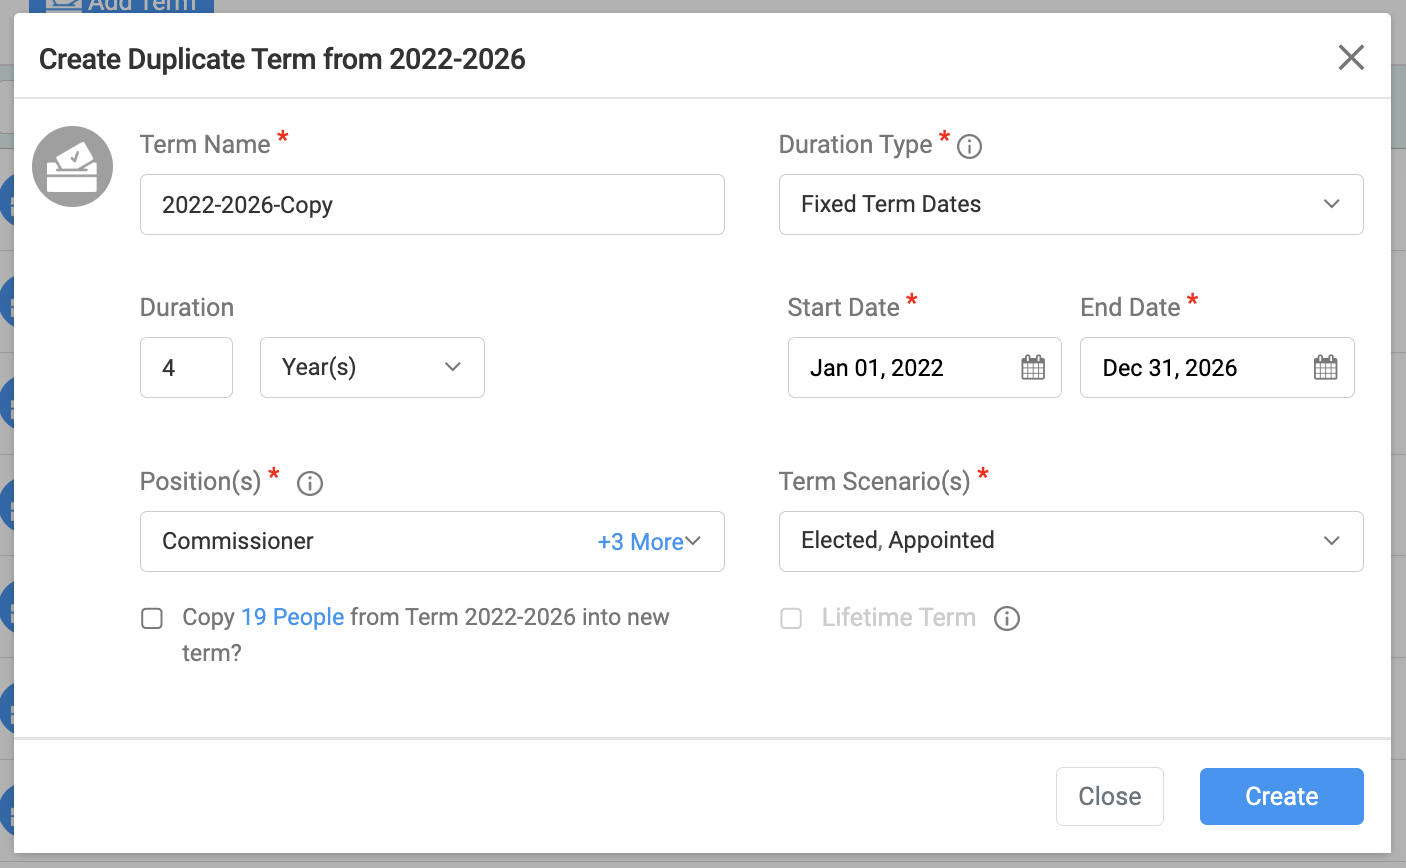
Step 2. Create a New or a Duplicate Term
You can create a Term in two ways:
- Click Add Term to create a new Term from scratch.
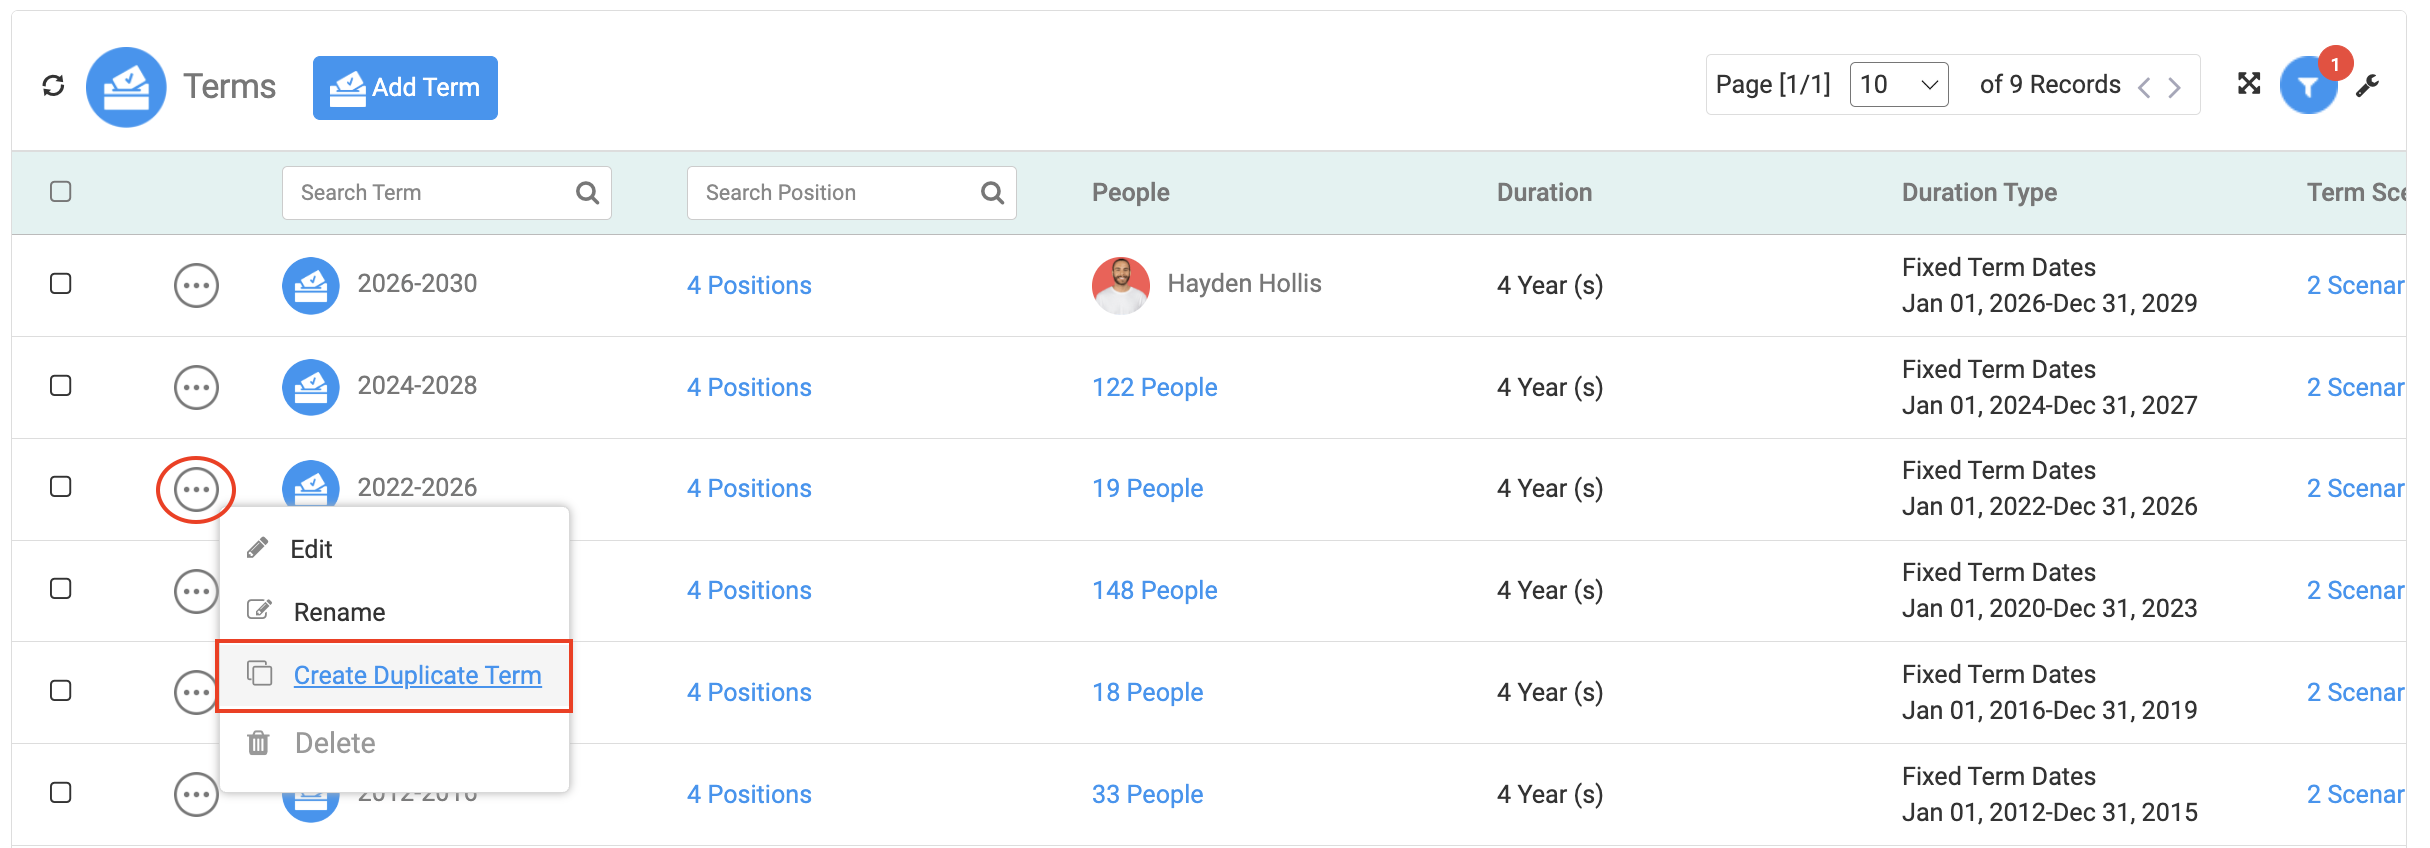
- Duplicate an existing Term when the new Term follows the same setup as a previous one.
For example, you could duplicate 2022–2026 to create 2026–2030, then update the details for the new cycle. You can also create a new Term from scratch when a different configuration is needed.
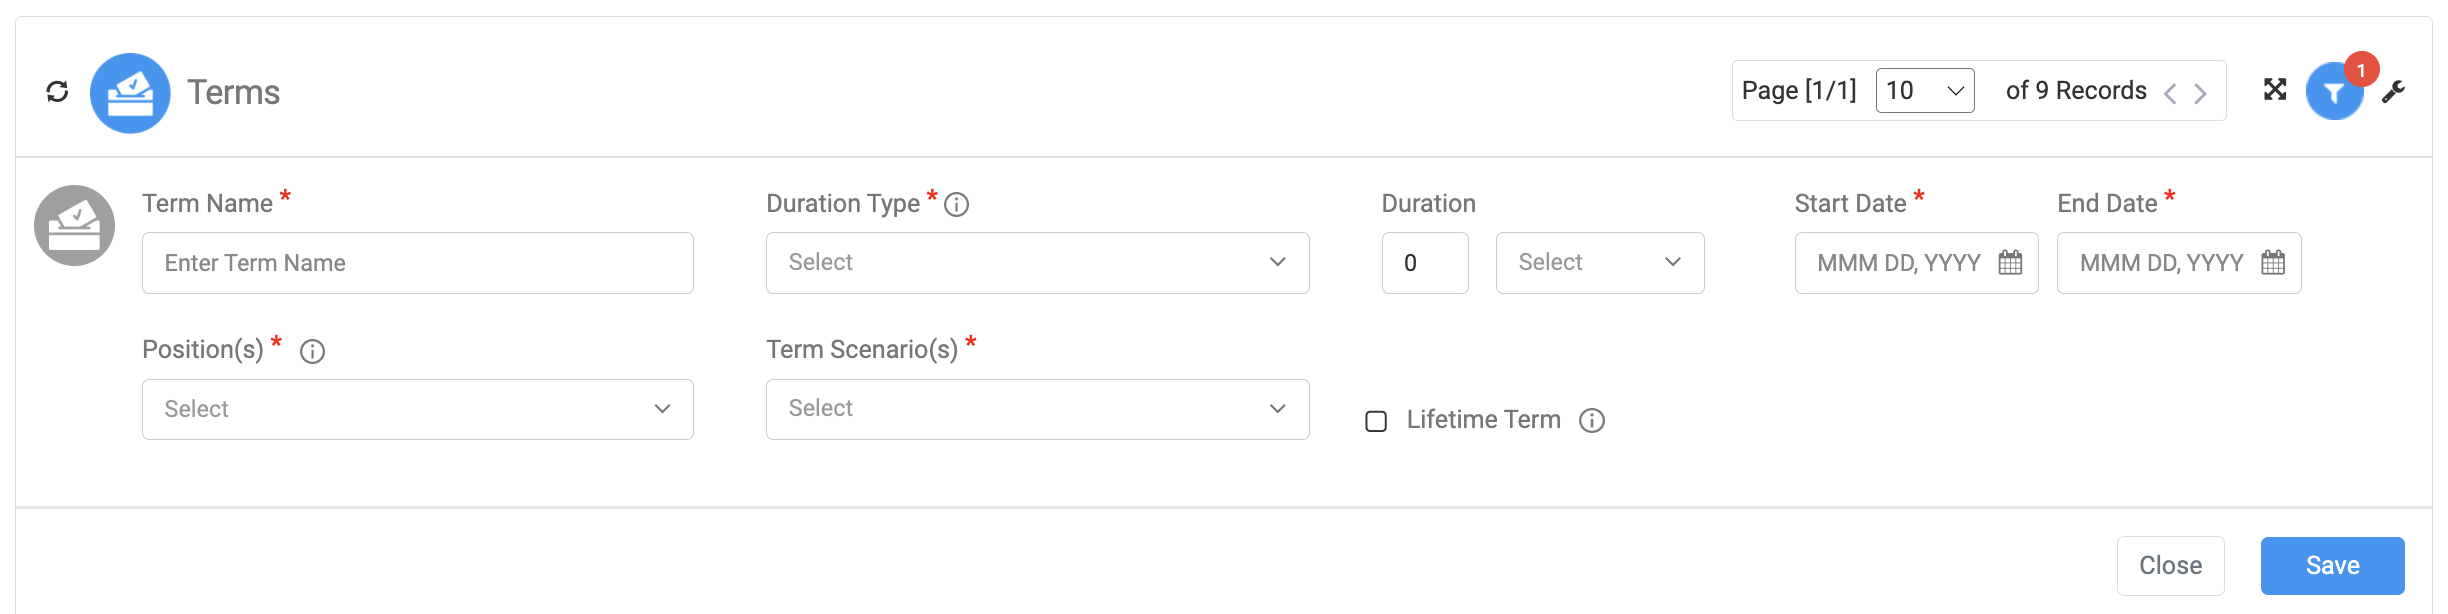
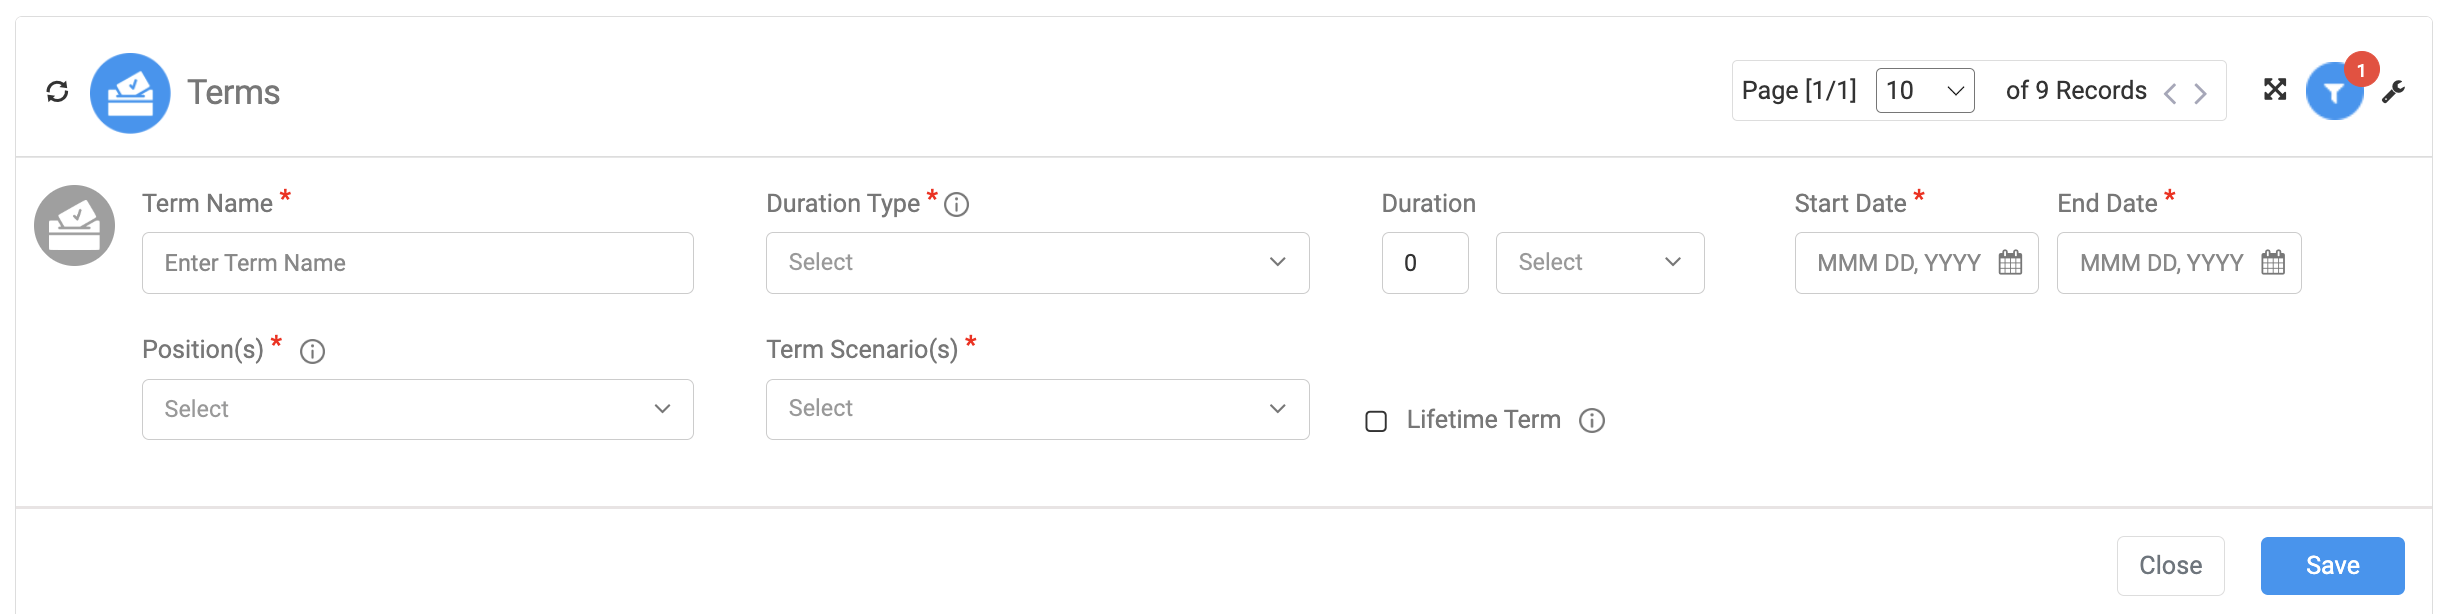
Enter or select:
- Term Name
- Duration Type
- Duration
- Start Date and End Date
- Position(s)
- Term Scenario(s)
Step 3. Configure the Term Details
Choose the Duration Type
Select the appropriate Term duration:
Fixed Term Dates
Use Fixed dates when the Term has a known beginning and end, such as a recurring four-year election cycle.
Flexible Term Dates
Use Flexible dates when the Term begins based on when a person is appointed or starts serving. Flexible Terms can also be used for lifetime appointments when applicable.
Select Positions
Choose which Positions can use the Term.
This ensures the Term only appears when assigning it to the appropriate Positions. For example, a Term created specifically for Commissioners does not need to appear when assigning an unrelated Position.
Select Term Scenarios
Choose the scenarios that apply, such as:
- Elected
- Appointed
More than one scenario can be selected when a Position may be filled in different ways. For example, a Position may normally be elected but temporarily filled by appointment when someone leaves office early.
Click Create or Save when finished.
Part 2: Assign and Manage People in Terms
Once the Term has been created, you can begin associating people with it through their Positions.
Add a Term to a Person's Position
-
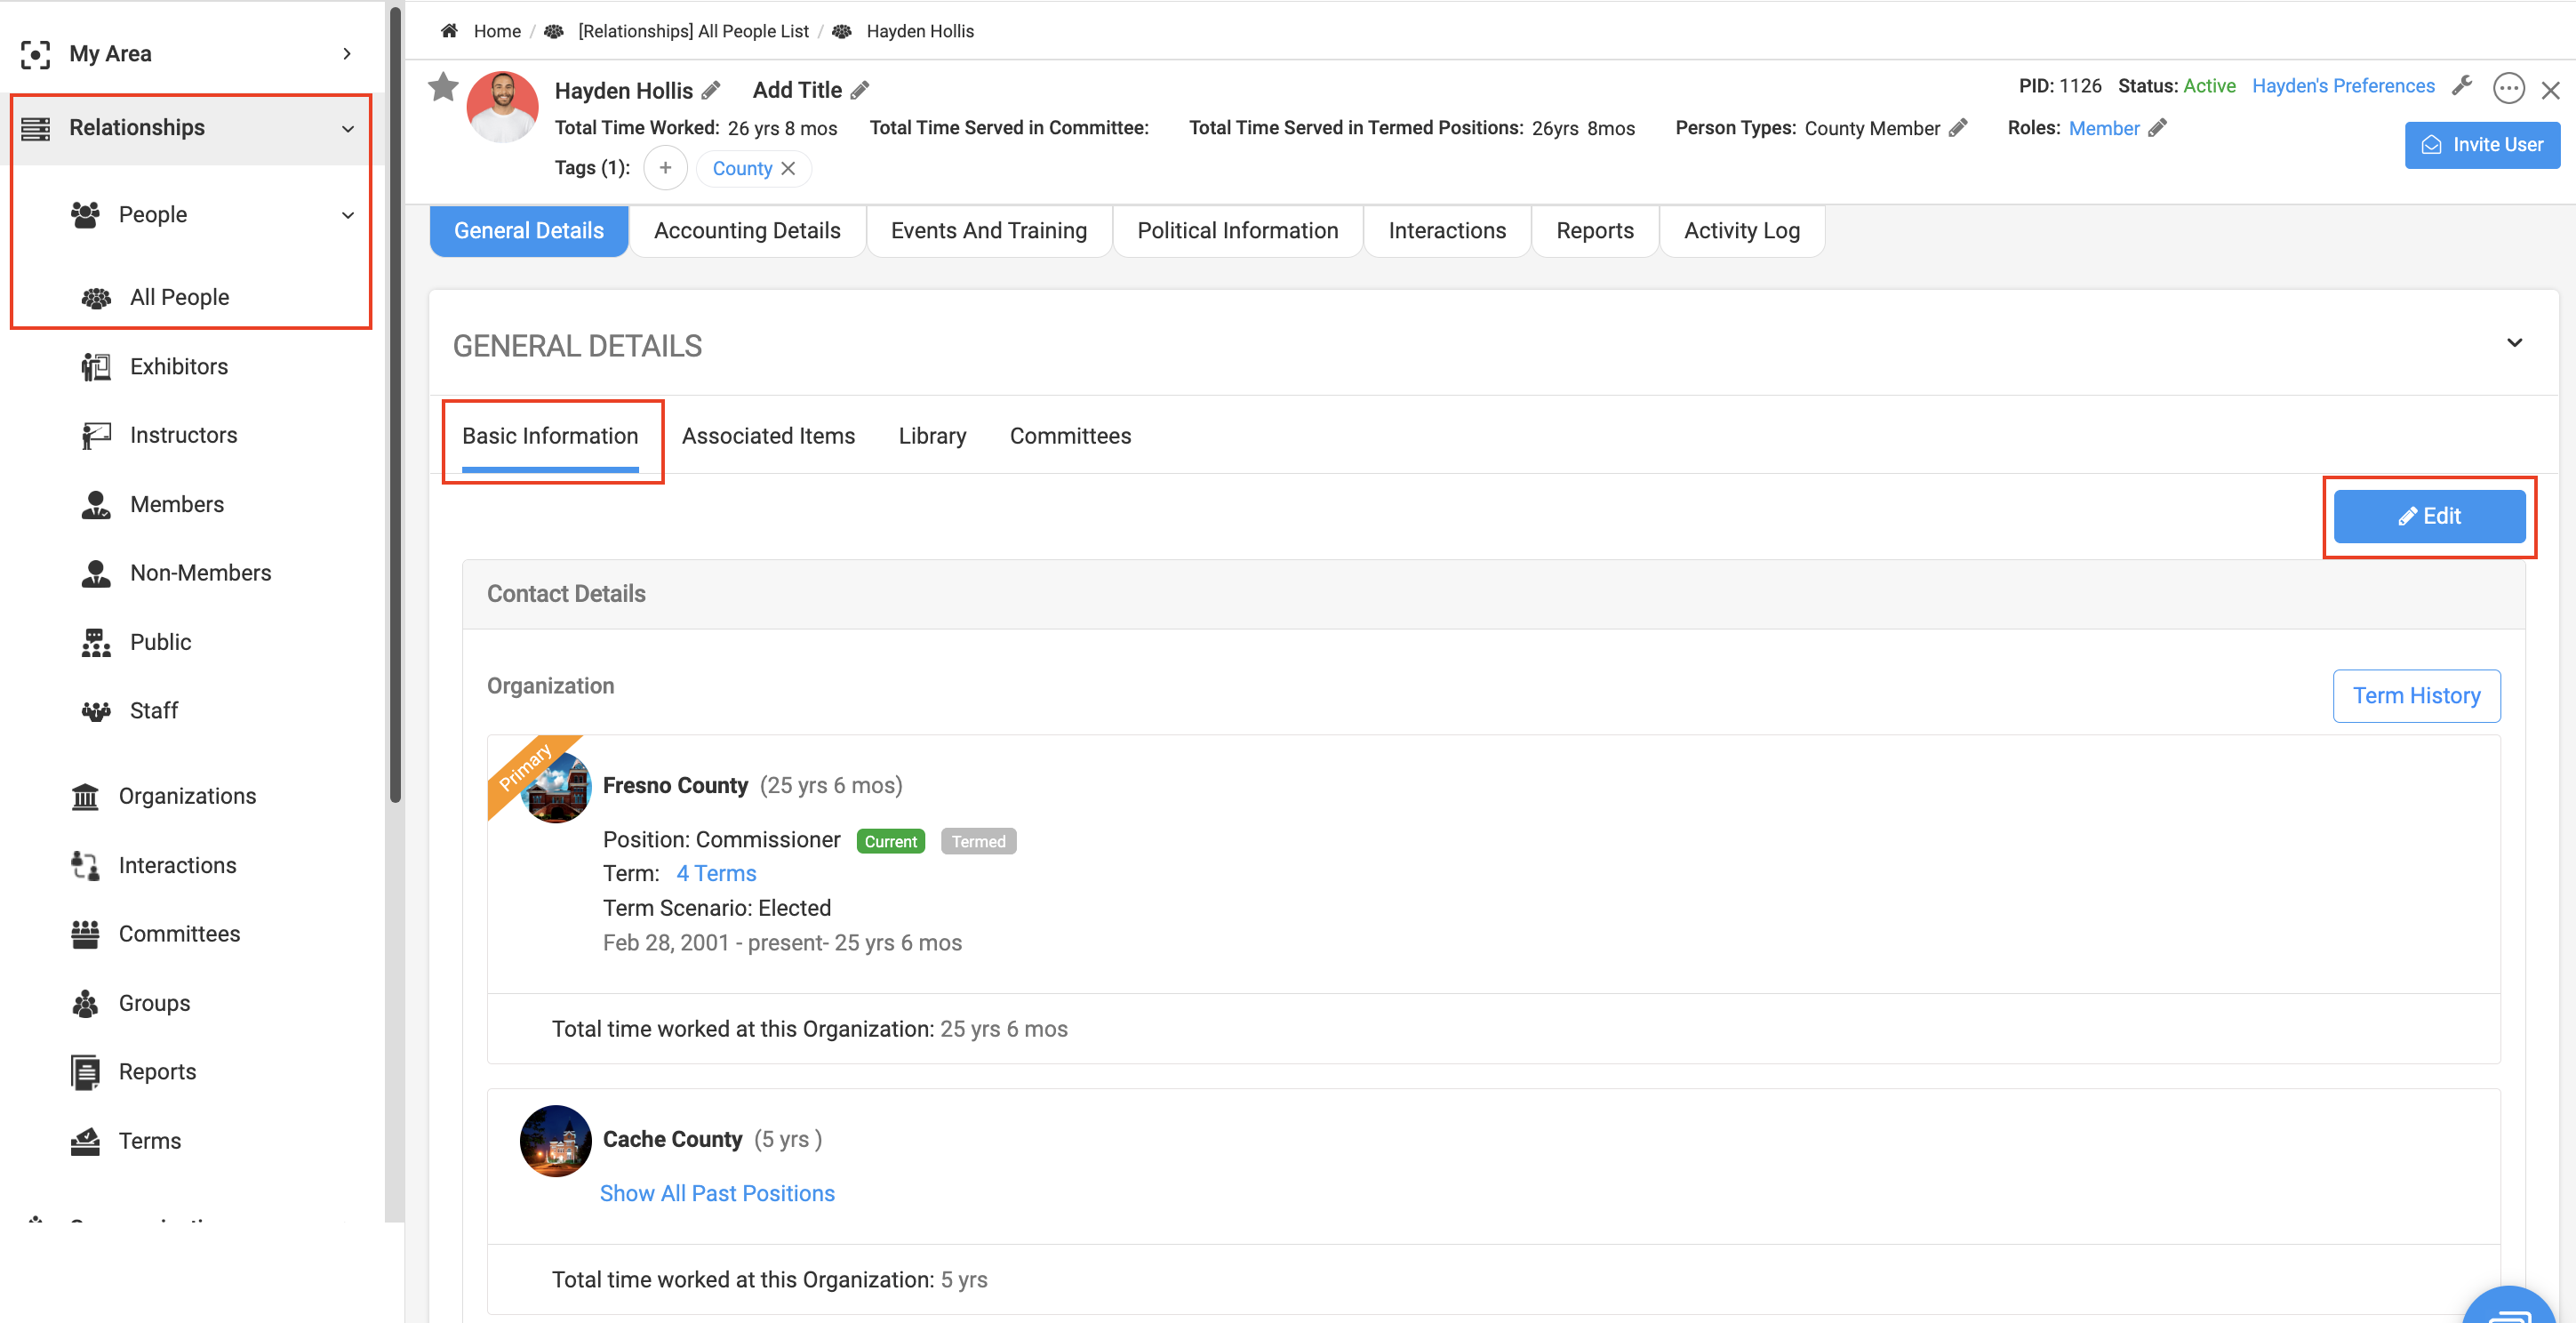
Go to Relationship Module → People → All People
-
Then open the Person's Profile → Basic Information → Contact Details → Edit
-
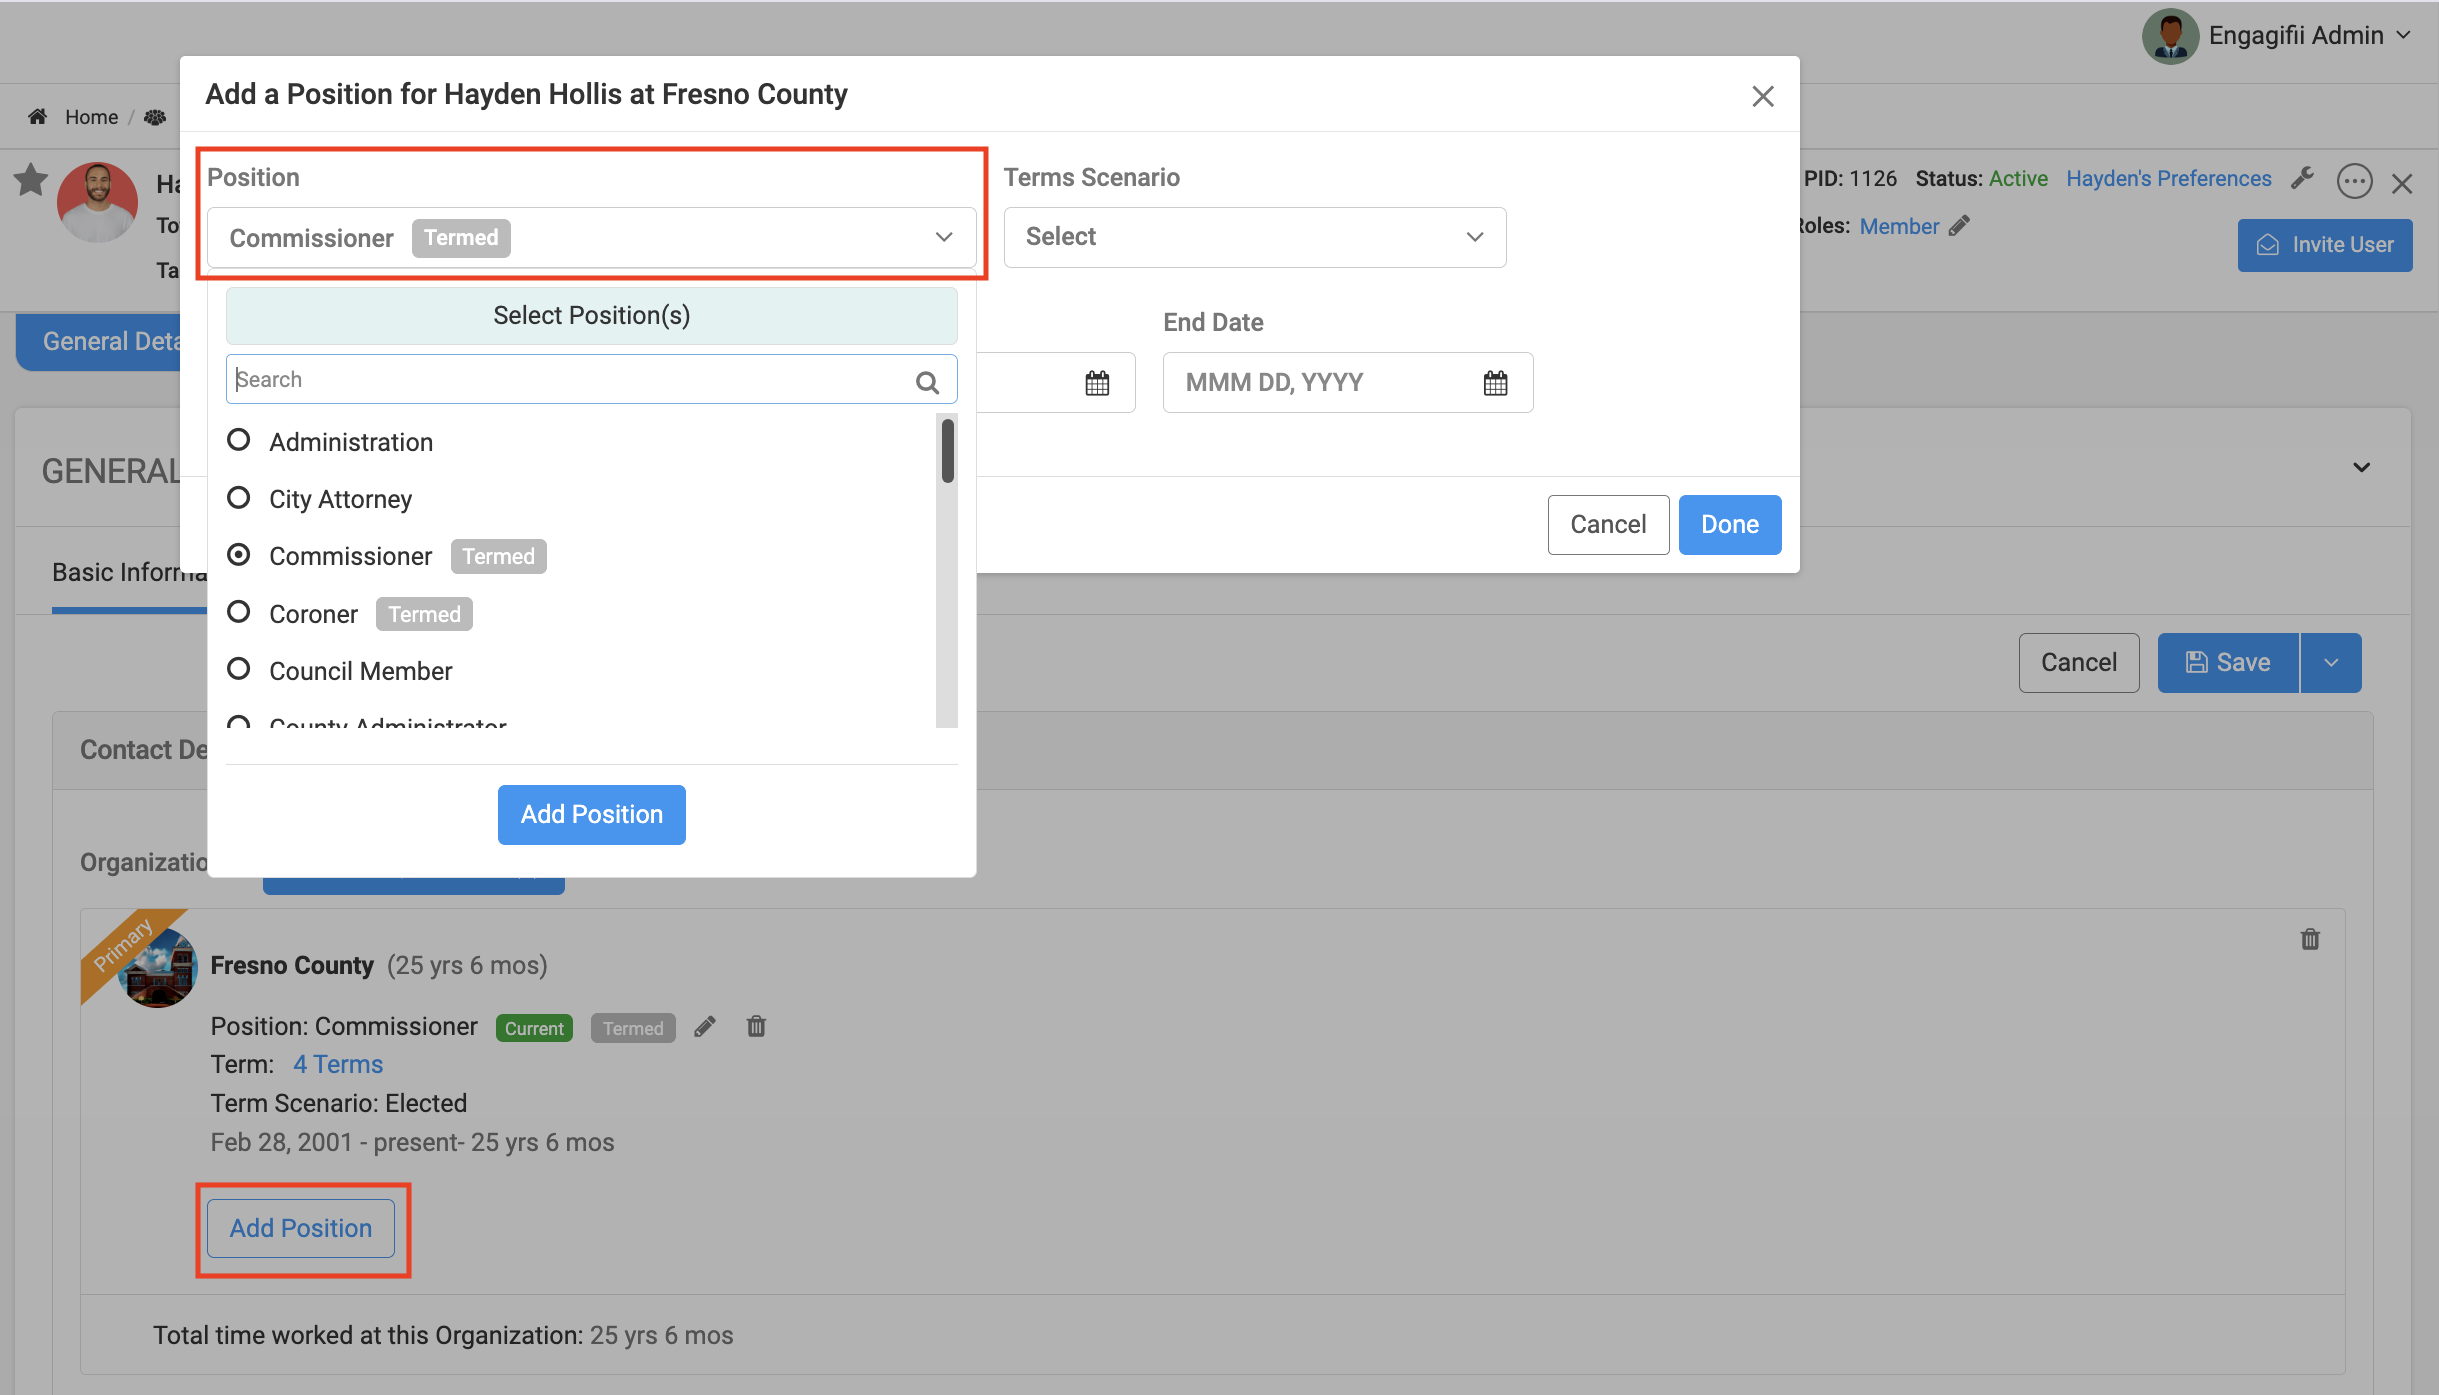
When adding or editing a Position, select the appropriate Termed Position, and then you will be able to enter the Position's start and end dates.
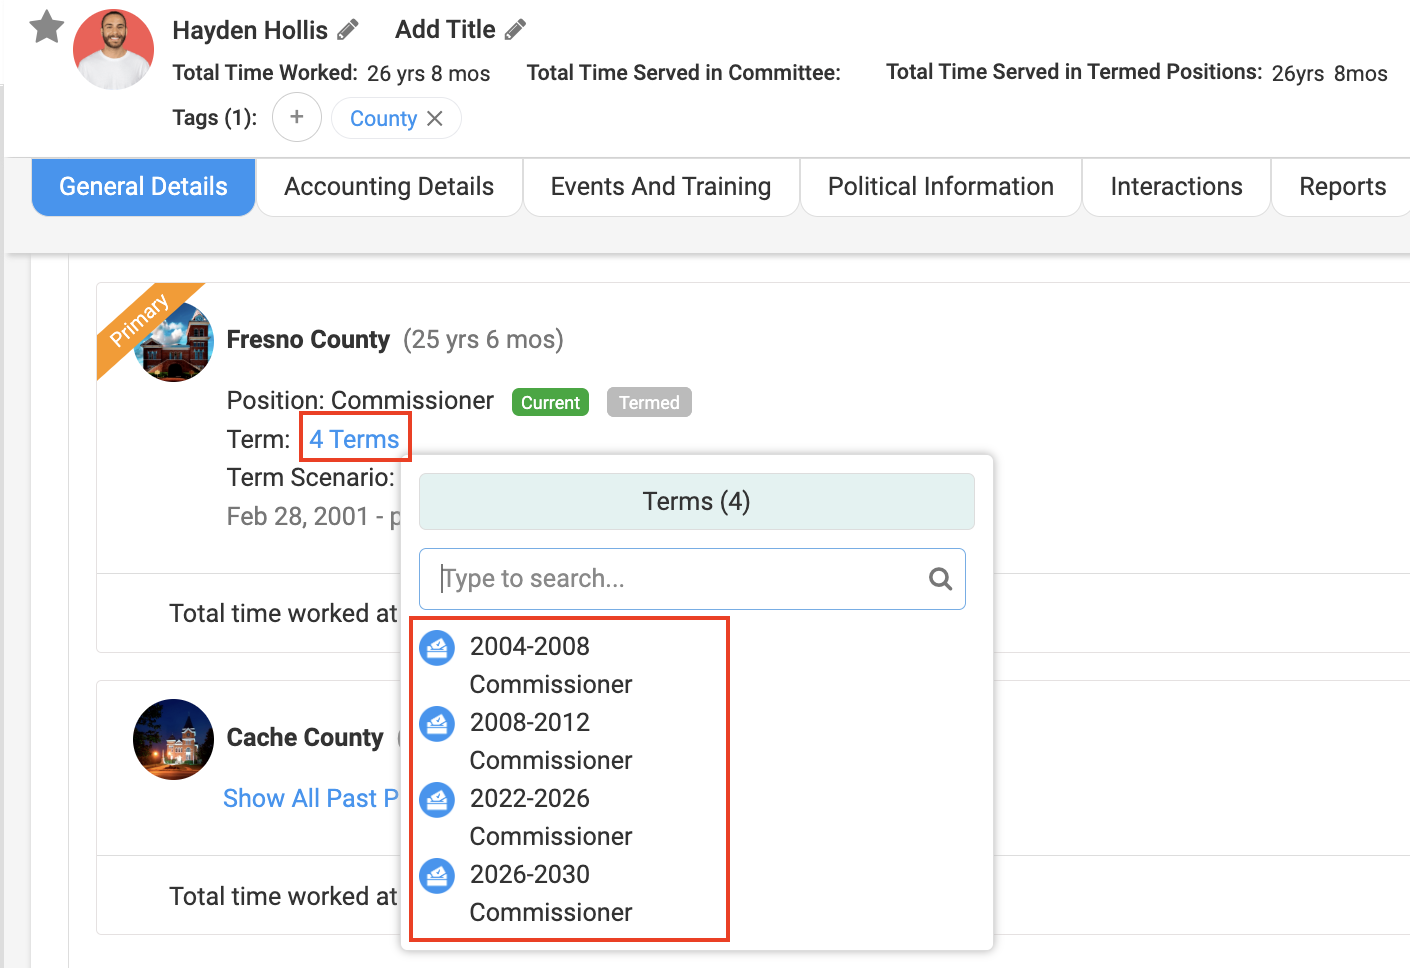
A person can have multiple Terms associated with their history. For example:
- 2004–2008
- 2008–2012
- 2022–2026
This allows Engagifii to maintain both current and historical service information, including non-consecutive Terms. A person's record can show multiple historical Terms while identifying which one is currently active. This makes it easier to understand how long someone has served and whether their Terms were consecutive or separated by time away.
Prepare for an Upcoming Term
You do not have to wait until someone's current Term ends before preparing for the next cycle.
If someone has been re-elected, you can add their upcoming Term ahead of time.
If a new person will be taking office, you can add their Position with a future Start Date. Likewise, you can enter a future End Date for the outgoing person's Position.
When those dates arrive, the incoming person becomes current while the outgoing person's Position moves into their history.
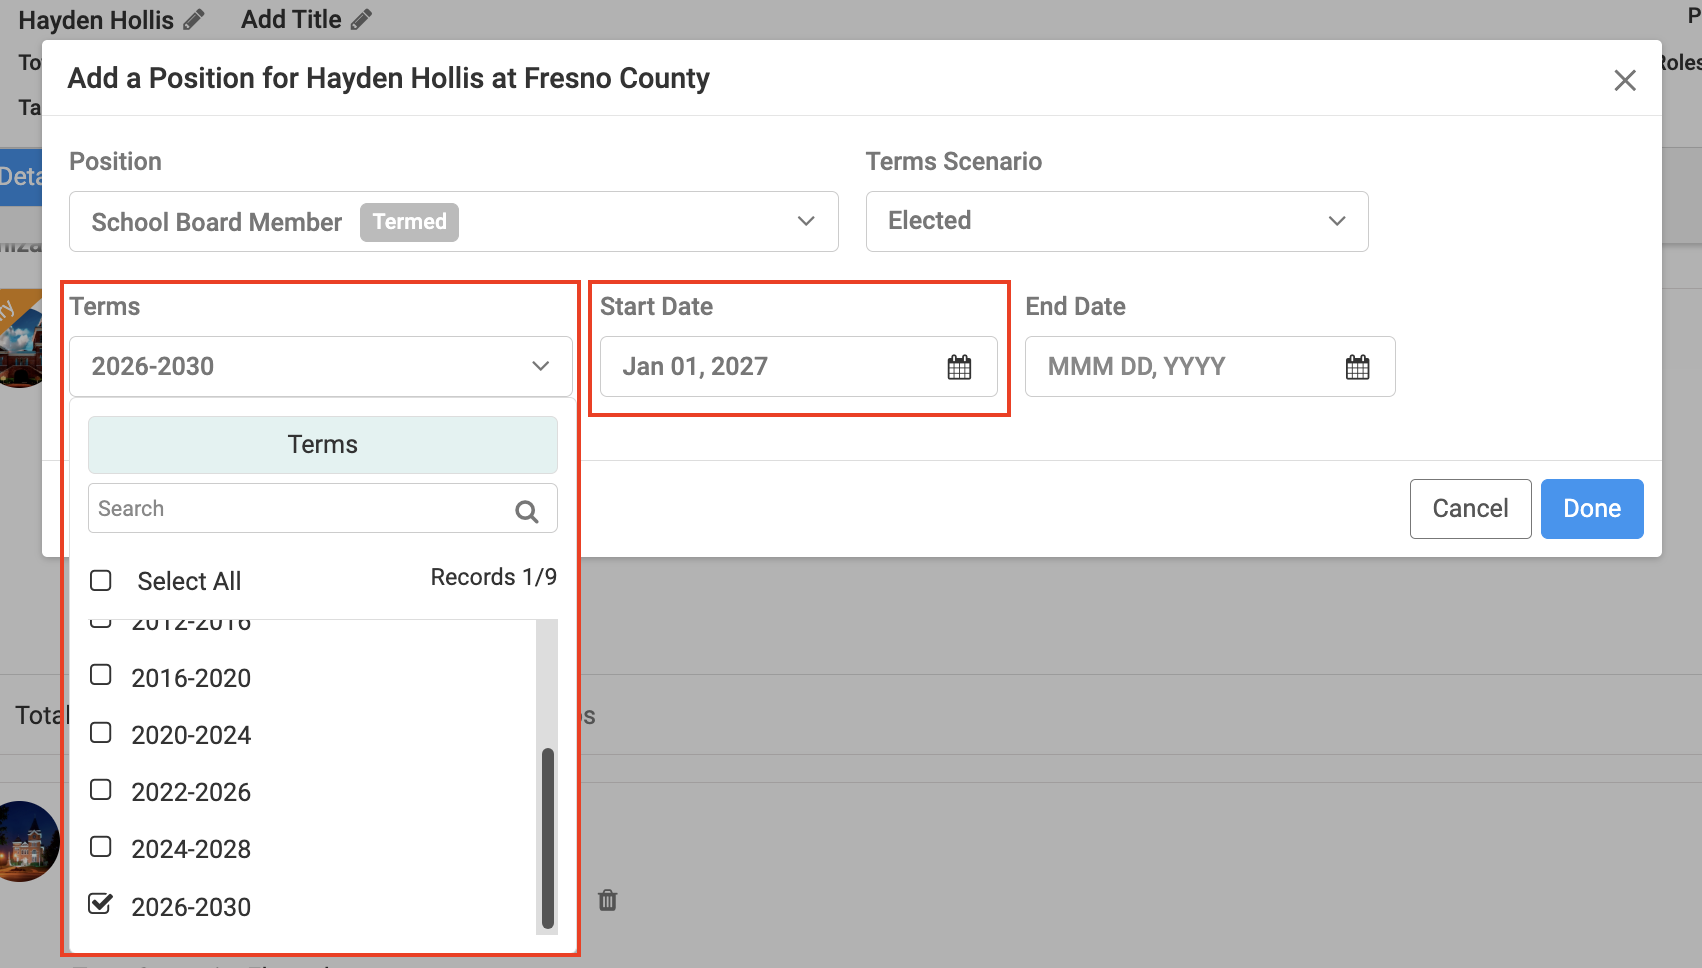
Tip: Updating future Start and End Dates as election or appointment results become available can help spread the work across several weeks instead of waiting until the new Term begins.
Manage Position Changes
-
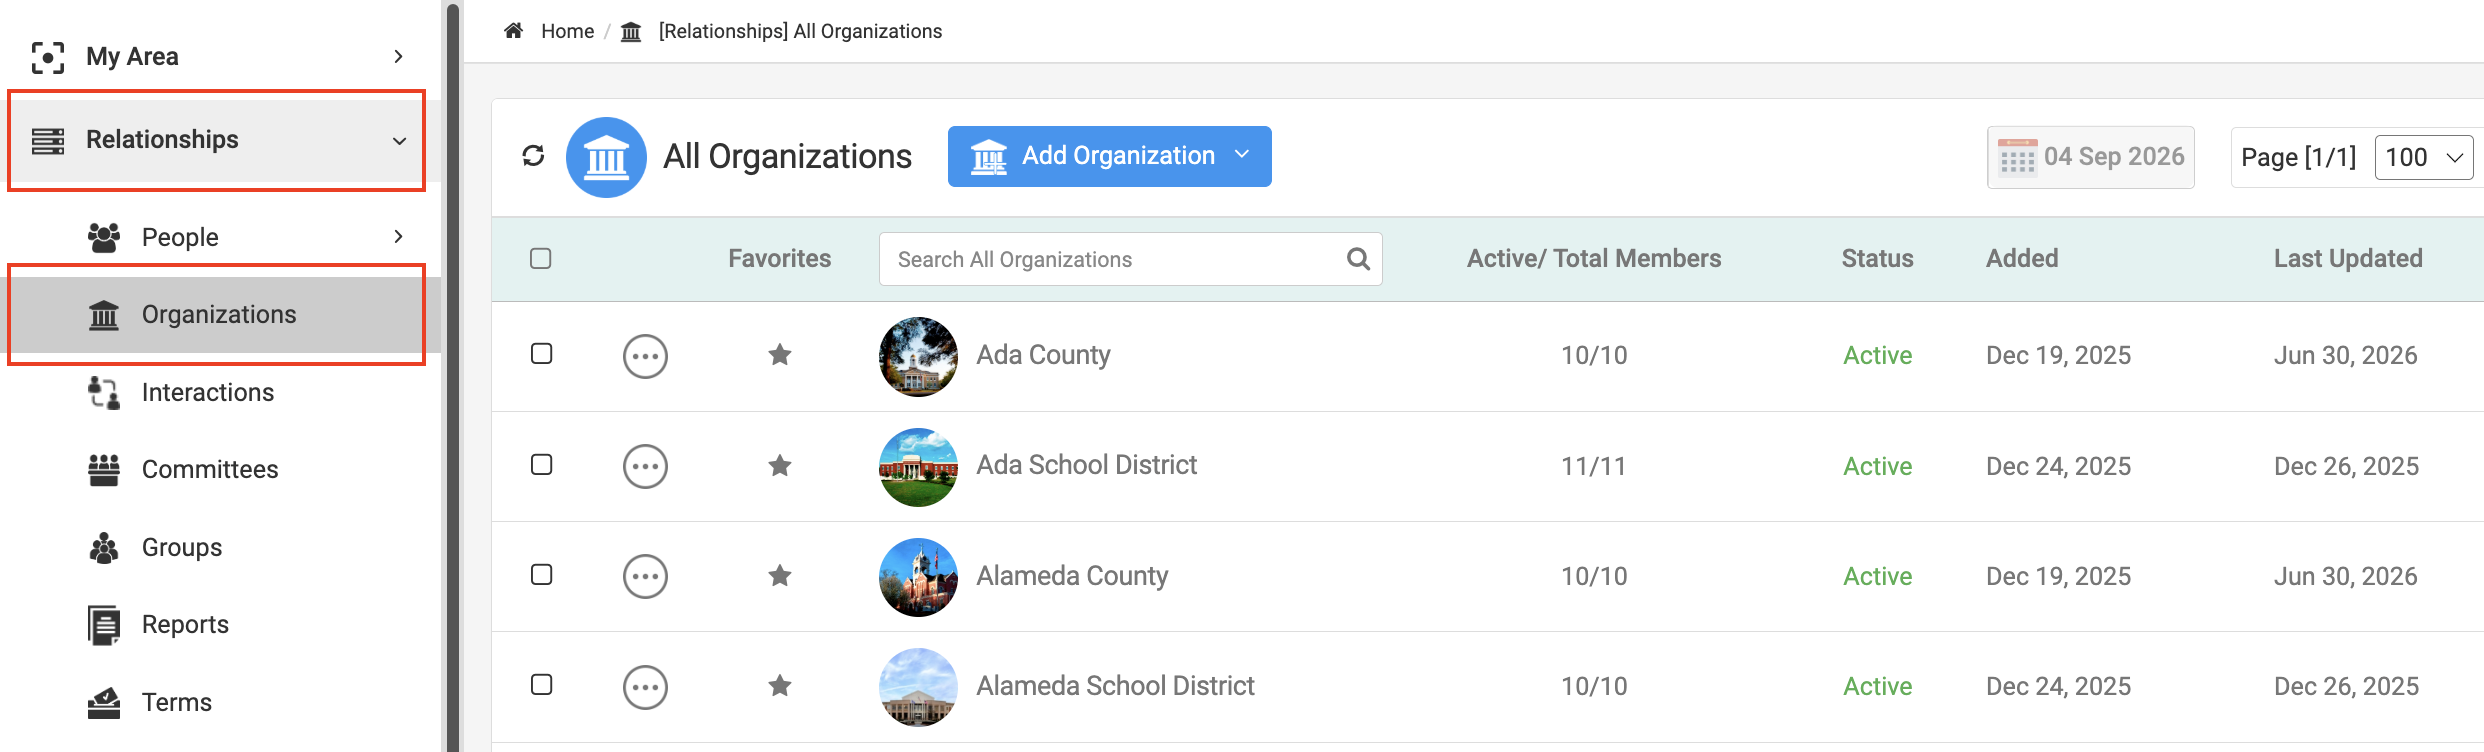
Navigate to: Relationship Module → Organizations → Open an Organization
-
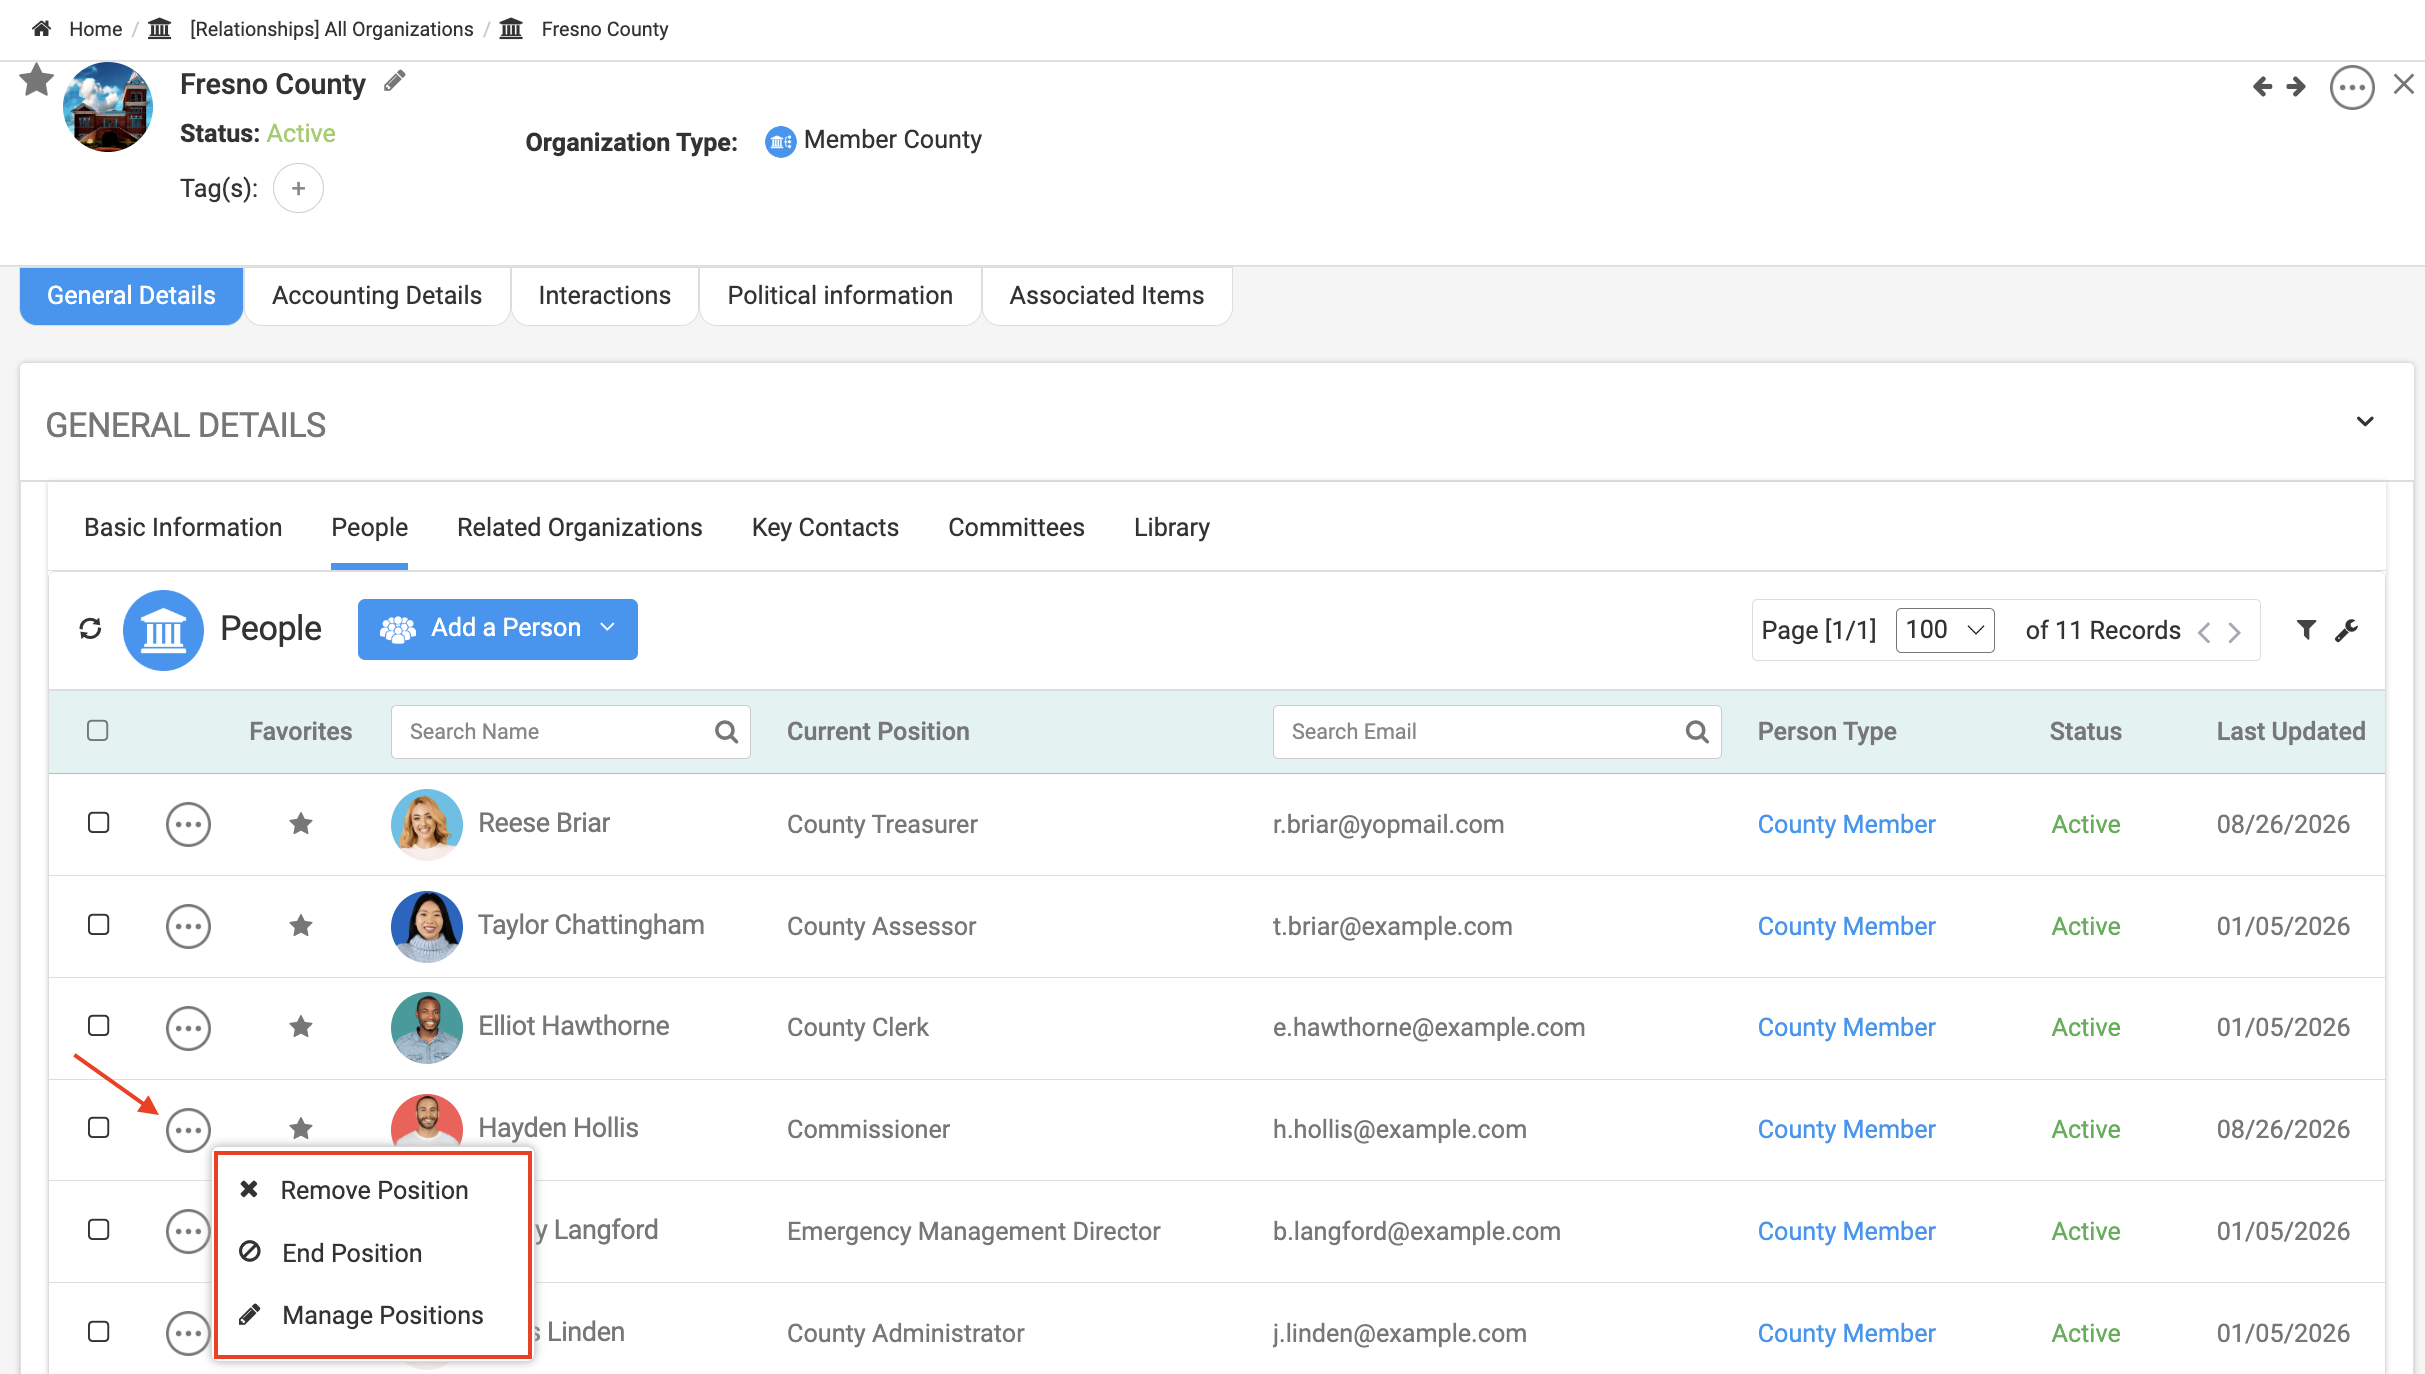
Within the selected Organization, open the People tab and click the three-dot menu next to the person whose Position you want to update.
-
From the Organization's People list, you can manage Position changes as election or appointment updates are received.
Depending on the situation, you can:
- Remove Position when a Position should no longer be associated with the person.
- End Position when someone is leaving their current Position.
- Manage Position to update an existing Position or its details.
Position changes can also be scheduled using future dates, helping ensure the appropriate person becomes current at the correct time.
Part 3: Review and Export Term Information
Once Terms are being maintained, you can use them to answer questions about current, past, and upcoming service.
Review People in a Term
Navigate to: Relationship Module → Terms
Select the Term you want to review.
You can see how many people are associated with that Term and use the list to identify who is approaching the end of a Term or participating in an upcoming cycle.
For example, reviewing the 2022–2026 Term can help identify people whose current Terms are ending in 2026.
Export People in a Term
When you need to share or further analyze the information,
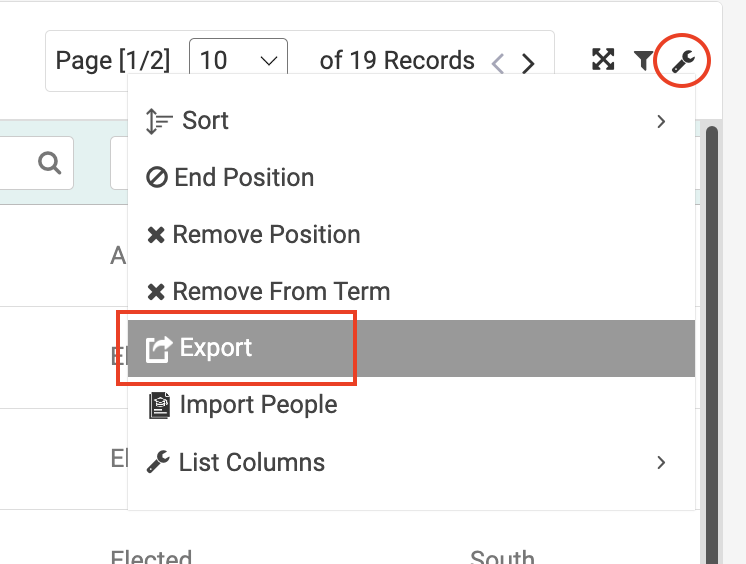
Click on Settings (wrench icon) → then select Export.
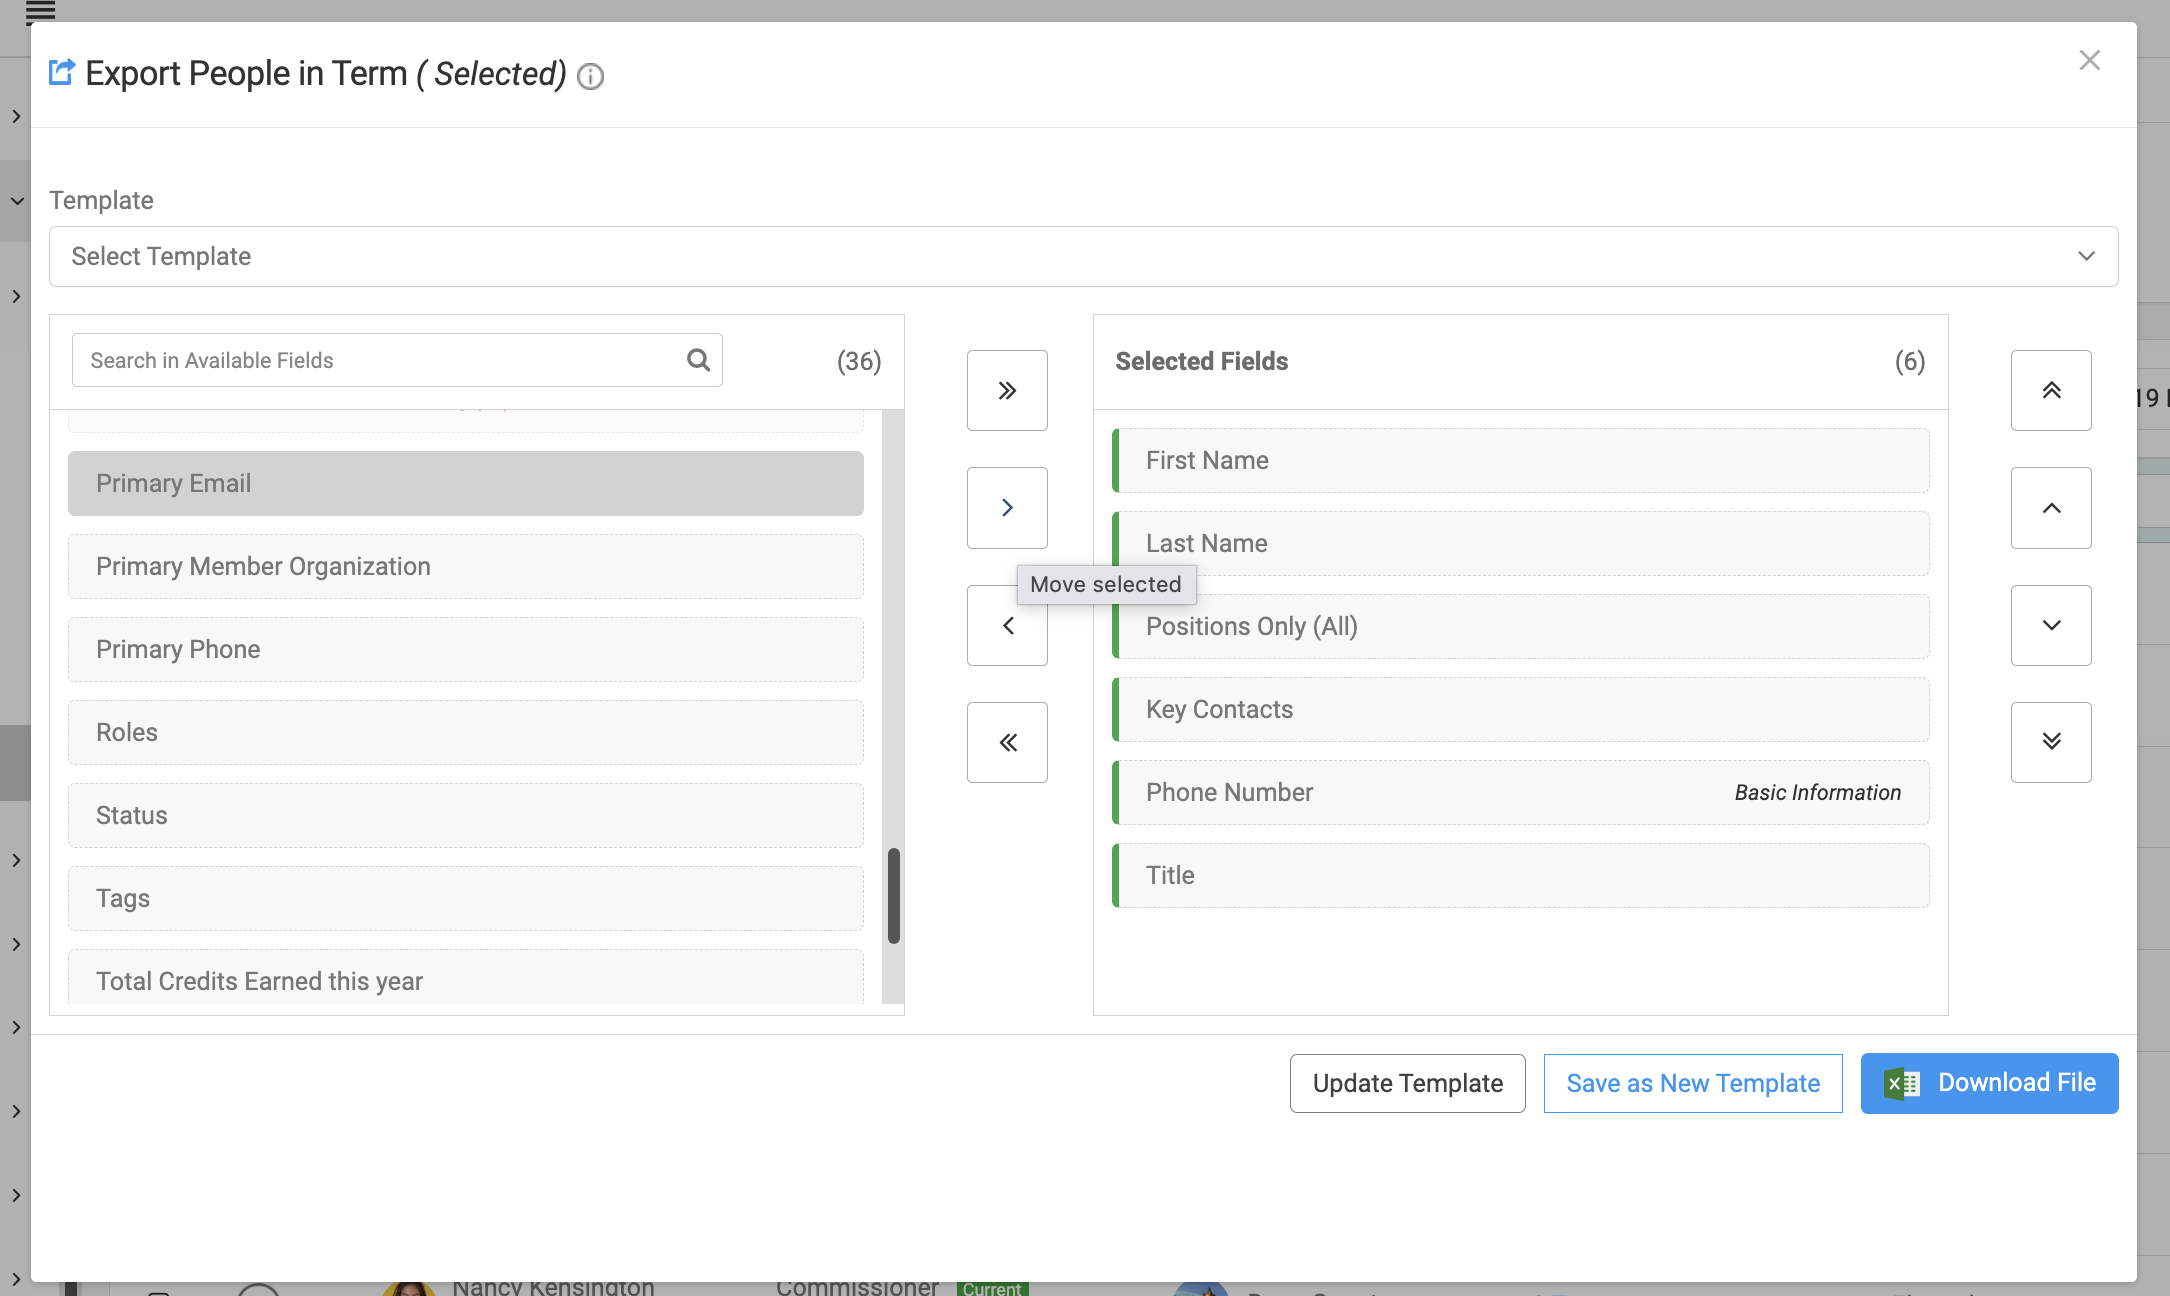
Choose the fields you want included, such as:
- Full Name
- Email Address
- Organization
- Position
- Other available person information
You can easily drag and drop field items or move them using the arrow buttons.
You may also select an existing export template, update a template, or save your selections as a new template.
Click Download File to export the information.
Use Terms to Prepare for Upcoming Changes
Keeping Terms current gives your team a clearer view of upcoming transitions.
You can review how many people are currently assigned to an outgoing Term, begin filling the next Term as election or appointment results become available, and identify records that still need attention.
For organizations managing staggered election cycles, separate Terms can also be created for different Positions or cycles as needed.
Best Practice
Before creating Terms, map out the Positions, election or appointment cycles, Term lengths, and scenarios your organization needs to track. This helps determine which Terms should be created and can reduce unnecessary or overlapping configurations.
Whenever possible, update outgoing and incoming Positions as results become available rather than waiting until the new Term begins.
Closing
Using Terms alongside Positions and service dates gives your organization a clearer picture of who is serving, when they are serving, and how their service has changed over time. Keeping this information current makes it easier to prepare for upcoming election cycles, preserve historical records, and quickly identify or report on the people associated with each Term.
We hope this guide helps you create and manage Terms in Engagifii. If you have any questions or feedback, please reach out to us at support@engagifii.com.